> ## Documentation Index
> Fetch the complete documentation index at: https://docs.incredibuild.com/llms.txt
> Use this file to discover all available pages before exploring further.
# Obtaining Azure Login Details
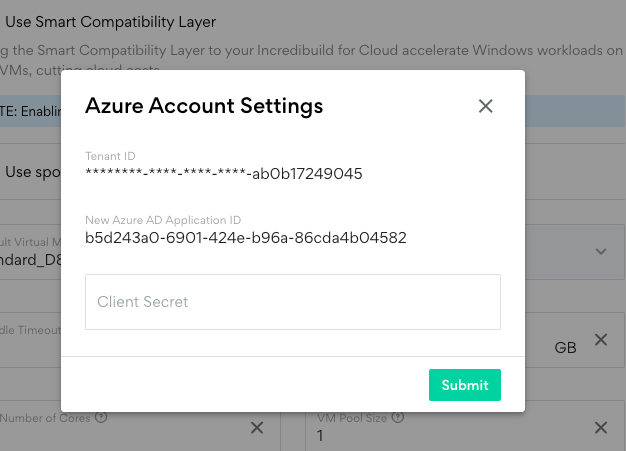
To enable Incredibuild Cloud to work with Azure, you need to provide the following login details during the activation of Incredibuild Cloud:
* **Tenant ID**
* **New Azure AD Application ID**
* **Client Secret**
To generate these details, follow the procedures in this article with a user who has **Global Administrator** and **Owner** roles.
**Note:** These procedures were verified in 2020, but the Azure application may have changed since then.
## Creating an Azure AD Application
To enable Incredibuild Cloud to manage for you resources on Azure platform, you need to create a new Azure AD application, which will grant Incredibuild Cloud the permission to access and modify Azure resources. For more information on creating an Azure Active Directory application, see the [Azure documentation](https://docs.microsoft.com/en-us/azure/active-directory/develop/howto-create-service-principal-portal).
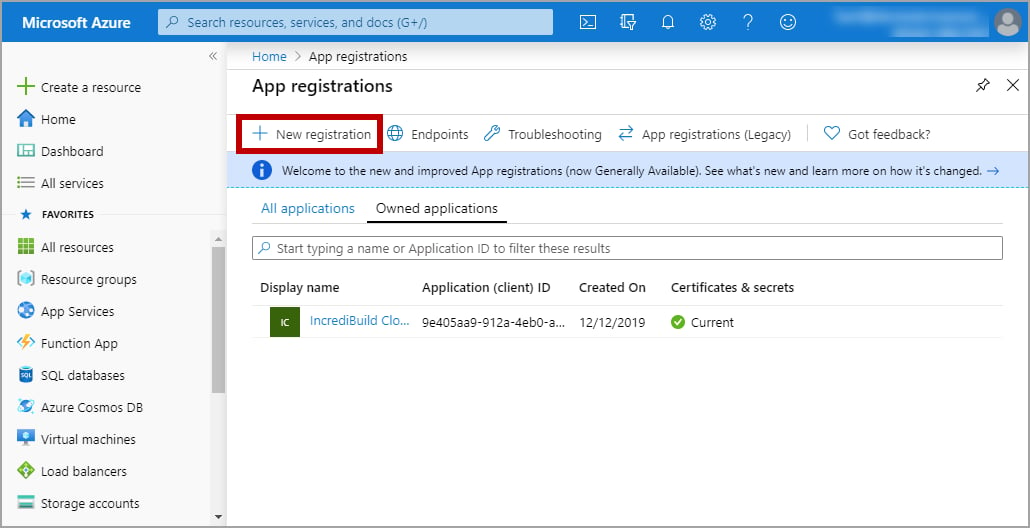
1. On Azure portal, enter in the Search box: **App registrations**.
2. On the **App registrations** page, click the **+** **New registration** option:
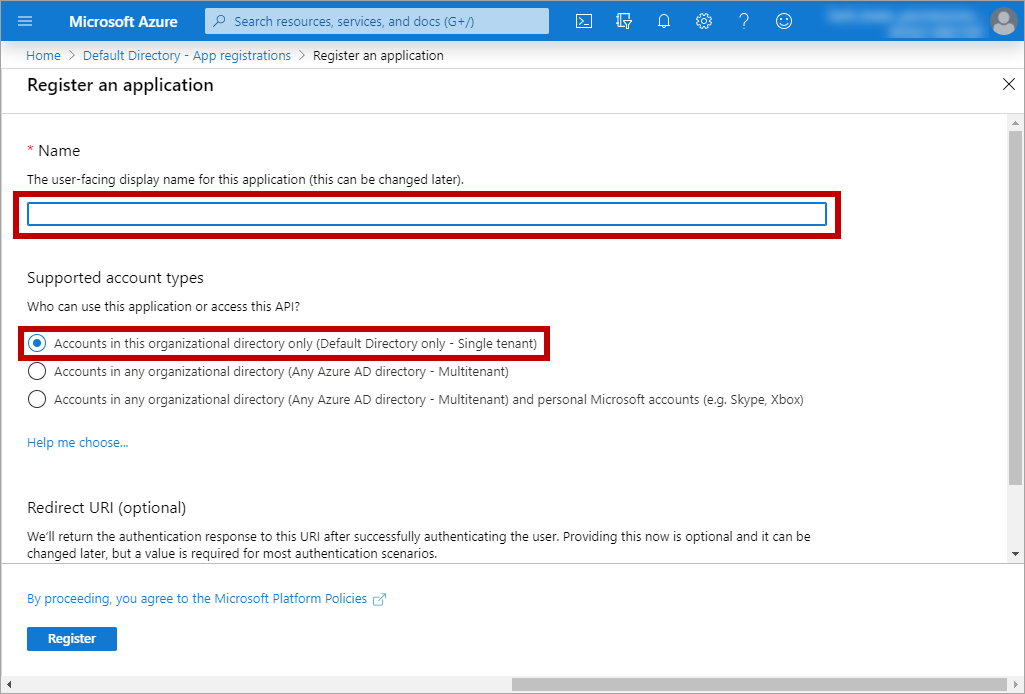
 3. On the **Register an Application** page, enter a **Name** and leave the default setting for **Supported Account Types**.
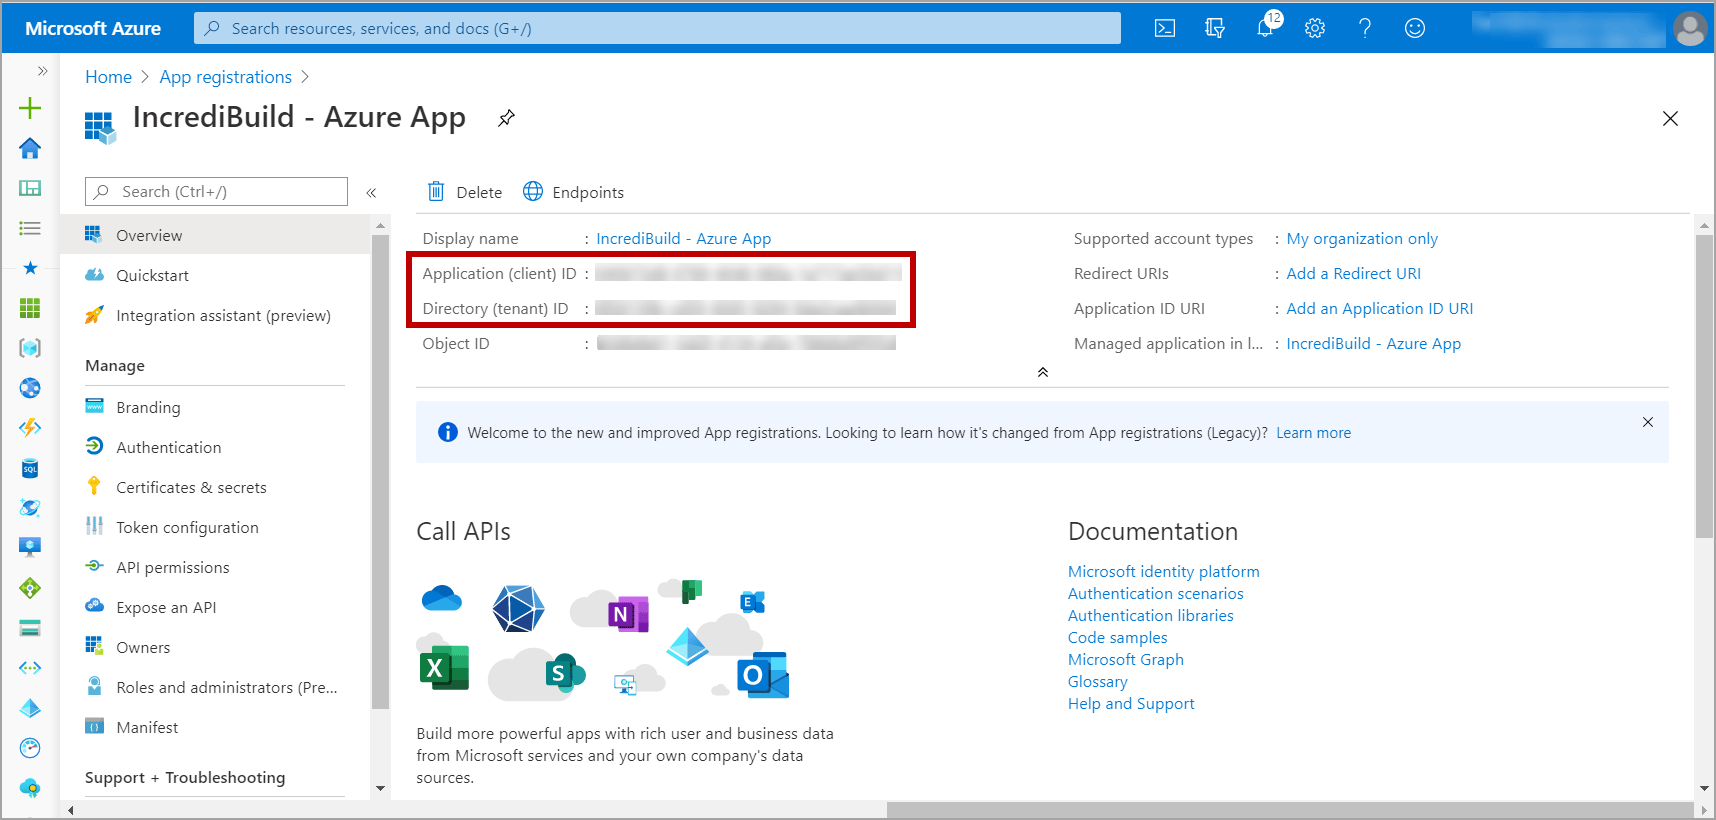
 4. On the new application page, copy the following data and save it on an available location:
* **Application (client) ID** – this is the **New Azure AD Application ID**.
* **Directory (tenant) ID** – this is the **Tenant ID**.
4. On the new application page, copy the following data and save it on an available location:
* **Application (client) ID** – this is the **New Azure AD Application ID**.
* **Directory (tenant) ID** – this is the **Tenant ID**.
 These details are required for the activation of Incredibuild Cloud solution. However, as long as you do not delete the new app, you can return to Azure portal at a later date and retrieve them.
5. On the same page, click the **Add an Application ID URI** option:
These details are required for the activation of Incredibuild Cloud solution. However, as long as you do not delete the new app, you can return to Azure portal at a later date and retrieve them.
5. On the same page, click the **Add an Application ID URI** option:
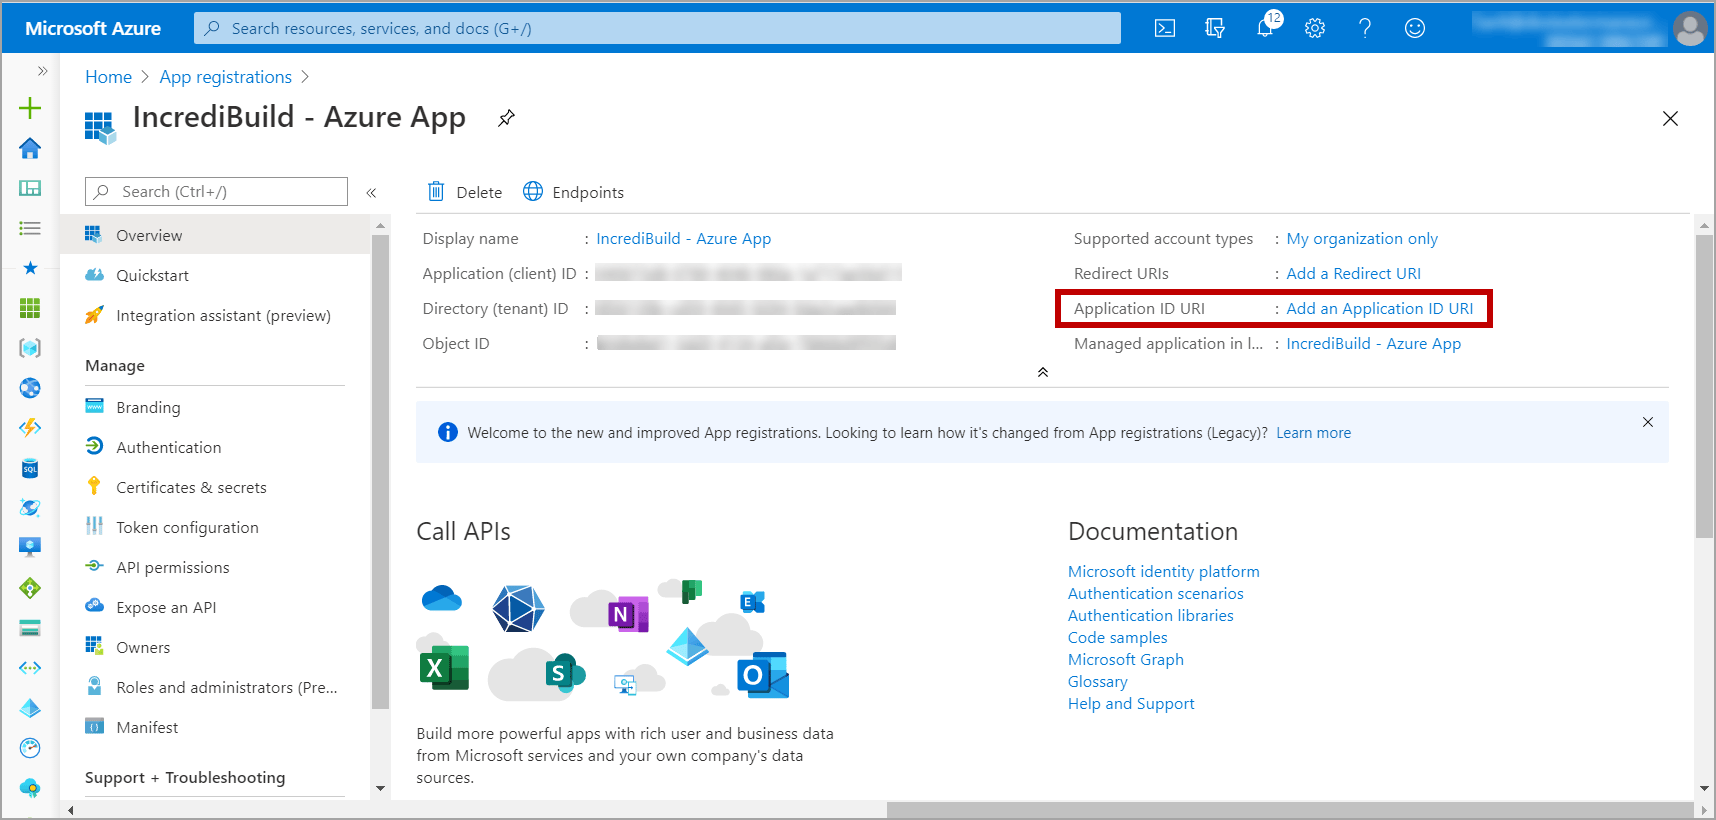 6. On the new application – **Expose an API** page, click the **Add a scope** option:
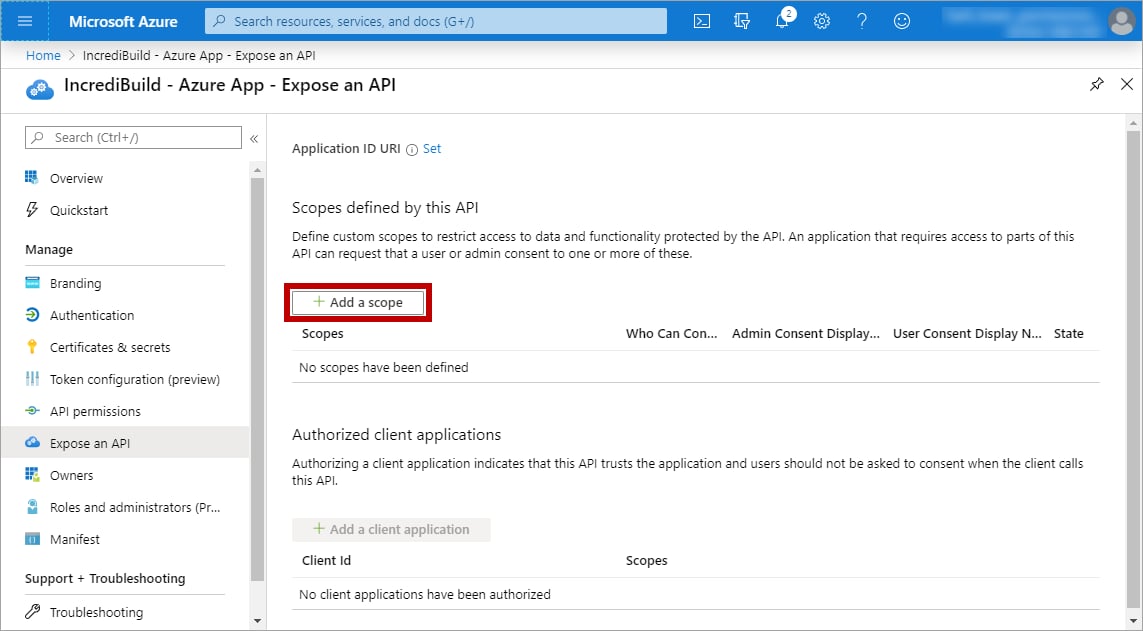 7. On the **Add a scope** dialog box, perform the following:
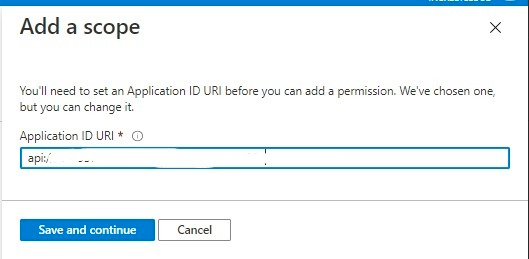 1. Accept the Default and Click on **Save and Continue**
2. **Note**: The text starting with "api://...." is just a default generated GUID which can be used.you can put whatever URL format you want in there, "api://" as valid as "http\://".
3. On the second **Add a scope** dialog box, enter the following:
1. Accept the Default and Click on **Save and Continue**
2. **Note**: The text starting with "api://...." is just a default generated GUID which can be used.you can put whatever URL format you want in there, "api://" as valid as "http\://".
3. On the second **Add a scope** dialog box, enter the following:
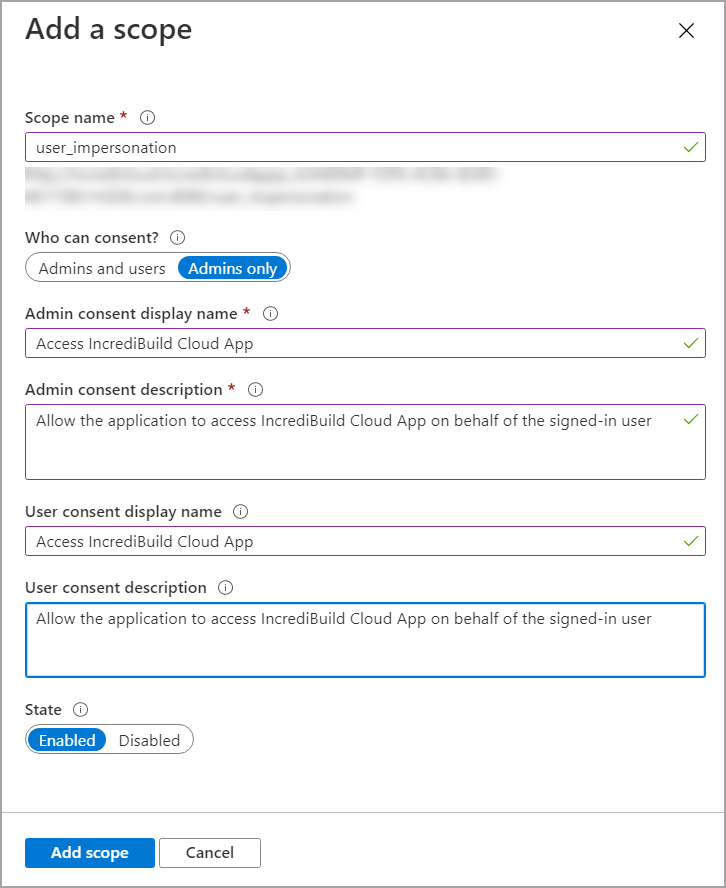 * **Scope name** – enter **user\_impersonation**.
* **Who can consent?** – select **Admins and users**.
* **Admin consent display name** – enter **Access Incredibuild Cloud App**.
* **Admin consent description** – enter **Allow the application to access Incredibuild Cloud App on behalf of the signed-in user**.
* **User consent display name** – enter **Access Incredibuild Cloud App**.
* **User consent description** – enter **Allow the application to access Incredibuild Cloud App on behalf of the signed-in user**.
* **State** – select **Enabled**.
9. After you entered all required details, click the **Add scope** button. Your new app is saved.
10. Open the **Authentication** screen. Then, click the **Add a platform** button:
* **Scope name** – enter **user\_impersonation**.
* **Who can consent?** – select **Admins and users**.
* **Admin consent display name** – enter **Access Incredibuild Cloud App**.
* **Admin consent description** – enter **Allow the application to access Incredibuild Cloud App on behalf of the signed-in user**.
* **User consent display name** – enter **Access Incredibuild Cloud App**.
* **User consent description** – enter **Allow the application to access Incredibuild Cloud App on behalf of the signed-in user**.
* **State** – select **Enabled**.
9. After you entered all required details, click the **Add scope** button. Your new app is saved.
10. Open the **Authentication** screen. Then, click the **Add a platform** button:
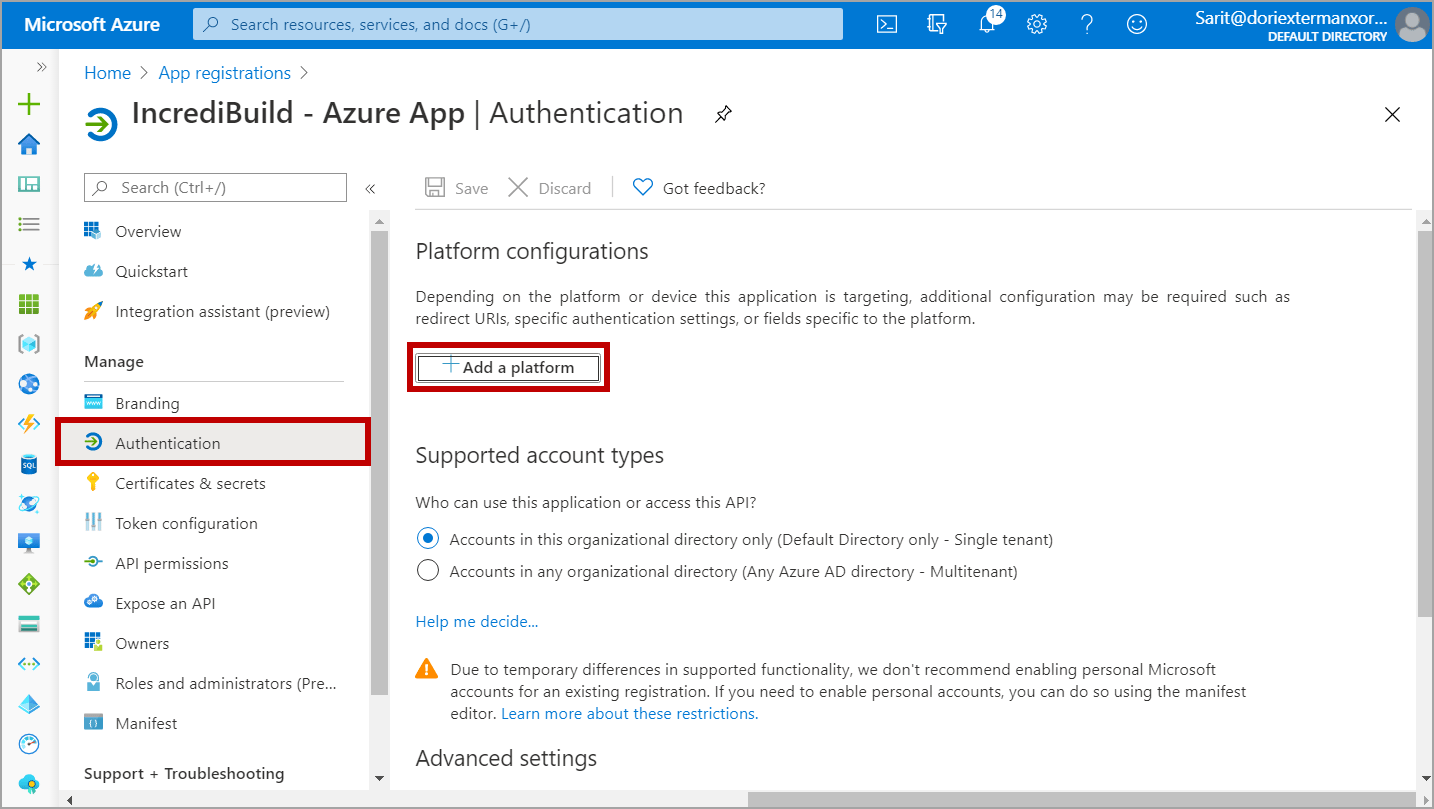 11. On the **Configure platforms** dialog box, select the **Web** option:
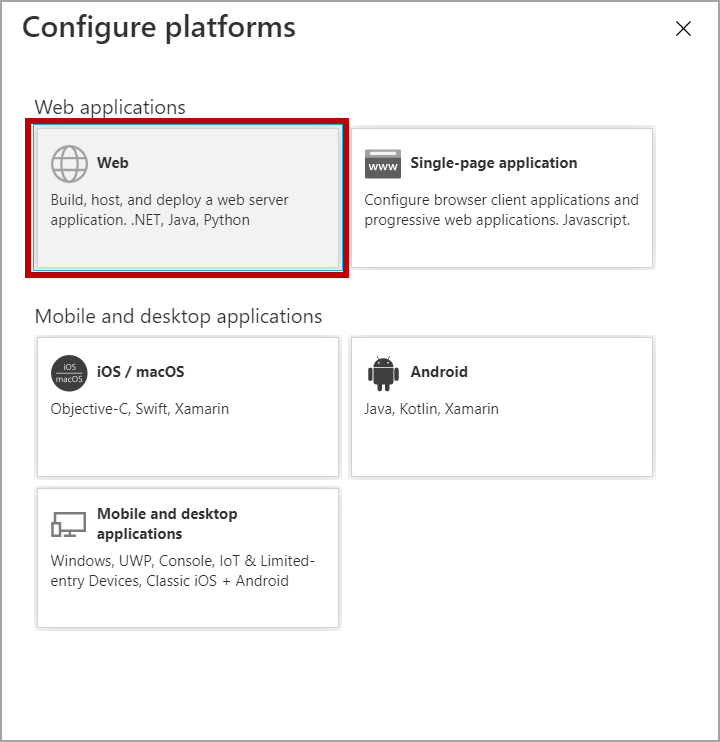 12. On the **Configure Web** dialog box, perform the following:
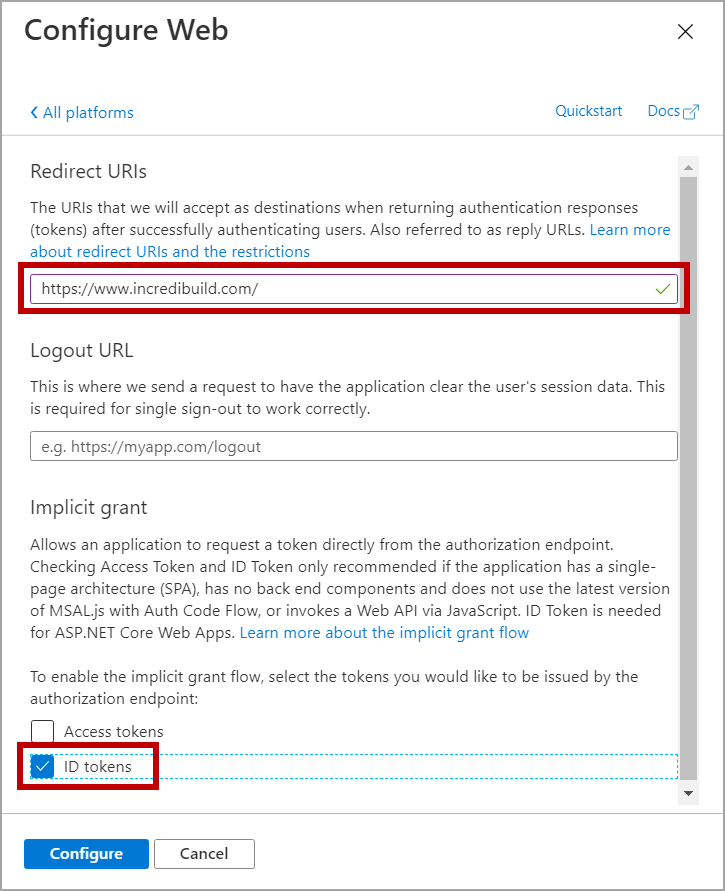 \- **Redirect URLs** – enter a dummy URL.- **Implicit grant** – select the **ID tokens** check box. Then, click the **Configure** button.
## Creating a New Client Secret
A Client Secret, also referred to as an Application Password, is needed in order to authenticate the new Azure app with Azure AD. After you create a client secret, you should copy and save it on an available location, because you will not be able to retrieve it later. However, if you cannot locate the original client secret, you can create a new one and use it to login to Incredibuild Cloud.
1. Open the **Certificates & secrets** page. Then, click the **+ New client secret** option:
\- **Redirect URLs** – enter a dummy URL.- **Implicit grant** – select the **ID tokens** check box. Then, click the **Configure** button.
## Creating a New Client Secret
A Client Secret, also referred to as an Application Password, is needed in order to authenticate the new Azure app with Azure AD. After you create a client secret, you should copy and save it on an available location, because you will not be able to retrieve it later. However, if you cannot locate the original client secret, you can create a new one and use it to login to Incredibuild Cloud.
1. Open the **Certificates & secrets** page. Then, click the **+ New client secret** option:
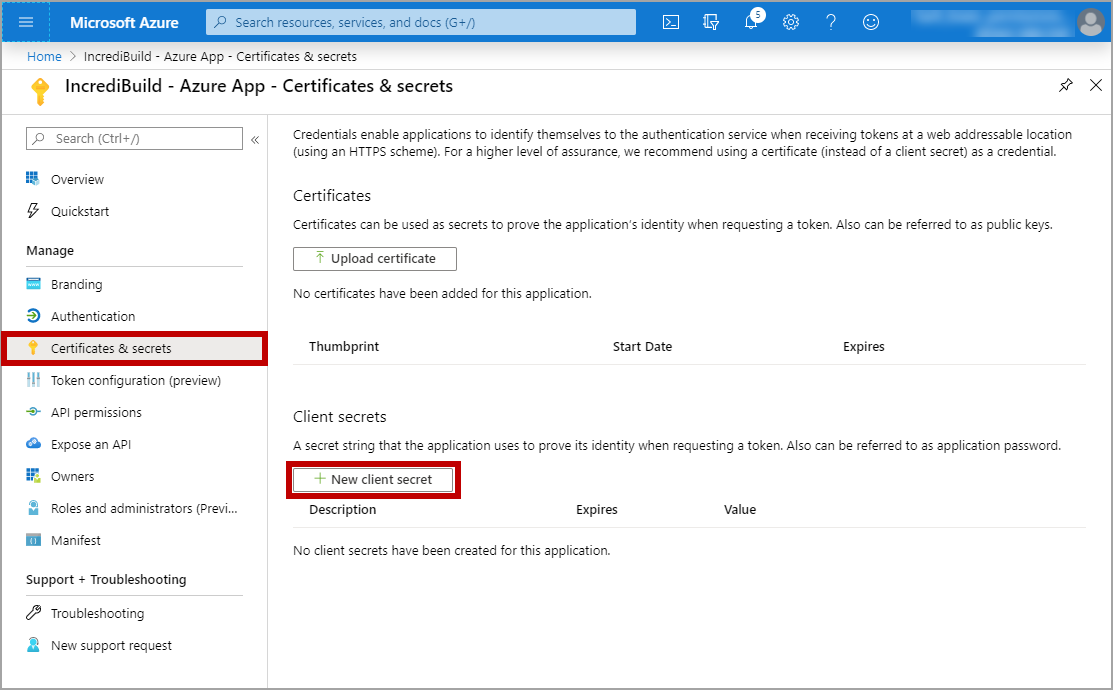 2. On the **Add a client secret** dialog box, perform the following:
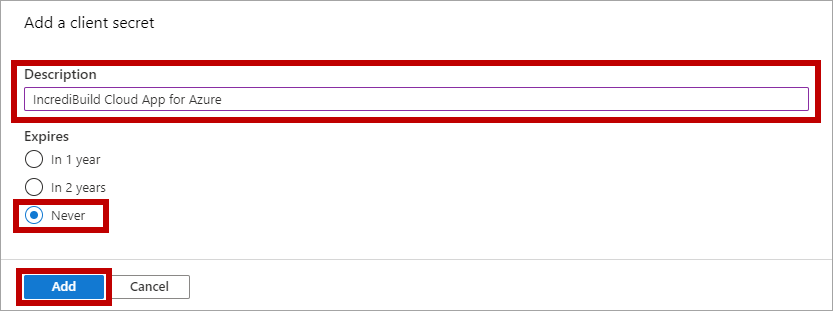 * **Description -** enter a free description.
* **Expires -** select the **Never** radio button.
Then, click the **Add** button.
3. On the **Certificates & secrets** page – **Client secrets** section, copy the content of the **Value** column of your new app:
* **Description -** enter a free description.
* **Expires -** select the **Never** radio button.
Then, click the **Add** button.
3. On the **Certificates & secrets** page – **Client secrets** section, copy the content of the **Value** column of your new app:
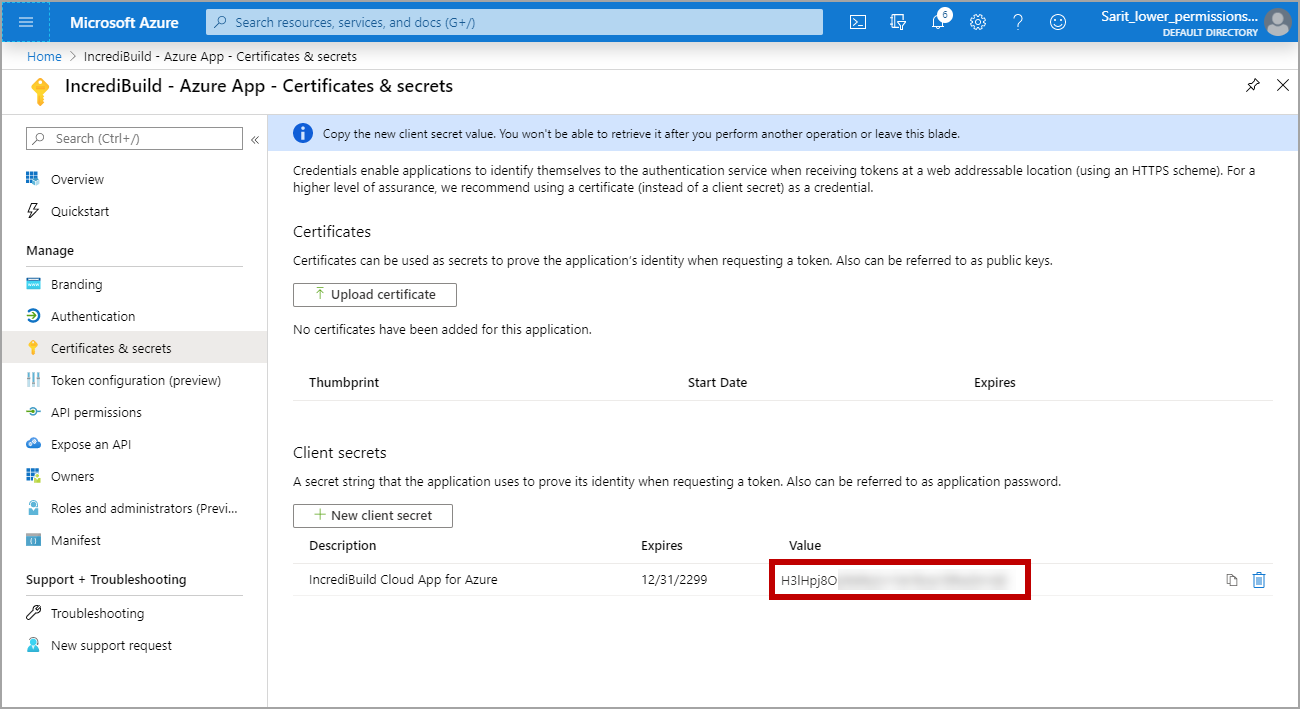 **Important!** During the activation procedure, you will need to enter this **Client Secret** **Value** into **Incredibuild Cloud – Azure Login** dialog box.
## Create one or more Custom Azure Roles
The roles define the permissions Incredibuild has in your account. Different permissions are required depending on your cloud configuration.
* Decide which of the following options you want to use:
1. Use a single role with full permissions for the entire subscription.
The **fullPermissions.json** file contains all required permissions for all Incredibuild use cases.
2. Use three different sets of custom roles on different resource groups:
1. **vnetPermissions.json**: Required on the resource group containing your virtual network
2. **nsgPermissions.json**: Required on the resource group containing your network security group
3. **resourceManagementPermissions.json**: Required on the resource group that will contain Incredibuild helpers
2\. [Download the sets of permissions](https://www.incredibuild.com/downloads/ibc-docs/azure_permissions.zip) in JSON format.
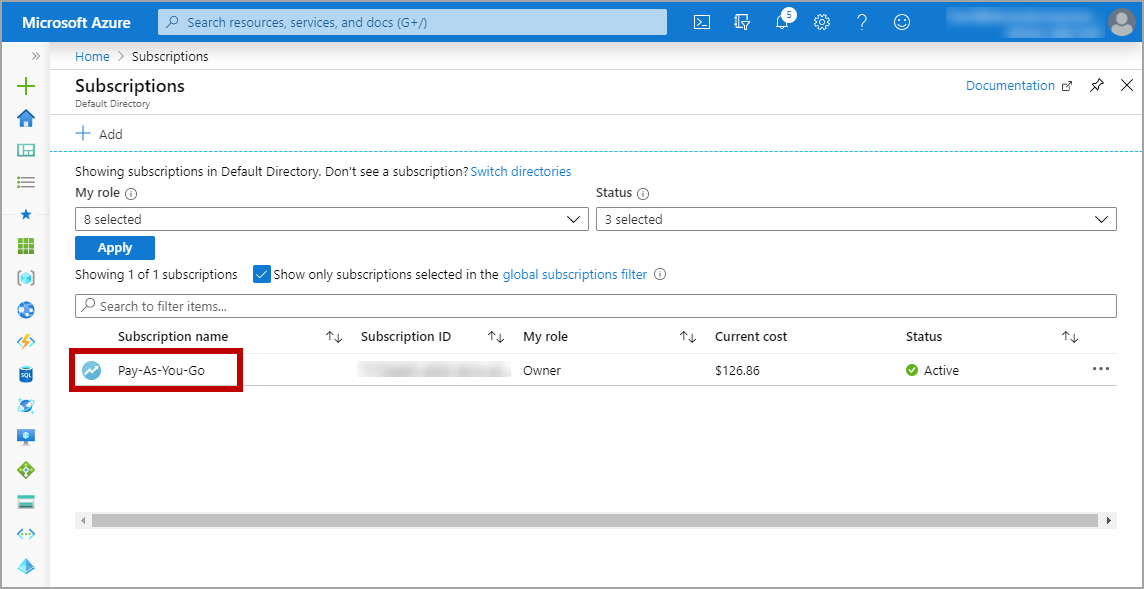
3. On Azure portal, enter **Subscriptions** in the Search box.
4. On the **Subscriptions** page, select the subscription to which you want to assign the new app:
**Important!** During the activation procedure, you will need to enter this **Client Secret** **Value** into **Incredibuild Cloud – Azure Login** dialog box.
## Create one or more Custom Azure Roles
The roles define the permissions Incredibuild has in your account. Different permissions are required depending on your cloud configuration.
* Decide which of the following options you want to use:
1. Use a single role with full permissions for the entire subscription.
The **fullPermissions.json** file contains all required permissions for all Incredibuild use cases.
2. Use three different sets of custom roles on different resource groups:
1. **vnetPermissions.json**: Required on the resource group containing your virtual network
2. **nsgPermissions.json**: Required on the resource group containing your network security group
3. **resourceManagementPermissions.json**: Required on the resource group that will contain Incredibuild helpers
2\. [Download the sets of permissions](https://www.incredibuild.com/downloads/ibc-docs/azure_permissions.zip) in JSON format.
3. On Azure portal, enter **Subscriptions** in the Search box.
4. On the **Subscriptions** page, select the subscription to which you want to assign the new app:
 5. On the selected Subscription page, select **Access control (IAM)**.
6. Create a role for every set of permissions you will need:
5. On the selected Subscription page, select **Access control (IAM)**.
6. Create a role for every set of permissions you will need:
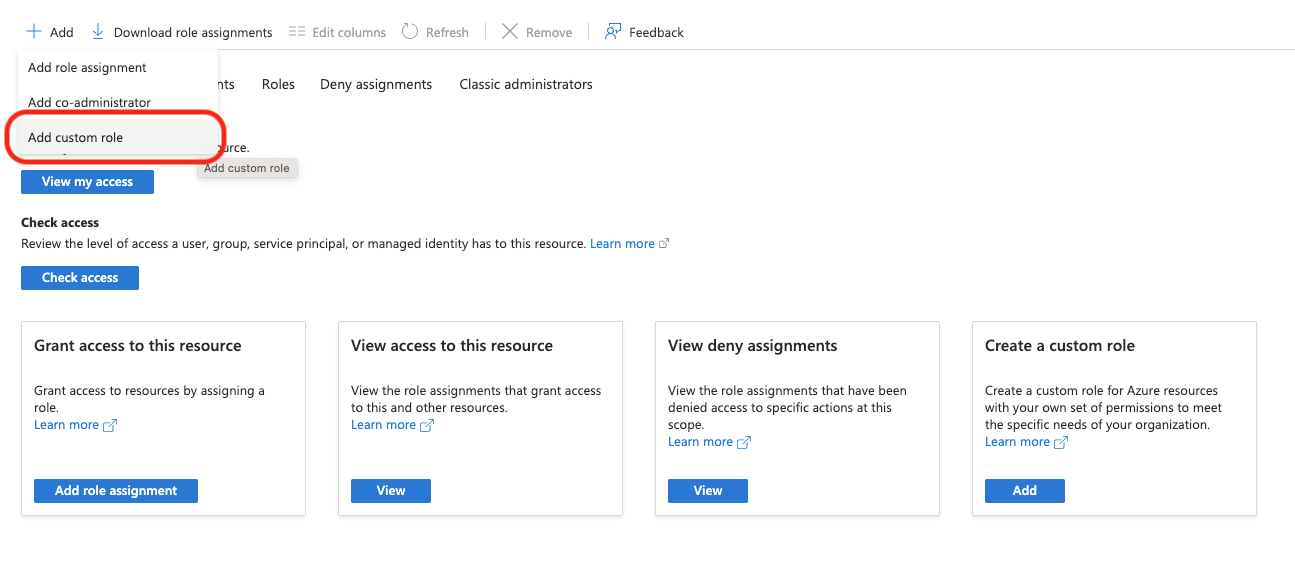 1. Click **Add** > **Add Custom Role**.
2. Click **Start from JSON** and select the JSON with the permissions for this role.
1. Click **Add** > **Add Custom Role**.
2. Click **Start from JSON** and select the JSON with the permissions for this role.
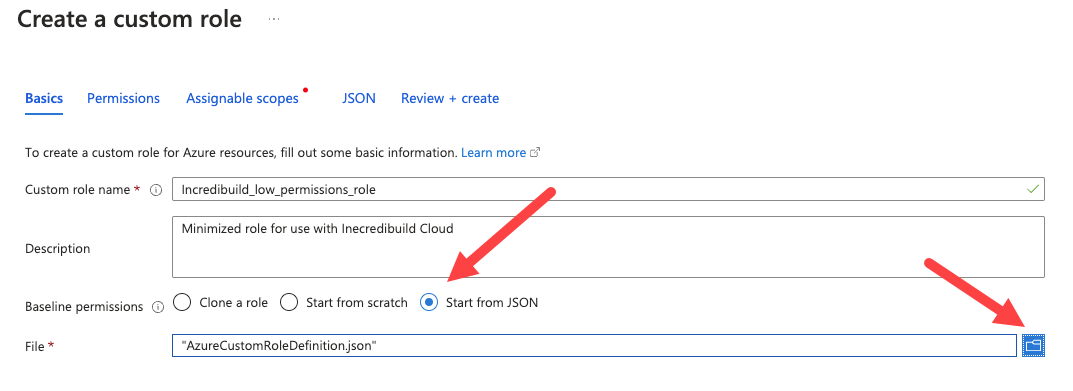 3. Go to **Assignable Scopes** and select the desired Subscription.
 4. Click **Review and Create**.
5. Repeat this procedure if you are creating more than one role.
## Assign the Roles to the Application
If you are using a single set of custom permissions, assign the role directly on your subscription. Otherwise, assign the individual roles as needed to relevant resource groups. The second option involves repeating the following procedure for each role.
1. Go to the relevant resource group or to the subscription.
2. Go to **Access control (IAM) > Add > Add Role Assignment**.
4. Click **Review and Create**.
5. Repeat this procedure if you are creating more than one role.
## Assign the Roles to the Application
If you are using a single set of custom permissions, assign the role directly on your subscription. Otherwise, assign the individual roles as needed to relevant resource groups. The second option involves repeating the following procedure for each role.
1. Go to the relevant resource group or to the subscription.
2. Go to **Access control (IAM) > Add > Add Role Assignment**.
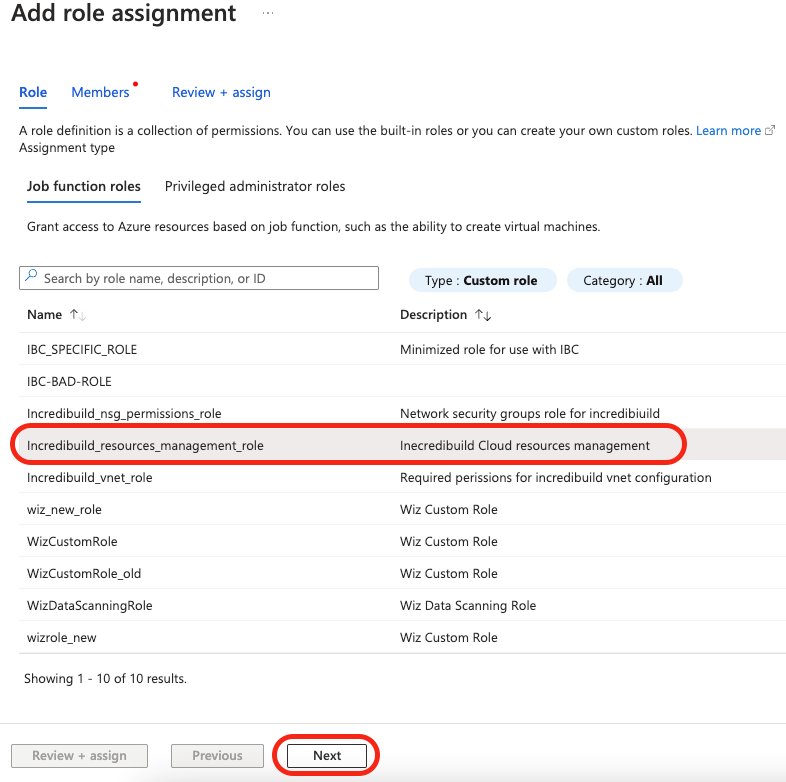
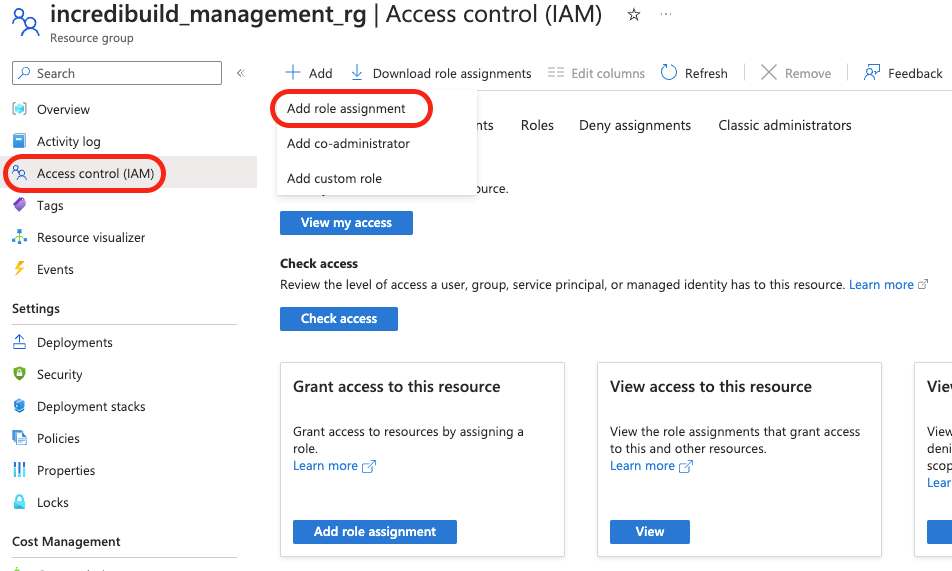 3. On the **Add role assignment** dialog box, select one of the custom roles you just created.
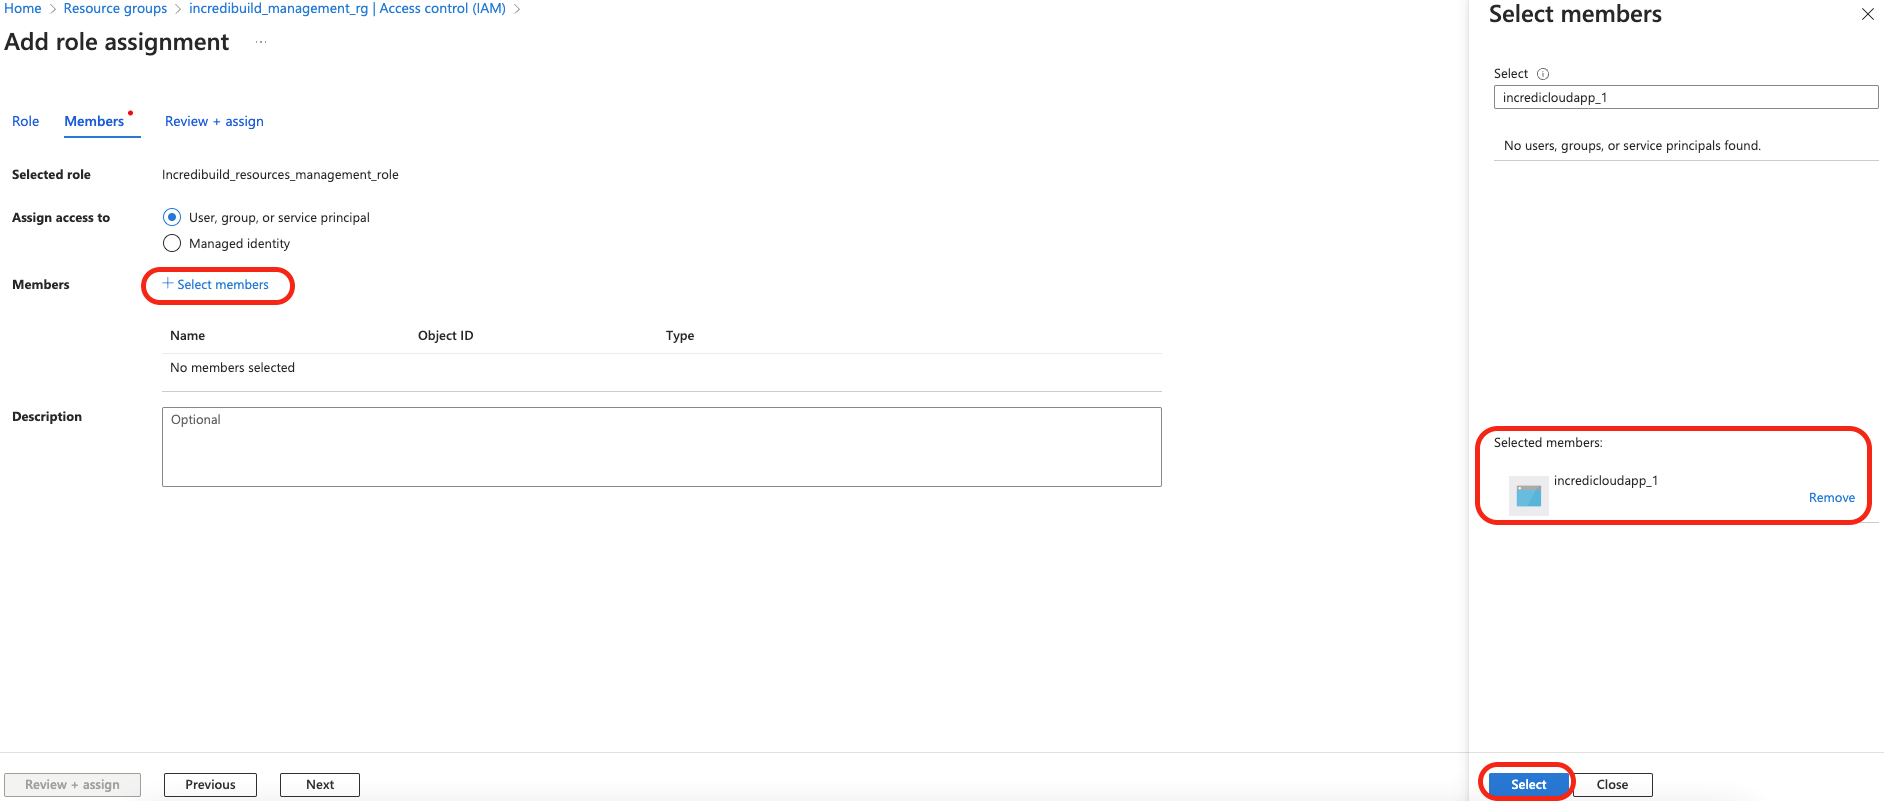
 4. Select the application you created earlier that will be used by Incredibuild:
 5. Click **Review and Assign**.
## Updating the Azure Client Secret After Initial Setup
You can update the Azure Client Secret at any time by going to the Update Key button in the Cloud Settings:
5. Click **Review and Assign**.
## Updating the Azure Client Secret After Initial Setup
You can update the Azure Client Secret at any time by going to the Update Key button in the Cloud Settings:
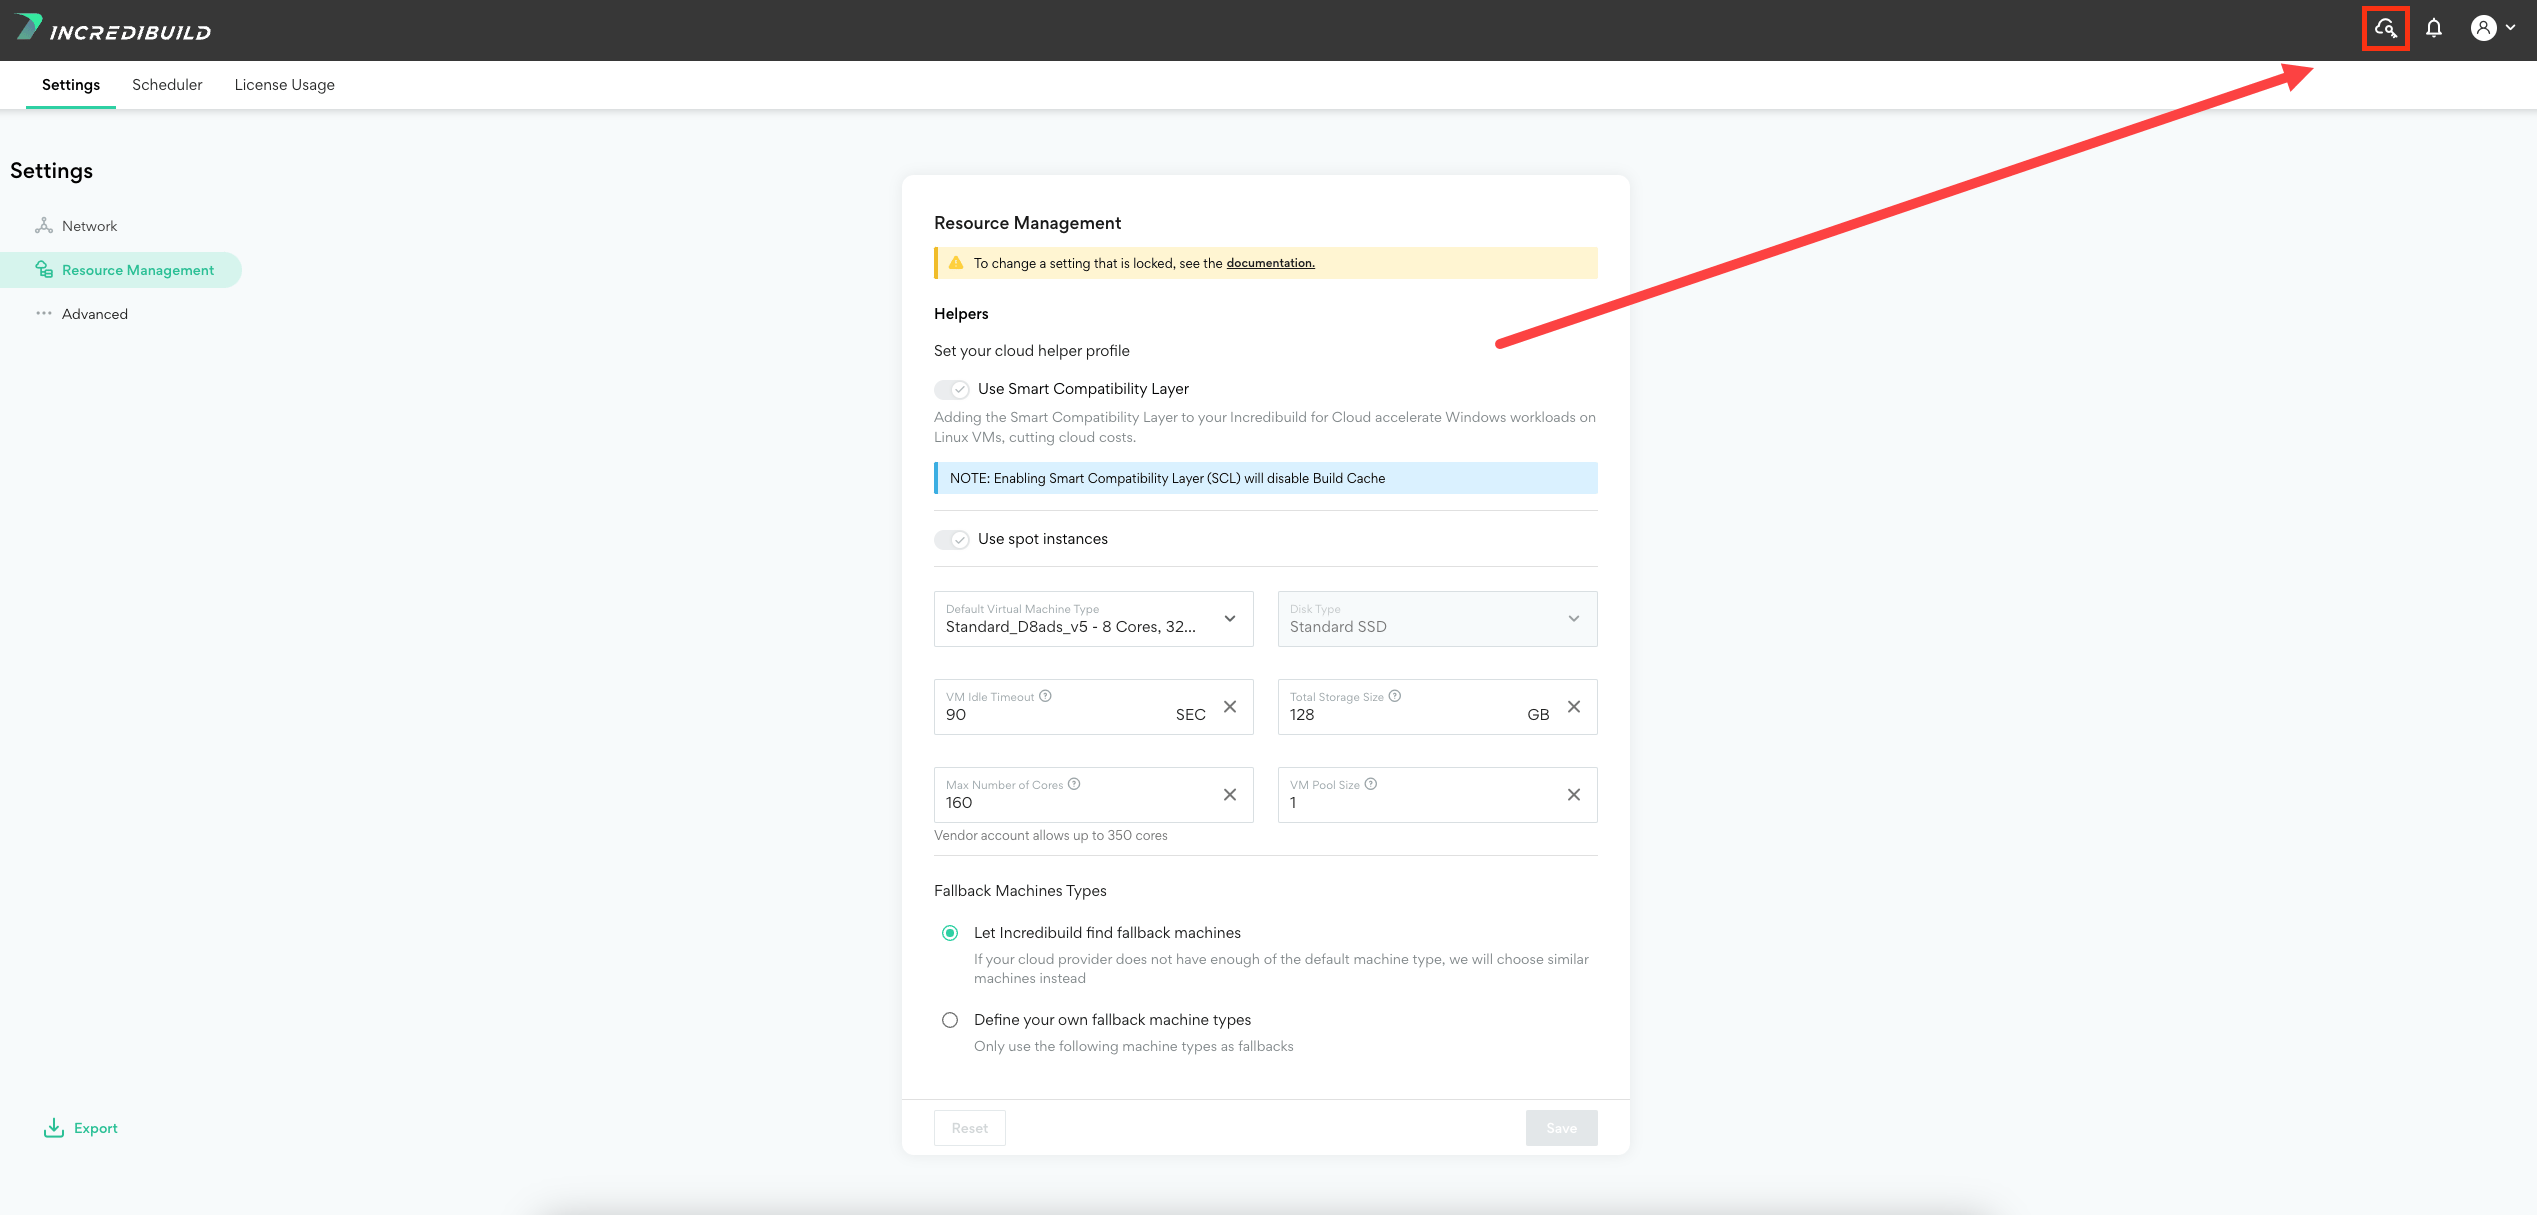 Enter a new Client Secret and click **Submit**.