Build Cache - Managing Build Cache
This feature is only available in Incredibuild's Enterprise and Business Plans.
You can view the details about the clusters and local endpoints in your Build Cache in the Coordinator Manager.
-
Go to Grid Components > Build Cache.

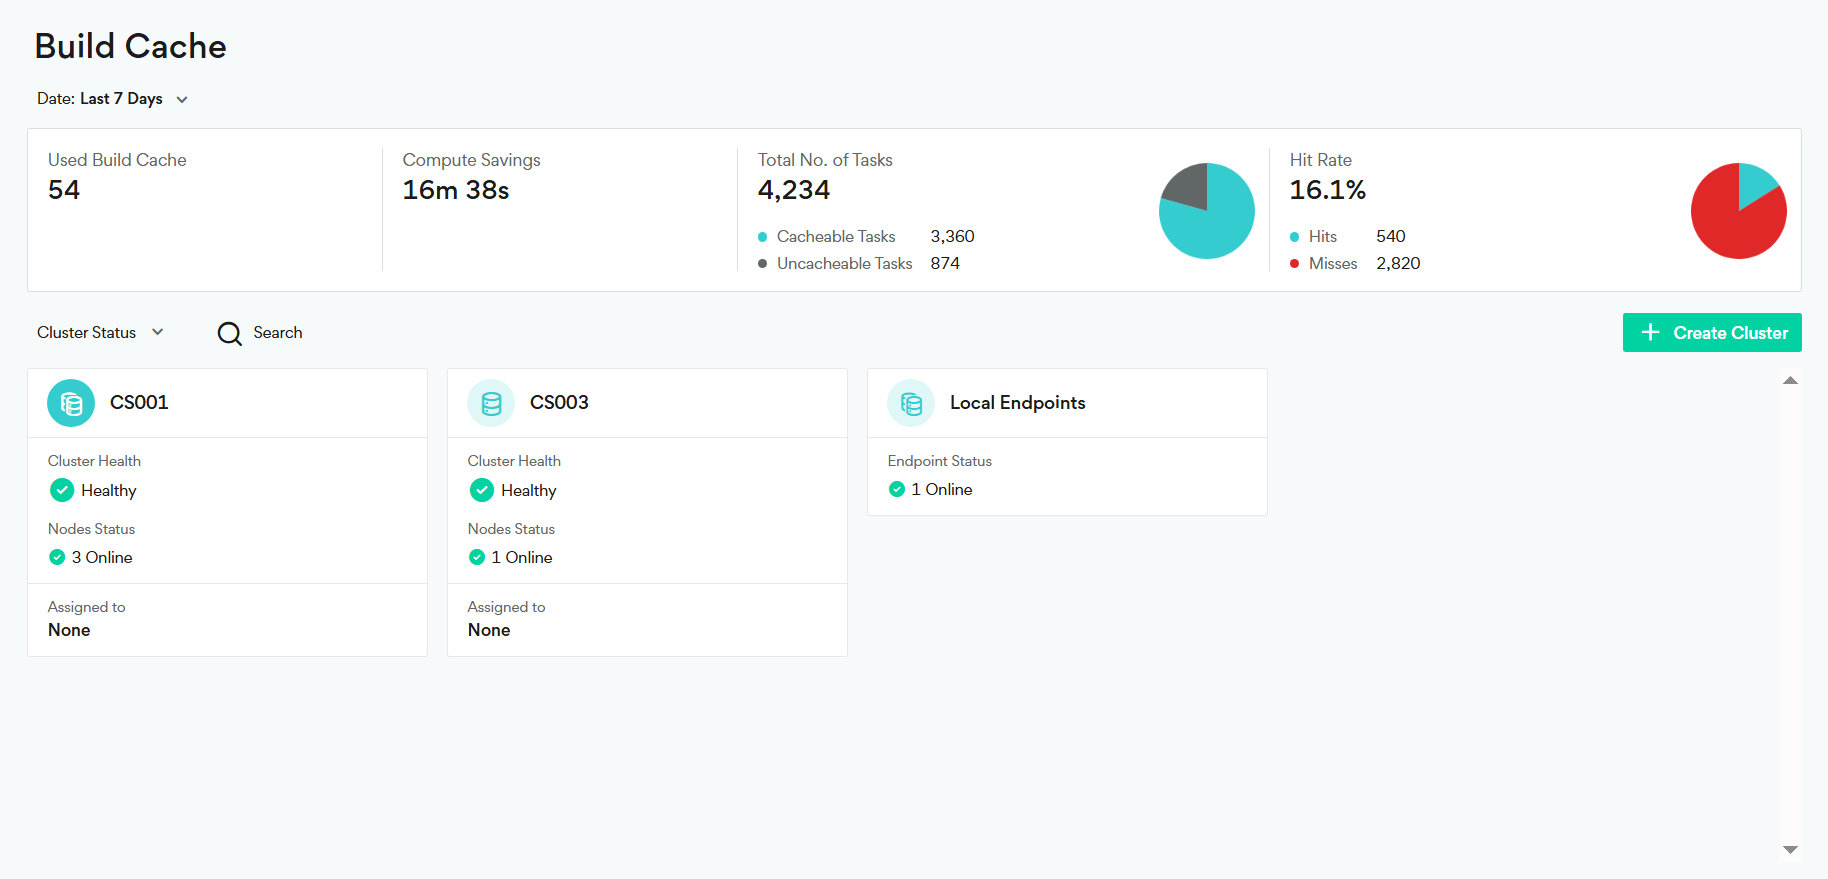
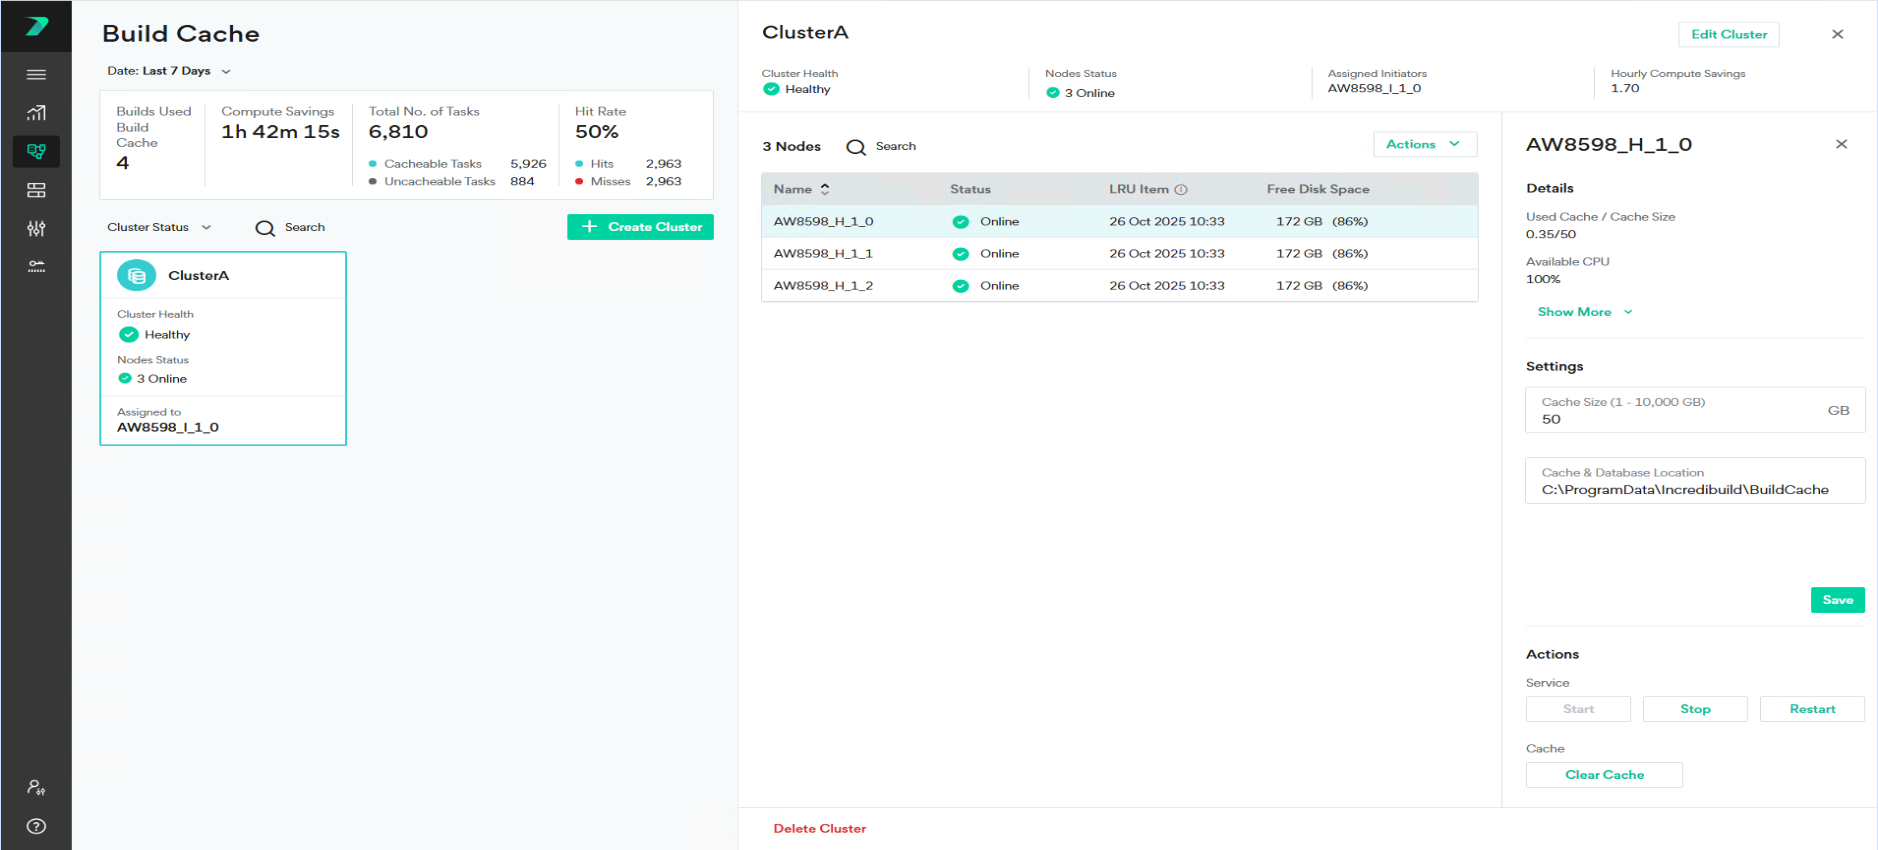
Build Cache Bar
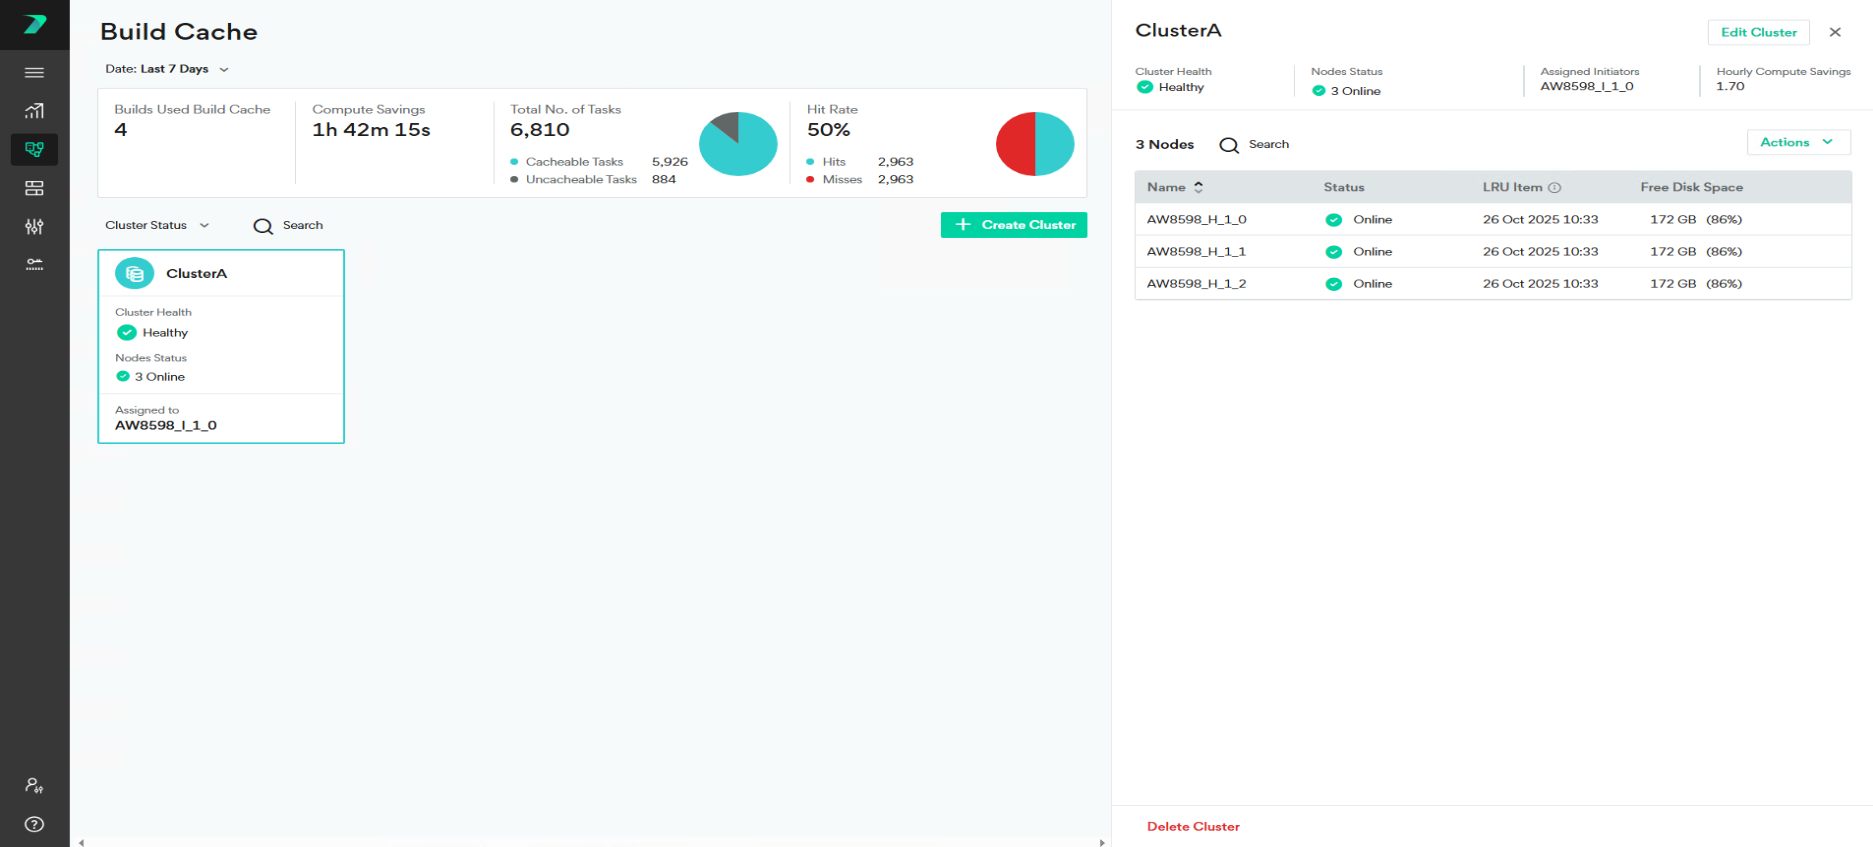
The Build Cache bar provides a quick overview of build cache usage based on data from the build list (up to the last 200,000 builds) within the specified period or date range. This includes:
-
Used Build Cache: The total number of builds that utilized the Build Cache.
-
Compute Savings: The total compute time saved by using Build Cance (in hours, minutes, and seconds).
-
Total No. of Tasks: The total number of tasks (cacheable and uncacheable).
-
Hit Rate: The hit rate percentage, showing the number of cache hits out of the total number of cacheable tasks.
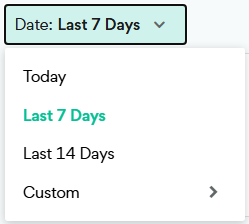
You can change period of the data in the Build Cache bar.
-
To change the date range, click Date and select an option.

Clusters and Local Endpoints
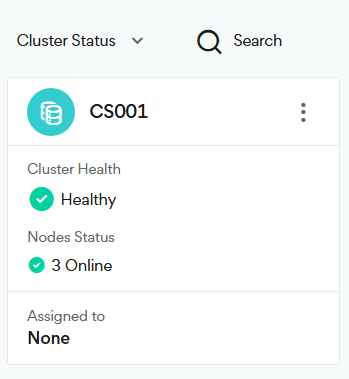
You can view the status of a cluster and its nodes, as well as how many initiators are assigned to the cluster.
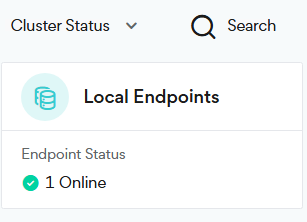
For local endpoints, you can view the status of the endpoints.
The following icons indicate the status of the nodes/endpoints:
 Stopped: The Build Cache service is down, but the endpoint is responsive.
 Offline: The endpoint is down.
 Error: The service reports that one or more of the monitored resources (cache, CPU, memory, disk) has reached 100% utilization.
 Warning: The service reports that one or more of the monitored resources (cache, CPU, memory, disk) as reached between 80-99% utilization.
 Online: The Build Cache service is running normally with no errors or warnings.
The following icons indicate the status of the cluster:
 Unavailable: All nodes either have errors, or are stopped, or are offline. No nodes are online.
Available: At least one cluster node is online, while others have different statuses.
Healthy: All cluster nodes are online.
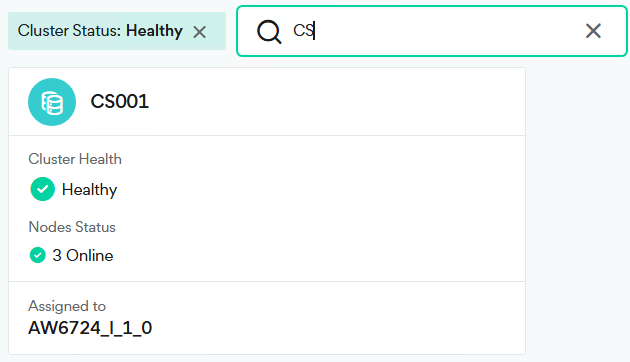
You can filter by Cluster Status to view Available, Healthy, or Unavailable clusters.

You can search for a cluster by typing a string in the search field.
Viewing a Cluster
-
Go to Grid Components > Build Cache.
-
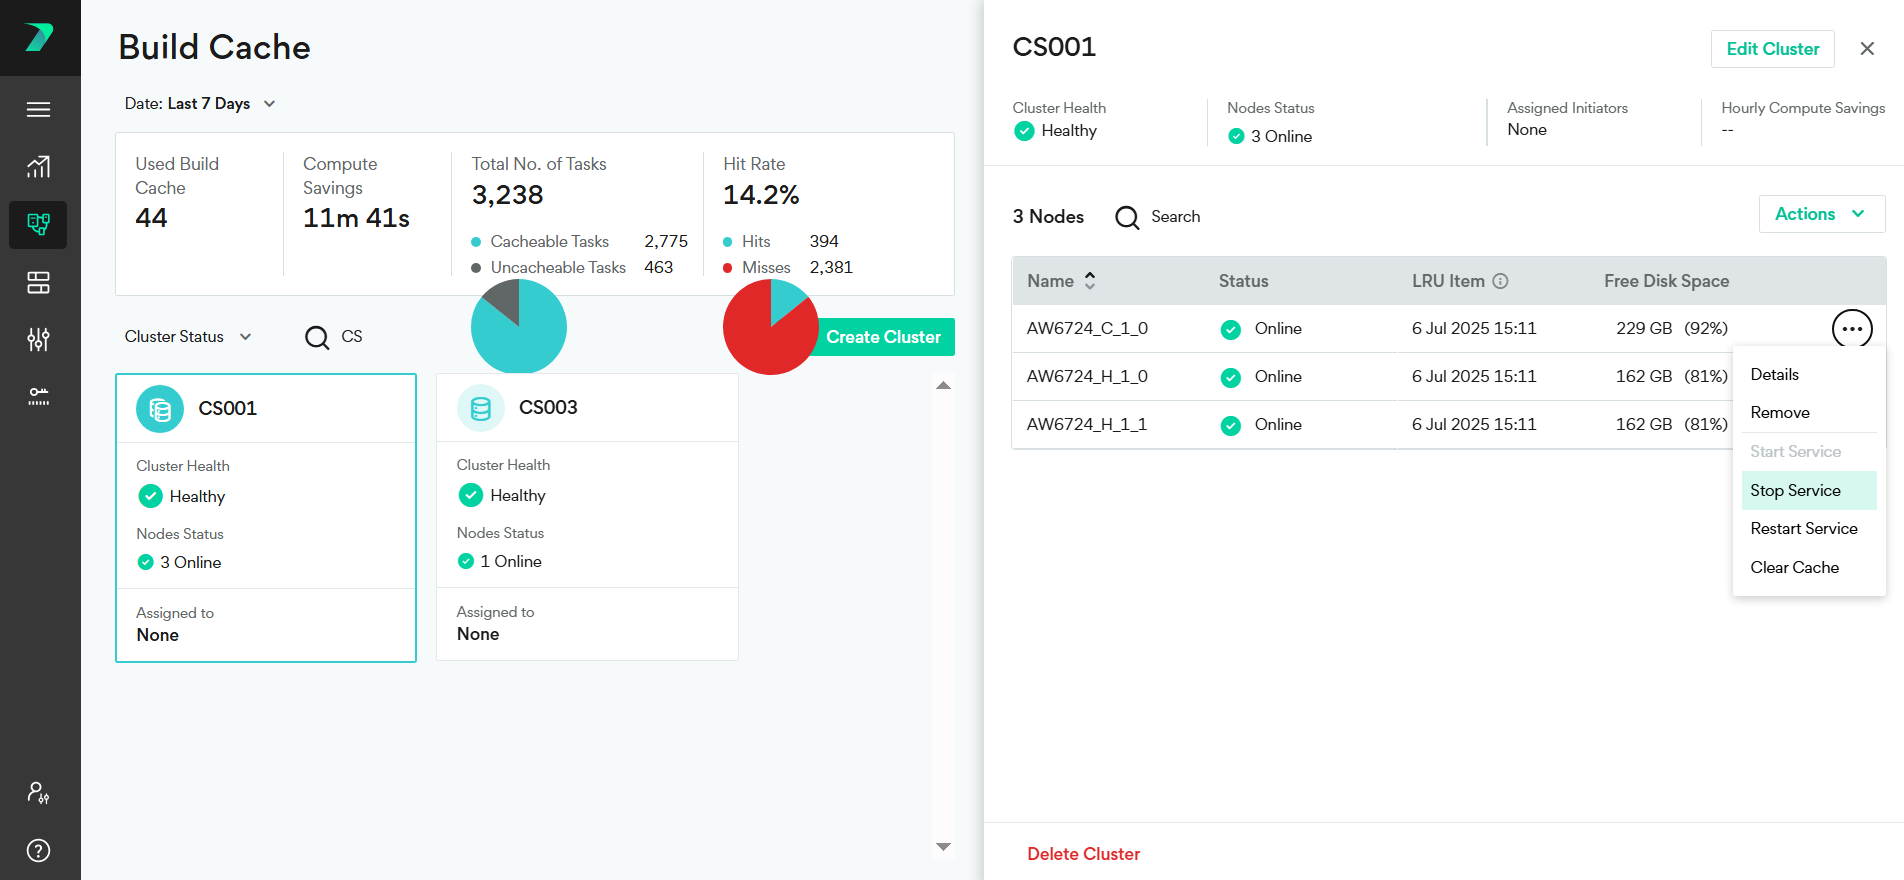
In Build Cache, click on the required cluster to view the following cluster information:
-
Cluster Health: The overall cluster status based on the health of the nodes in the cluster.
-
Nodes Status: The number of nodes in each status.
-
Assigned Initiators: The number of Initiators assigned to the cluster.
-
Hourly Compute Savings: The total aggregated number of hours of compute saved.
-
-
And for the list of nodes in the cluster:
-
Name: The node name.
-
Status: The node status.
-
LRU Item: The date and time for the least recently used item. This is the first candidate for eviction in the automatic cleanup. If this is a very recent date and time, consider increasing the cache size. Ensure that there is sufficient free disk space.
-
Free Disk Space: The free disk space on the node.
-
Viewing a Node
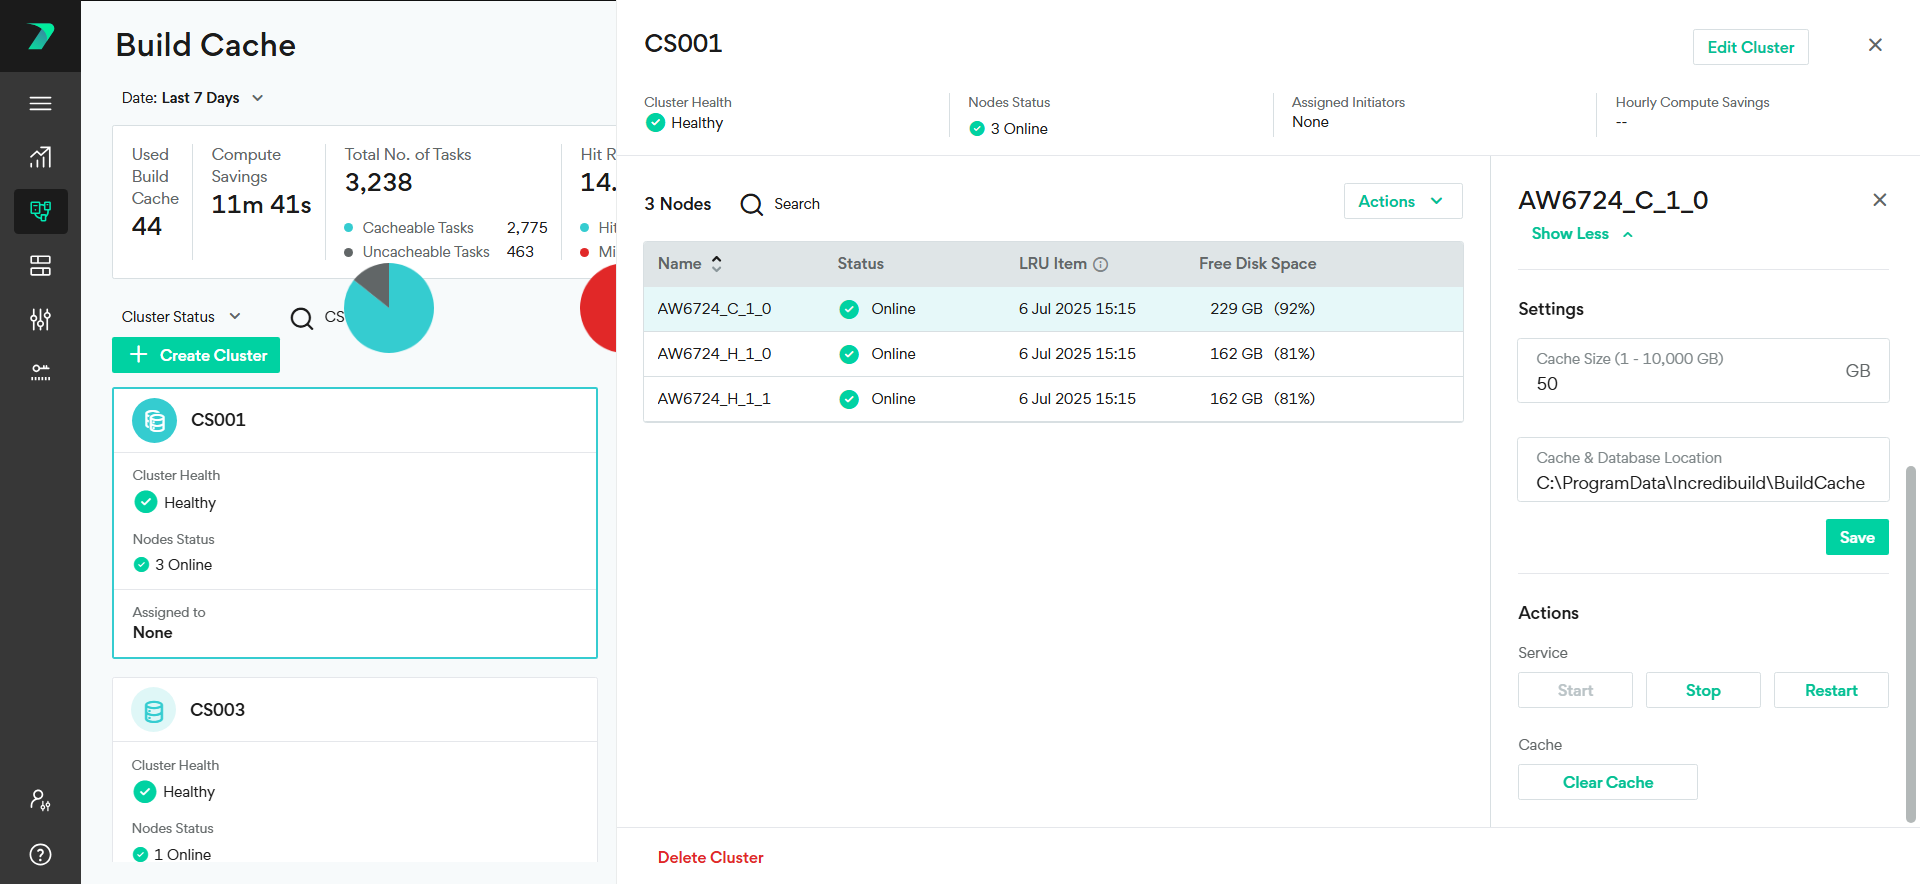
You can select a node and view the following details, settings, and actions.
-
Go to Grid Component > Build Cache.
-
Click on the required cluster or Local Endpoints.
-
In the cluster or Local Endpoints, click on the required node.
-
To view all the node details and options, click Show More.
Details
-
Used Cache / Cache Size: The current usage out of the total cache capacity
-
Available CPU: The percentage of CPU currently available.
-
Available Memory: The available RAM out of the total system memory.
-
Network Utilization: The type of connection and speed.
-
Last Cache Eviction: The date of the most recent cache eviction event.
Settings
-
Cache Size: The cache size in GB.
-
Cache & Database Location: The cache folder location.
Actions:
-
Service: Start, Stop and Restart the service.
-
Cache: Clear Cache.
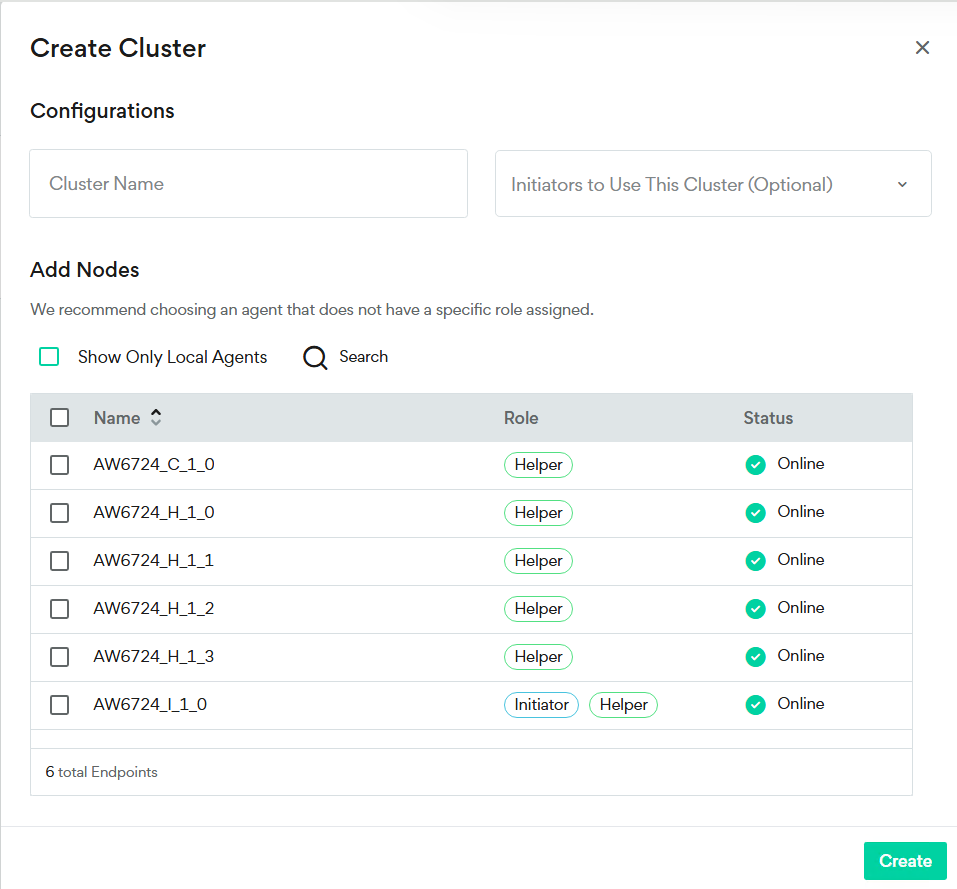
Creating a Cluster
A Build Cache Cluster comprises multiple Agent nodes. You can connect multiple Initiator Agents to the Build Cache Cluster. All Initiators Agents connected to the cluster submit files to the cluster, and can read all files on the cluster, enabling a team of developers to share the Build Cache on the cluster.
Note:
- Although adding or removing a node from the Build Cache Cluster is relatively easy, this initially reduces the number of cache hits. While some build tasks may be a hit in the first build after the Build Cache Cluster configuration change, others build tasks may require re-caching.
Multiple Initiators can use the same cluster, however, an Initiator only uses one cluster. If you add an Initiator to a cluster and it is already assigned to a different cluster, it is automatically removed from the cluster it was previously assigned to.
-
Go to Grid Component > Build Cache.
-
Click Create Cluster
-
Enter the Cluster Name.
-
(Optional) Select Initiators to use this cluster.
-
To add nodes to the cluster, select one of more agents. It is recommended to choose agents that do not have a specific role assigned.
-
(Optional) Select Show Only Local Agents to view endpoints connected to this Coordinator.
-
Click Create.

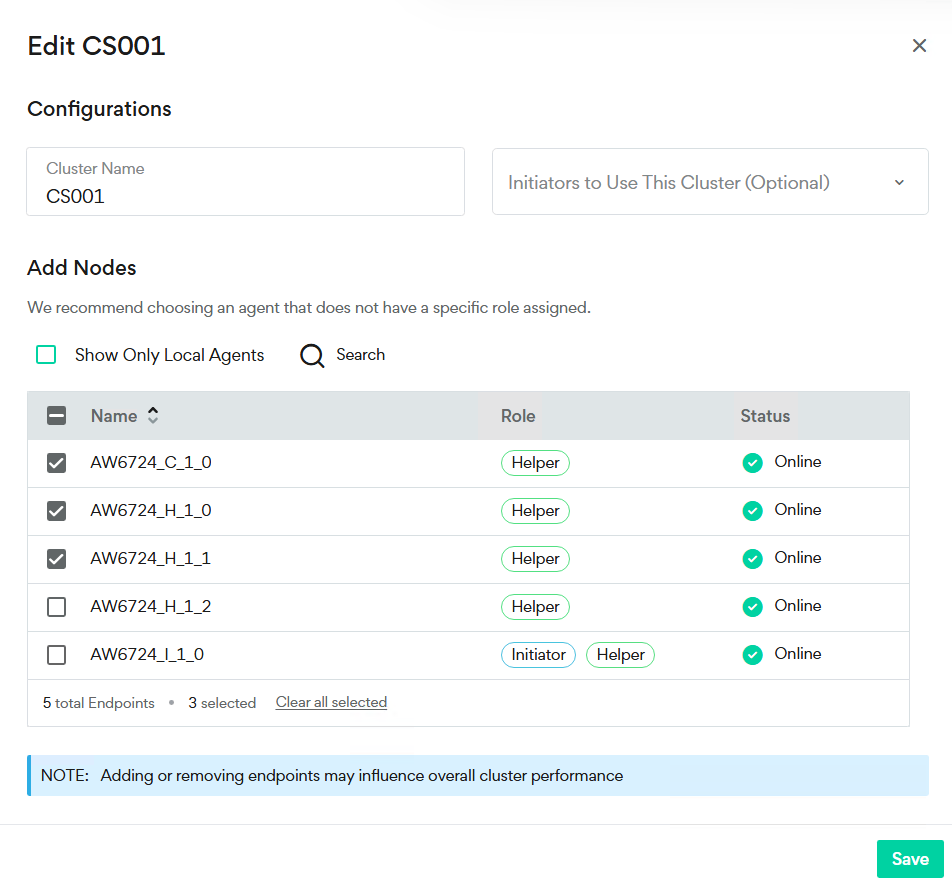
Editing a Cluster
You can add or remove nodes from the cluster, change the cluster name, and assign Initiators to use this cluster.
-
Go to Grid Components > Build Cache.
-
To edit a cluster use the three dots menu next to the cluster name and click Edit.
or
Click on the required cluster, and then click Edit Cluster.
-
Edit the cluster as required.
-
Click Save.

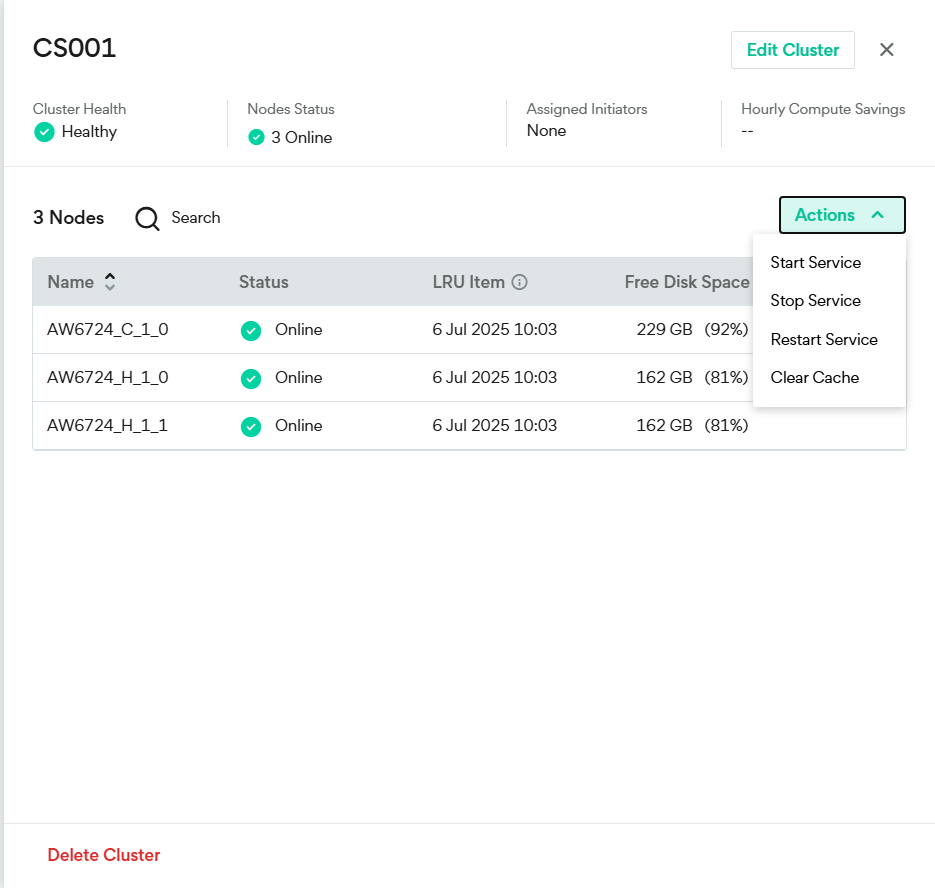
Deleting a Cluster
-
Go to Grid Components > Build Cache.
-
To delete a cluster use the three dots menu next to the cluster name and click Delete, or click on the cluster to view the cluster details and click Delete Cluster.
-
To confirm the deletion, click Delete.
Merging Clusters
You can move an endpoint from a single-node cluster to a different cluster.
-
Go to Grid Components > Build Cache.
-
To move the endpoint from the single-node cluster use the three dots menu next to the cluster name and click Move.
-
Select the target cluster name. In this example, the node from the CS003 cluster is moved to CS001.

Managing Cluster Node Services
You can start, stop, or restart the services for all of your cluster nodes, or for your local endpoint.
To start, stop or restart the service on a specific node or local endpoint, see Managing Node Services.
-
Go to Grid Components > Build Cache.
-
Click on the required cluster or Local Endpoints.
-
Click Actions.
-
Click Start Service, Stop Service, or Restart Service.
Managing Node Services
To start, stop or restart the service on a node or local endpoint.
-
Go to Grid Components > Build Cache.
-
Click on the required cluster or local endpoint.
-
To start, stop, or restart a node use the three dots menu next to the node name and click Start Service, Stop Service, or Restart Service.
or
In the cluster, click on the required node, and click Start, Stop or Restart.
Clearing a Node Cache
To clear the cache on a node:
-
Go to Grid Components > Build Cache.
-
Click on the required cluster or local endpoint.
-
Use the three dots menu next to the node and click Clear Cache in Actions > Cache.
or
Click on the required node and then click Clear Cache.
Editing the Node Cache Settings
You can change the cache size. If the LRU Item date is very recent (the LRU Item is the first candidate for eviction in the automatic cleanup) this may indicate that you need to increase the cache size.
To edit the node settings:
-
Go to Grid Components > Build Cache.
-
Click on the required cluster or local endpoint.
-
Click on the required node.
-
In the Settings area, edit the Cache Size and the Cache & Database Location.
-
Click Save.
Setting the Cluster Log Level
When working with Incredibuild Technical Support on a technical issue, you may be asked to change this setting in order to provide more information. It is generally recommended to keep this option set to Minimal. Other logging levels can affect the performance.
Technical Support may request you to select a different logging level. In this case, when you are finished resolving the technical issue, reset the logging level to Minimal.
-
Go to Grid Components > Build Cache.
-
Click on the required cluster.
-
Click Actions.
-
Click Log Level and set the log level between 1 (Minimal) and 5 (Detailed).
Using Linux Endpoints
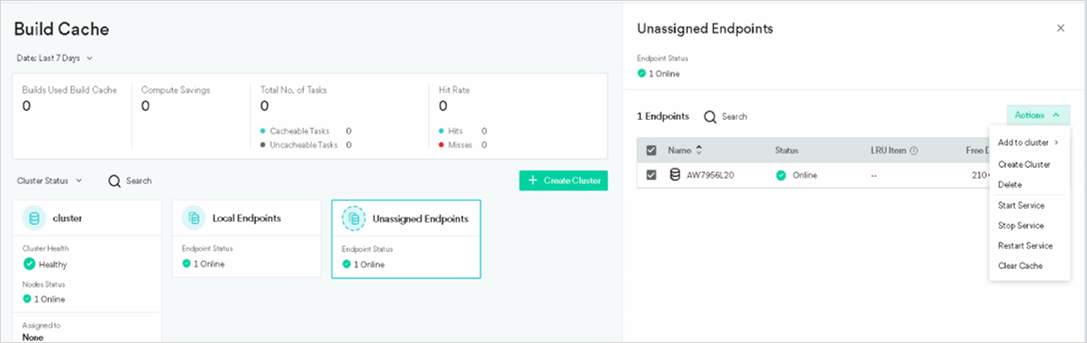
Build Cache can be deployed on native Linux endpoints. These appear as Unassigned Endpoints.
-
Go to Grid Components > Build Cache.
-
Use the Unassigned Endpoints as you would Local Endpoints.