Build Cache
This feature is only available in Incredibuild's Enterprise and Business Plans and is currently in limited availability. For more details, speak to your Customer Success Representative.
Build Cache saves time and resources by reusing portions of previous outputs. As you run builds, we store the outputs in a cache. When future builds are run, we check the cache to avoid regenerating portions of the build that have not changed.
This can have a major impact when working from home, as you can reuse previous build data stored on your local machine to drastically reduce build times without impacting your bandwidth.
Using Build Cache requires a special license for each initiator agent.
Overview
Builds are often processed in tree-like structures based on the dependencies in your code. The files in Layer 1 are used to create the files in Layer 2, Layer 2 is used to create the files in Layer 3, and so on until the final output is produced.
As builds are processed, Incredibuild saves details of the process for future use. Each part of the process that is generated from other files is saved as a pair of input files and output files in the cache. If you run a build after changing some of the files, Build Cache can use the portions that are similar to prevent parts of the process from running.
Supported Platforms
-
Build cache can only be used with Visual Studio 2017 and higher.
-
Build cache only supports msbuild builds using the cl toolset (cl.exe).
How is this Different from the Helper Cache
When Helpers are given a task, the files they need to process are stored in the Helper Cache. If the same exact file is sent, the Helpers still process it again, but the files do not need to be re-transferred.
In Build Cache, the Initiator recognizes files that have already been processed, and they are skipped entirely (they do not need to be re-transferred OR rerun).
How to Assign Build Cache Licenses
A special Build Cache license must be assigned to every initiator that will use Build Cache.
-
Go to Coordinator > Agent List.
-
Select every initiator agent that you want to enable Build Cache.
-
Click Actions > Build Cache License > Allocate License.
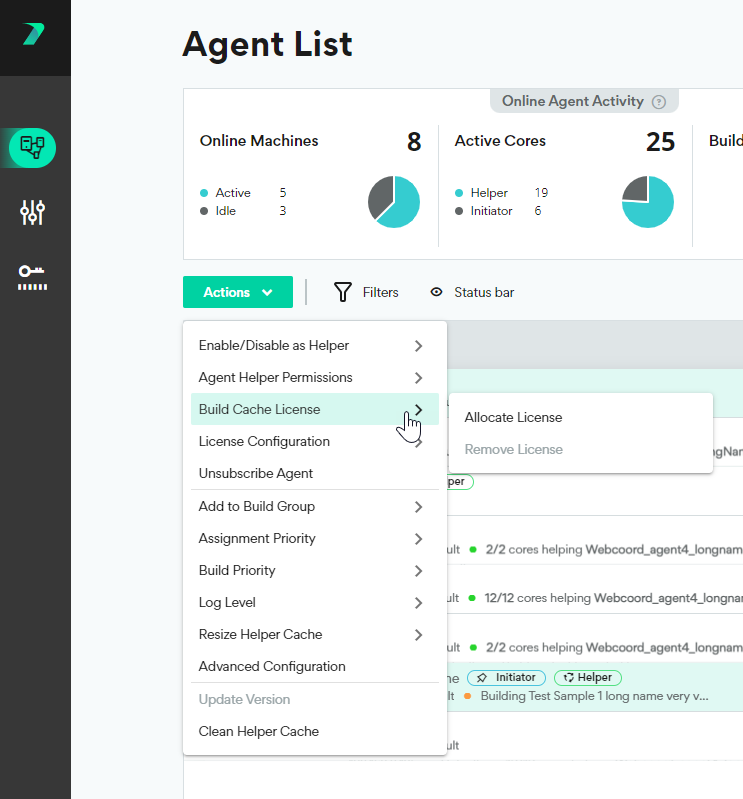

Note: You can also assign a license to a single initiator using the options (...) menu next to each agent.
How to Enable the Build Cache on an Initiator Agent
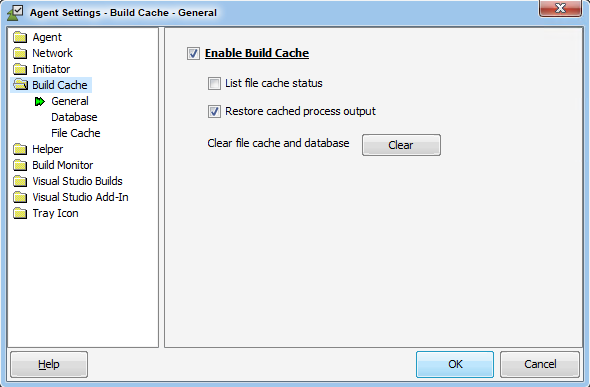
In addition to assigning a license, the following settings must be configured for every initiator agent that will use Build Cache.
You can enable the Build Cache and adjust the settings in Agent Settings > Build Cache. Once enabled, Build Cache is used for all of your builds, and cannot be disabled for individual builds.
-
On the initiator machine, go to Agent Settings > Build Cache.
-
Go to the General window.
-
Click Enable Build Cache.
-
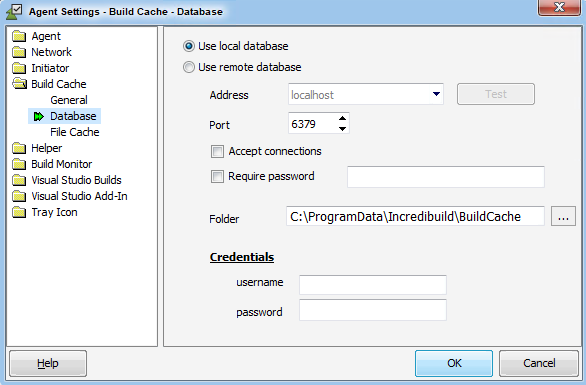
Go to Build Cache > Database.
-
Build Cache requires a Redis database to store metadata. You can use the default database we automatically install on each Initiator during installation, or specify a remote Redis database.
If you are using a remote database, enter the address, port and password if required to access the database.
-
Whether you are using a remote or local database, specify the location in the Folder field. We recommend using a local, and not a remote network folder to optimize performance.
If the folder requires credentials, specify the username and password.
-
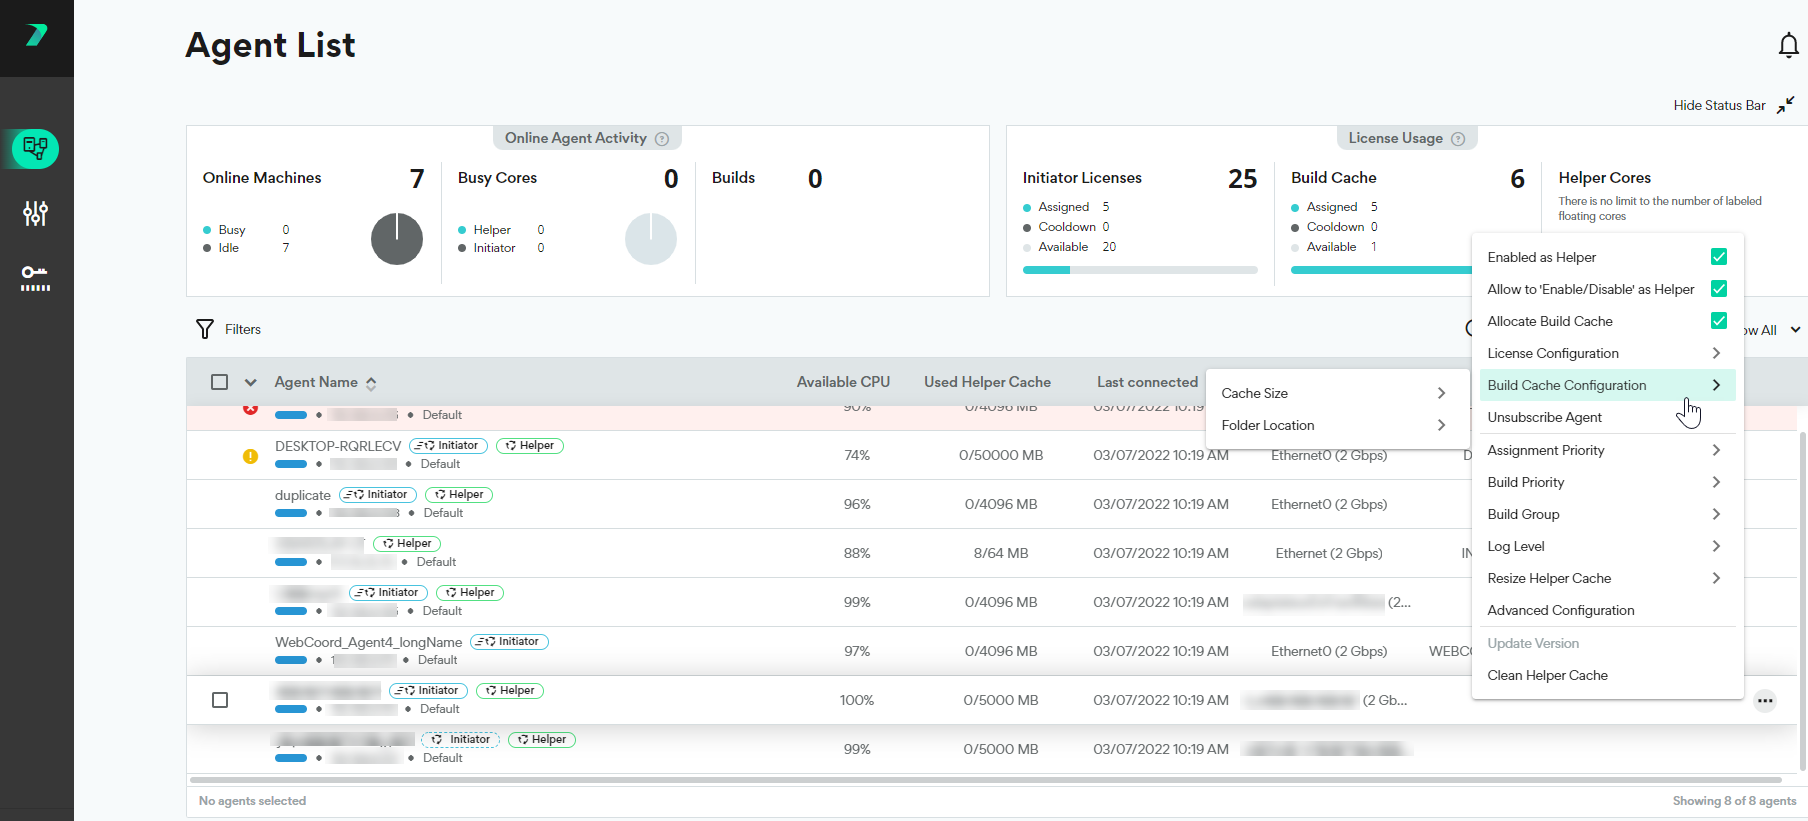
Go to Build Cache > File Cache. This area contains the cache files themselves. You can define their location, size limit, and any required credentials. The size limit should be 2-3 times the size of the output of all of the builds you plan to run, and be at least 10GB.

You can also modify the folder and cache size in the Coordinator's Agent List. Select an Initiator Agent, open the options menu, and select Build Cache Configuration. This can be done at scale by selecting multiple agents and using the Actions menu.


Advanced Settings

-
List cache file status: Lists which files were cached when running a build in the command line.
-
Restore cached process output: If a part of a build is skipped because it was found in the build cache, this option allows you to still view details in the console as if it was fully executed. Disabling this can improve performance, but in some cases the console output is needed. Use caution when disabling.
-
Clear cache: Clear both the database and build cache. As these items are the basis of the Build Cache feature, we do not recommend clearing the cache under normal circumstances.
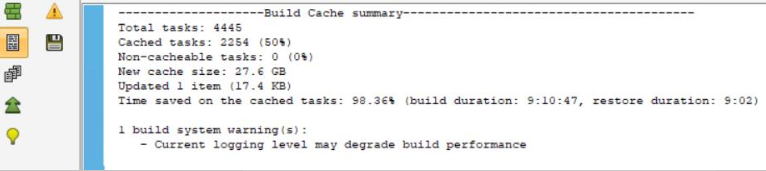
Verifying the Effectiveness of Build Cache
Details of how much time was saved from using the Build Cache is included in the output of all of your builds. This can be seen in the output tab of the Build Monitor, as well as the output you see in the command line.
Limitations
-
Currently, you can only run build cache on one build at a time.
-
If the location of the cache is remote, it must be on a location that shares data about available disk space.