> ## Documentation Index
> Fetch the complete documentation index at: https://docs.incredibuild.com/llms.txt
> Use this file to discover all available pages before exploring further.
# Assigning Agents to Build Groups During Installation
> For Enterprise Edition only
You can assign an Agent to a Build Group during its installation via:
* Silent installation
* Setup wizard
The Build Group must already exist.
## Enabling Assignment
 In order to assign an Agent to a Build Group during installation, enable this option on the Coordinator.
**To enable the assignment:**
1. Go to **Coordinator > Coordinator Settings > Coordinator > API Access** and select **Allow Agents self registration to Build Group**.
2. Click **OK**.
## Assigning an Agent via the Silent Installer
Use the option:/Agent:Group=\{Group name}
If a \{Group name} is not specified, or if a non-existent group name is provided, the Agent is assigned to the **Default** Build Group.
**To assign an Agent to a Build Group via the Automated Installer:**
* Use the command, adding the \{Group name} value:
IBSetupConsole.exe /Install /Components=Agent /Coordinator=\{COORDINATORNAME} /Agent:Group=\{Group name} \[General Options] \[Agent Options]
For example:
IBSetupConsole.exe /Install /Components=Agent /Coordinator=win10-1 /Agent:Group=QA
**To install both a Coordinator and an Agent:**
* Use the following command, adding the \{Group name} value:
IBSetupConsole.exe /Install /Components=Coordinator,Agent /Coordinator=\{COORDINATORNAME} /Agent:Group=\{Group name} \[General Options] \[Agent Options]
**To install an Agent with a Single-Use VM license:**
* Use the command, adding the \{Group name} value:
IBSetupConsole.exe /Install /Components=Agent,oneuse /Coordinator=\{COORDINATORNAME} /Agent:Group=\{Group name} \[General Options] \[Agent Options]
## Assigning an Agent via the Setup Wizard
In order to assign an Agent to a Build Group during installation, enable this option on the Coordinator.
**To enable the assignment:**
1. Go to **Coordinator > Coordinator Settings > Coordinator > API Access** and select **Allow Agents self registration to Build Group**.
2. Click **OK**.
## Assigning an Agent via the Silent Installer
Use the option:/Agent:Group=\{Group name}
If a \{Group name} is not specified, or if a non-existent group name is provided, the Agent is assigned to the **Default** Build Group.
**To assign an Agent to a Build Group via the Automated Installer:**
* Use the command, adding the \{Group name} value:
IBSetupConsole.exe /Install /Components=Agent /Coordinator=\{COORDINATORNAME} /Agent:Group=\{Group name} \[General Options] \[Agent Options]
For example:
IBSetupConsole.exe /Install /Components=Agent /Coordinator=win10-1 /Agent:Group=QA
**To install both a Coordinator and an Agent:**
* Use the following command, adding the \{Group name} value:
IBSetupConsole.exe /Install /Components=Coordinator,Agent /Coordinator=\{COORDINATORNAME} /Agent:Group=\{Group name} \[General Options] \[Agent Options]
**To install an Agent with a Single-Use VM license:**
* Use the command, adding the \{Group name} value:
IBSetupConsole.exe /Install /Components=Agent,oneuse /Coordinator=\{COORDINATORNAME} /Agent:Group=\{Group name} \[General Options] \[Agent Options]
## Assigning an Agent via the Setup Wizard

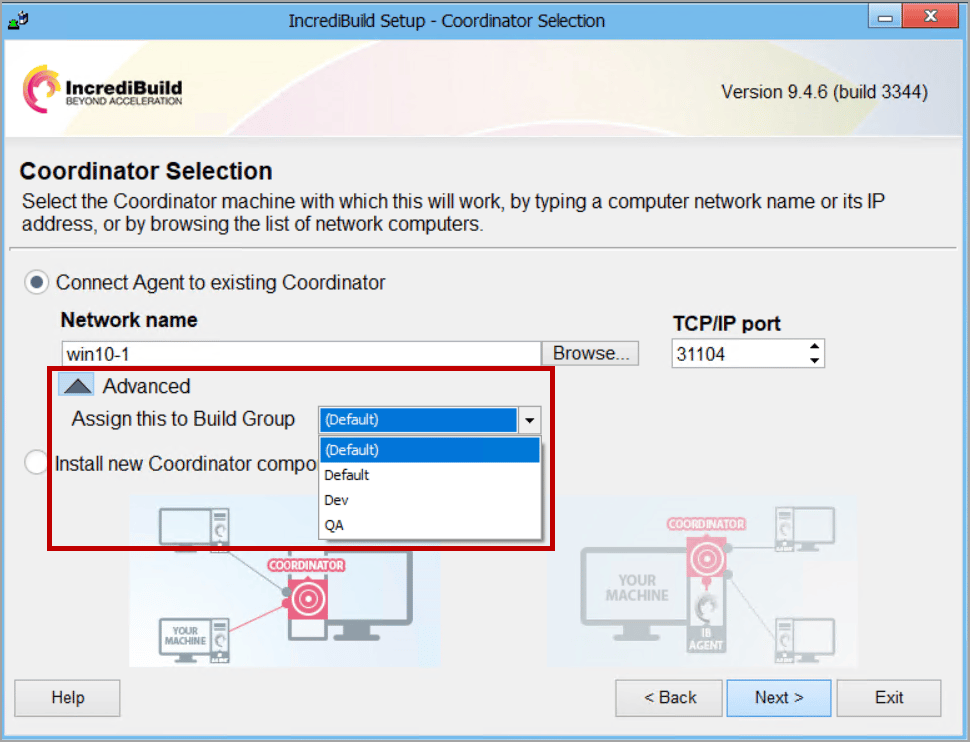 **To assign an Agent to a Build Group via the Setup wizard:**
1. Double-click the Incredibuild Setup file to start the Agent installation.
2. Follow the Setup wizard instructions, and click **Next** until you reach the **Coordinator Selection** page.
3. Select **Connect Agent to existing Coordinator**, and in the **Network name** field, enter the Coordinator IP address or hostname.
4. Click the **Advanced** arrow and then, from the **Assign this to Build Group** dropdown list, select the required Build Group.
5. Click **Next** and continue to follow the wizard instructions until you complete the Agent installation
**To assign an Agent to a Build Group via the Setup wizard:**
1. Double-click the Incredibuild Setup file to start the Agent installation.
2. Follow the Setup wizard instructions, and click **Next** until you reach the **Coordinator Selection** page.
3. Select **Connect Agent to existing Coordinator**, and in the **Network name** field, enter the Coordinator IP address or hostname.
4. Click the **Advanced** arrow and then, from the **Assign this to Build Group** dropdown list, select the required Build Group.
5. Click **Next** and continue to follow the wizard instructions until you complete the Agent installation