Obtaining AWS Login Details
To enable cloud with AWS, you need to provide several login details during the activation of Incredibuild Cloud.
-
Role ARN – the Role Amazon Resource Name (ARN) that is generated automatically upon the creation of the new role. For more information on Amazon Resource Names (ARNs), see the AWS documentation.
-
External ID – the External ID you will enter as a condition into the Trust Relationships settings of the new role. For more information on External IDs, see the AWS documentation.
To generate these login details, you need to perform the following procedures:
Note: The procedures require an IAM user who has an Administrator Access policy and a Programmatic Access type. These procedures were verified in November 2021, but the AWS application may have changed since then.
Creating a Custom AWS Policy
-
On AWS Management Console, enter in the Find Services box: IAM:
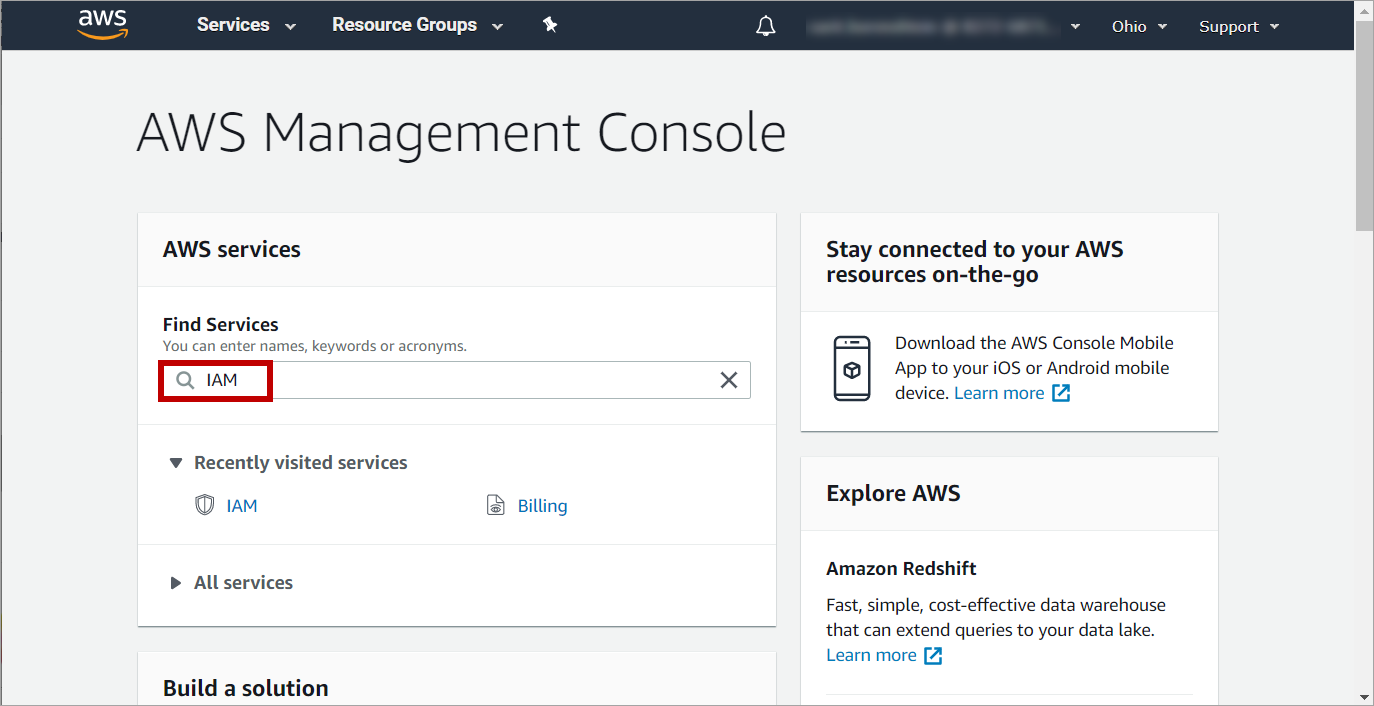
-
On the IAM page, click the Policies option:
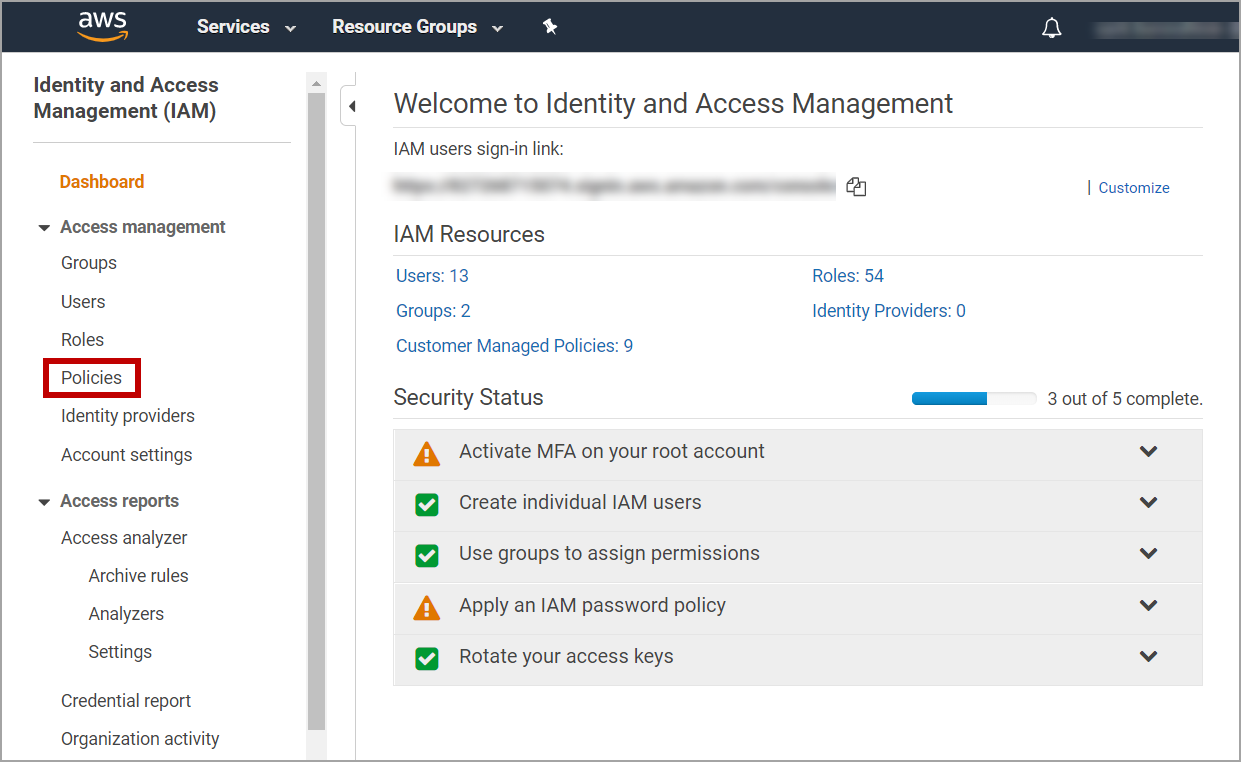
-
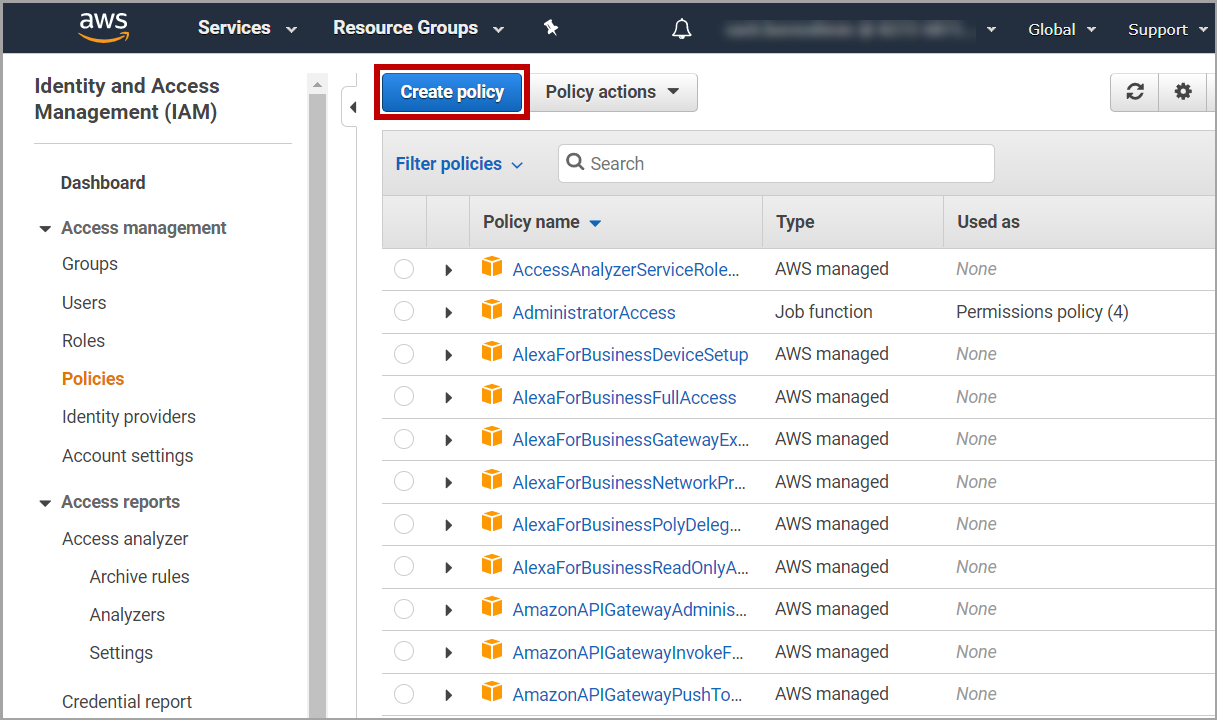
On the Policies page, click the Create policy button:

-
On the first Create policy page, click the JSON tab.
-
Enter the following code depending on your environment.
-
If you want to attach a custom role to your cloud VMs, use the Custom VM Role options below and specify the role you created in AWS. You also need to specify the role in the Cloud Settings.
-
In the private policy, you must replace some of the code with your account details.
-
If you are not sure which one to use, you should use the policy for public networks with the custom VM role.
-
If you are planning to use Private Link, add the ec2:DescribeVpcEndpoints permission as well.
 Policy for Public Networks without Custom VM Roles
{
    "Version": "2012-10-17",
    "Statement": [
        {
            "Sid": "VisualEditor0",
            "Effect": "Allow",
            "Action": [
                "servicequotas:ListServices",
                "ec2:AuthorizeSecurityGroupIngress",
                "ec2:DeleteSubnet",
                "ec2:DescribeInstances",
                "ec2:RequestSpotInstances",
                "ec2:CreateVpc",
                "ec2:RequestSpotFleet",
                "ec2:AttachInternetGateway",
                "ec2:DescribeSpotInstanceRequests",
                "servicequotas:GetServiceQuota",
                "ec2:ModifySubnetAttribute",
                "ec2:DescribeInternetGateways",
                "ec2:ModifySpotFleetRequest",
                "ec2:DescribeNetworkInterfaces",
                "ec2:StartInstances",
                "ec2:CreateRoute",
                "ec2:CreateInternetGateway",
                "ec2:CreateSecurityGroup",
                "ec2:DeleteInternetGateway",
                "ec2:ModifyInstanceAttribute",
                "ec2:DescribeRouteTables",
                "servicequotas:ListServiceQuotas",
                "ec2:DescribeCapacityReservations",
                "ec2:TerminateInstances",
                "ec2:DescribeLaunchTemplates",
                "ec2:ModifyLaunchTemplate",
                "ec2:DescribeLaunchTemplateVersions",
                "ec2:DeleteLaunchTemplateVersions",
                "ec2:CreateTags",
                "ec2:RunInstances",
                "ec2:CreateFleet",
                "ec2:DetachInternetGateway",
                "ec2:StopInstances",
                "ec2:DescribeSecurityGroups",
                "ec2:CreateLaunchTemplateVersion",
                "ec2:RevokeSecurityGroupIngress",
                "ec2:DescribeImages",
                "ec2:CancelSpotInstanceRequests",
                "ec2:CreateLaunchTemplate",
                "ec2:DescribeSecurityGroupRules",
                "ec2:DescribeVpcs",
                "ec2:DeleteSecurityGroup",
                "ec2:DeleteVpc",
                "ec2:CreateSubnet",
                "ec2:DescribeSubnets",
                "ec2:DescribeAvailabilityZones",
                "ec2:DescribeInstanceTypeOfferings"
            ],
            "Resource": "*"
        },
 {
             "Effect": "Allow",
            "Action": "iam:CreateServiceLinkedRole",
            "Resource": "arn:aws:iam::*:role/aws-service-role/spot.amazonaws.com/*",
            "Condition": {
                "StringLike": {
                    "iam:AWSServiceName": "spot.amazonaws.com"
                }
            }
        },
        {
            "Sid": "VisualEditor1",
            "Effect": "Allow",
            "Action": "iam:CreateServiceLinkedRole",
            "Resource": "arn:aws:iam::*:role/aws-service-role/ec2fleet.amazonaws.com/*",
            "Condition": {
                "StringLike": {
                    "iam:AWSServiceName": "ec2fleet.amazonaws.com"
                }
            }
        },
        {
            "Sid": "VisualEditor2",
            "Effect": "Allow",
            "Action": [
                "iam:AttachRolePolicy",
                "iam:PutRolePolicy"
            ],
            "Resource": "arn:aws:iam::*:role/aws-service-role/ec2fleet.amazonaws.com/*"
        }
    ]
}
Policy for Private Networks without Custom VM Roles
Replace "youraccountnumber" and "vpcid" with your account information.
{
    "Version": "2012-10-17",
    "Statement": [
        {
            "Sid": "Subnets",
            "Effect": "Allow",
            "Action": [
                "ec2:DescribeSubnets"
            ],
            "Resource": "*"
        },
        {
            "Sid": "Vpc",
            "Effect": "Allow",
            "Action": [
                "ec2:DescribeInternetGateways",
                "ec2:DescribeVpcs"
            ],
            "Resource": "*"
        },
        {
            "Sid": "Images",
            "Effect": "Allow",
            "Action": [
                "ec2:DescribeImages"
            ],
            "Resource": "*"
        },
        {
            "Sid": "Tags",
            "Effect": "Allow",
            "Action": [
                "ec2:CreateTags"
            ],
            "Resource": "*"
        },
        {
            "Sid": "LaunchTemplatesRead",
            "Effect": "Allow",
            "Action": [
                "ec2:DescribeLaunchTemplates"
                "ec2:DescribeLaunchTemplateVersions"
            ],
            "Resource": "*"
        },
        {
            "Sid": "LaunchTemplatesCreate",
            "Effect": "Allow",
            "Action": [
                "ec2:CreateLaunchTemplate"
            ],
            "Resource": "*"
        },
        {
            "Sid": "LaunchTemplatesUpdate",
            "Effect": "Allow",
            "Action": [
                "ec2:ModifyLaunchTemplate",
                "ec2:CreateLaunchTemplateVersion",
                "ec2:DeleteLaunchTemplateVersions
            ],
            "Resource": "*"
        },
        {
            "Sid": "InstancesRead",
            "Effect": "Allow",
            "Action": [
                "ec2:DescribeCapacityReservations",
                "ec2:DescribeInstances",
                "ec2:DescribeSpotInstanceRequests",
                "ec2:DescribeAvailabilityZones",
                "ec2:DescribeInstanceTypeOfferings"

            ],
            "Resource": "*"
        },
        {
            "Sid": "InstancesCreate",
            "Effect": "Allow",
            "Action": [
                "ec2:RunInstances",
                "ec2:CreateFleet",
                "ec2:RequestSpotFleet",
                "ec2:RequestSpotInstances"
            ],
            "Resource": "*"
        },
        {
            "Sid": "InstancesWrite",
            "Effect": "Allow",
            "Action": [
                "ec2:StartInstances",
                "ec2:StopInstances",
                "ec2:TerminateInstances",
                "ec2:ModifyInstanceAttribute",
                "ec2:ModifySpotFleetRequest",
                "ec2:CancelSpotInstanceRequests"
            ],
            "Resource": "*",
            "Condition": {
                "StringLike": {
                    "ec2:ResourceTag/resourceGroup": "*cloud-rg"
                }
            }
        },
        {
            "Sid": "SecurityGroupsRead",
            "Effect": "Allow",
            "Action": [
                "ec2:DescribeSecurityGroups"
            ],
            "Resource": "*"
        },
        {
            "Sid": "SecurityGroupCreate",
            "Effect": "Allow",
            "Action": [
                "ec2:CreateSecurityGroup"
            ],
            "Resource": [
                "arn:aws:ec2:*:<youraccountnumber>:vpc/<yourvpcid>",
                "arn:aws:ec2:*:<youraccountnumber>:security-group/*"
            ]
        },
        {
            "Sid": "SecurityGroupDelete",
            "Effect": "Allow",
            "Action": [
                "ec2:DeleteSecurityGroup"
            ],
            "Resource": "*",
            "Condition": {
                "StringLike": {
                    "ec2:ResourceTag/resourceGroup": "*cloud-rg"
                }
            }
        },
        {
            "Sid": "SecurityGroupsRulesRead",
            "Effect": "Allow",
            "Action": [
                "ec2:DescribeSecurityGroupRules"
            ],
            "Resource": "*"
        },
        {
            "Sid": "SecurityGroupsRulesWrite",
            "Effect": "Allow",
            "Action": [
                "ec2:AuthorizeSecurityGroupIngress",
                "ec2:RevokeSecurityGroupIngress"
            ],
            "Resource": "*",
            "Condition": {
                "StringLike": {
                    "ec2:ResourceTag/resourceGroup": "*cloud-rg"
                }
            }
        },
        {
            "Sid": "Quotas",
            "Effect": "Allow",
            "Action": [
                "servicequotas:ListServices",
                "servicequotas:GetServiceQuota",
                "servicequotas:ListServiceQuotas"
            ],
            "Resource": "*"
        },
        {
            "Sid": "SpotServiceLinkedRole",
            "Effect": "Allow",
            "Action": "iam:CreateServiceLinkedRole",
            "Resource": "arn:aws:iam::*:role/aws-service-role/spot.amazonaws.com/*",
            "Condition": {
                "StringLike": {
                    "iam:AWSServiceName": "spot.amazonaws.com"
                }
            }
        },
        {
            "Sid": "Ec2FleetServiceLinkedRole",
            "Effect": "Allow",
            "Action": "iam:CreateServiceLinkedRole",
            "Resource": "arn:aws:iam::*:role/aws-service-role/ec2fleet.amazonaws.com/*",
            "Condition": {
                "StringLike": {
                    "iam:AWSServiceName": "ec2fleet.amazonaws.com"
                }
            }
        }
    ]
}
Policy for Public Networks with Custom VM Roles
Replace "Account-Id", "RoleName1", and "RoleName2" with the name or names of your account ID and custom VM roles. You can specify one role or as many as you want.
{
    "Version": "2012-10-17",
    "Statement": [
        {
            "Sid": "VisualEditor0",
            "Effect": "Allow",
            "Action": [
                "servicequotas:ListServices",
                "ec2:AuthorizeSecurityGroupIngress",
                "ec2:DeleteSubnet",
                "ec2:DescribeInstances",
                "ec2:RequestSpotInstances",
                "ec2:CreateVpc",
                "ec2:RequestSpotFleet",
                "ec2:AttachInternetGateway",
                "ec2:DescribeSpotInstanceRequests",
                "servicequotas:GetServiceQuota",
                "ec2:ModifySubnetAttribute",
                "ec2:DescribeInternetGateways",
                "ec2:ModifySpotFleetRequest",
                "ec2:DescribeNetworkInterfaces",
                "ec2:StartInstances",
                "ec2:CreateRoute",
                "ec2:CreateInternetGateway",
                "ec2:CreateSecurityGroup",
                "ec2:DeleteInternetGateway",
                "ec2:ModifyInstanceAttribute",
                "ec2:DescribeRouteTables",
                "servicequotas:ListServiceQuotas",
                "ec2:DescribeCapacityReservations",
                "ec2:TerminateInstances",
                "ec2:DescribeLaunchTemplates",
                "ec2:ModifyLaunchTemplate",
                "ec2:DescribeLaunchTemplateVersions",
                "ec2:DeleteLaunchTemplateVersions",
                "ec2:CreateTags",
                "ec2:RunInstances",
                "ec2:CreateFleet",
                "ec2:DetachInternetGateway",
                "ec2:StopInstances",
                "ec2:DescribeSecurityGroups",
                "ec2:CreateLaunchTemplateVersion",
                "ec2:RevokeSecurityGroupIngress",
                "ec2:DescribeImages",
                "ec2:CancelSpotInstanceRequests",
                "ec2:CreateLaunchTemplate",
                "ec2:DescribeSecurityGroupRules",
                "ec2:DescribeVpcs",
                "ec2:DeleteSecurityGroup",
                "ec2:DeleteVpc",
                "ec2:CreateSubnet",
                "ec2:DescribeIamInstanceProfileAssociations",
                "ec2:DescribeSubnets",
                "ec2:DescribeAvailabilityZones",
                "ec2:DescribeInstanceTypeOfferings"
            ],
            "Resource": "*"
        },
     {
             "Effect": "Allow",
            "Action": "iam:CreateServiceLinkedRole",
            "Resource": "arn:aws:iam::*:role/aws-service-role/spot.amazonaws.com/*",
            "Condition": {
                "StringLike": {
                    "iam:AWSServiceName": "spot.amazonaws.com"
                }
            }
        },
        {
            "Sid": "VisualEditor1",
            "Effect": "Allow",
            "Action": "iam:CreateServiceLinkedRole",
            "Resource": "arn:aws:iam::*:role/aws-service-role/ec2fleet.amazonaws.com/*",
            "Condition": {
                "StringLike": {
                    "iam:AWSServiceName": "ec2fleet.amazonaws.com"
                }
            }
        },
        {
            "Sid": "VisualEditor2",
            "Effect": "Allow",
            "Action": [
                "iam:AttachRolePolicy",
                "iam:PutRolePolicy"
            ],
            "Resource": "arn:aws:iam::*:role/aws-service-role/ec2fleet.amazonaws.com/*"
        },
      {
            "Sid": "VisualEditor3",
            "Effect": "Allow",
            "Action": [
                "iam:GetRole",
                "iam:PassRole"
            ],
            "Resource": [
                "arn:aws:iam::<Account-Id>:role/<RoleName1>",
                "arn:aws:iam::<Account-Id>:role/<RoleName2>"
            ]
        },

    {
            "Sid": "VisualEditor4",
            "Effect": "Allow",
            "Action": [
                "ec2:DisassociateIamInstanceProfile",
                "ec2:AssociateIamInstanceProfile"
            ],
            "Resource": "",
            "Condition": {
                "StringEquals": {
                    "ec2:ResourceTag/incredibuild": "1"
                }
            }
        }
    ]
}
Policy for Private Networks with Custom VM Roles
Replace "youraccountnumber" and "vpcid" with your account information.
Replace "Account-Id", "RoleName1", and "RoleName2" with the name or names of your account ID and custom VM roles. You can specify one role or as many as you want.
{
  "Version": "2012-10-17",
  "Statement": [
    {LaunchTemplatesRead
      "Sid": "Subnets",
      "Effect": "Allow",
      "Action": [
        "ec2:DescribeSubnets"
      ],
      "Resource": "*"
    },
    {
      "Sid": "Vpc",
      "Effect": "Allow",
      "Action": [
        "ec2:DescribeInternetGateways",
        "ec2:DescribeVpcs"
      ],
      "Resource": "*"
    },
    {
      "Sid": "Images",
      "Effect": "Allow",
      "Action": [
        "ec2:DescribeImages"
      ],
      "Resource": "*"
    },
    {
      "Sid": "Tags",
      "Effect": "Allow",
      "Action": [
        "ec2:CreateTags"
      ],
      "Resource": "*"
    },
    {
      "Sid": "LaunchTemplatesRead",
      "Effect": "Allow",
      "Action": [
        "ec2:DescribeLaunchTemplates"
        "ec2:DescribeLaunchTemplateVersions"
      ],
      "Resource": "*"
    },
    {
      "Sid": "LaunchTemplatesCreate",
      "Effect": "Allow",
      "Action": [
        "ec2:CreateLaunchTemplate"
      ],
      "Resource": "*"
    },
    {
      "Sid": "LaunchTemplatesUpdate",
      "Effect": "Allow",
      "Action": [
        "ec2:ModifyLaunchTemplate",
        "ec2:CreateLaunchTemplateVersion",
        "ec2:DeleteLaunchTemplateVersions"
      ],
      "Resource": "*"
    },
    {
      "Sid": "InstancesRead",
      "Effect": "Allow",
      "Action": [
        "ec2:DescribeCapacityReservations",
        "ec2:DescribeInstances",
        "ec2:DescribeSpotInstanceRequests",
        "ec2:DescribeAvailabilityZones",
        "ec2:DescribeInstanceTypeOfferings"
      ],
      "Resource": "*"
    },
    {
      "Sid": "InstancesCreate",
      "Effect": "Allow",
      "Action": [
        "ec2:RunInstances",
        "ec2:CreateFleet",
        "ec2:RequestSpotFleet",
        "ec2:RequestSpotInstances"
      ],
      "Resource": "*"
    },
    {
      "Sid": "InstancesWrite",
      "Effect": "Allow",
      "Action": [
        "ec2:StartInstances",
        "ec2:StopInstances",
        "ec2:TerminateInstances",
        "ec2:ModifyInstanceAttribute",
        "ec2:ModifySpotFleetRequest",
        "ec2:CancelSpotInstanceRequests"
      ],
      "Resource": "*",
      "Condition": {
        "StringLike": {
          "ec2:ResourceTag/resourceGroup": "*cloud-rg"
        }
      }
    },
    {
      "Sid": "SecurityGroupsRead",
      "Effect": "Allow",
      "Action": [
        "ec2:DescribeSecurityGroups"
      ],
      "Resource": "*"
    },
    {
      "Sid": "SecurityGroupCreate",
      "Effect": "Allow",
      "Action": [
        "ec2:CreateSecurityGroup"
      ],
      "Resource": [
        "arn:aws:ec2:*:<youraccountnumber>:vpc/<yourvpcid>",
        "arn:aws:ec2:*:<youraccountnumber>:security-group/*"
      ]
    },
    {
      "Sid": "SecurityGroupDelete",
      "Effect": "Allow",
      "Action": [
        "ec2:DeleteSecurityGroup"
      ],
      "Resource": "*",
      "Condition": {
        "StringLike": {
          "ec2:ResourceTag/resourceGroup": "*cloud-rg"
        }
      }
    },
    {
      "Sid": "SecurityGroupsRulesRead",
      "Effect": "Allow",
      "Action": [
        "ec2:DescribeSecurityGroupRules"
      ],
      "Resource": "*"
    },
    {
      "Sid": "SecurityGroupsRulesWrite",
      "Effect": "Allow",
      "Action": [
        "ec2:AuthorizeSecurityGroupIngress",
        "ec2:RevokeSecurityGroupIngress"
      ],
      "Resource": "*",
      "Condition": {
        "StringLike": {
          "ec2:ResourceTag/resourceGroup": "*cloud-rg"
        }
      }
    },
    {
      "Sid": "Quotas",
      "Effect": "Allow",
      "Action": [
        "servicequotas:ListServices",
        "servicequotas:GetServiceQuota",
        "servicequotas:ListServiceQuotas"
      ],
      "Resource": "*"
    },
    {
      "Sid": "SpotServiceLinkedRole",
      "Effect": "Allow",
      "Action": "iam:CreateServiceLinkedRole",
      "Resource": "arn:aws:iam::*:role/aws-service-role/spot.amazonaws.com/*",
      "Condition": {
        "StringLike": {
          "iam:AWSServiceName": "spot.amazonaws.com"
        }
      }
    },
    {
      "Sid": "Ec2FleetServiceLinkedRole",
      "Effect": "Allow",
      "Action": "iam:CreateServiceLinkedRole",
      "Resource": "arn:aws:iam::*:role/aws-service-role/ec2fleet.amazonaws.com/*",
      "Condition": {
        "StringLike": {
          "iam:AWSServiceName": "ec2fleet.amazonaws.com"
        }
      }
    },
    {
      "Sid": "GetAndPassRole",
      "Effect": "Allow",
      "Action": [
        "iam:GetRole",
        "iam:PassRole"
      ],
      "Resource": [
        "arn:aws:iam::<Account-Id>:role/<RoleName1>",
        "arn:aws:iam::<Account-Id>:role/<RoleName2>"
      ]
    },
    {
      "Sid": "AssociateAndDisassociateIamProfile",
      "Effect": "Allow",
      "Action": [
        "ec2:DisassociateIamInstanceProfile",
        "ec2:AssociateIamInstanceProfile"
      ],
      "Resource": "",
      "Condition": {
        "StringEquals": {
          "ec2:ResourceTag/incredibuild": "1"
        }
      }
    },
    {
      "Sid": "IamInstanceProfileRulesRead",
      "Effect": "Allow",
      "Action": [
        "ec2:DescribeIamInstanceProfileAssociations"
      ],
      "Resource": "*"
    }
  ]
} -
-
Complete the policy by defining a name and clicking Create Policy. You will need the name in later steps.


Create a Custom AWS Role
-
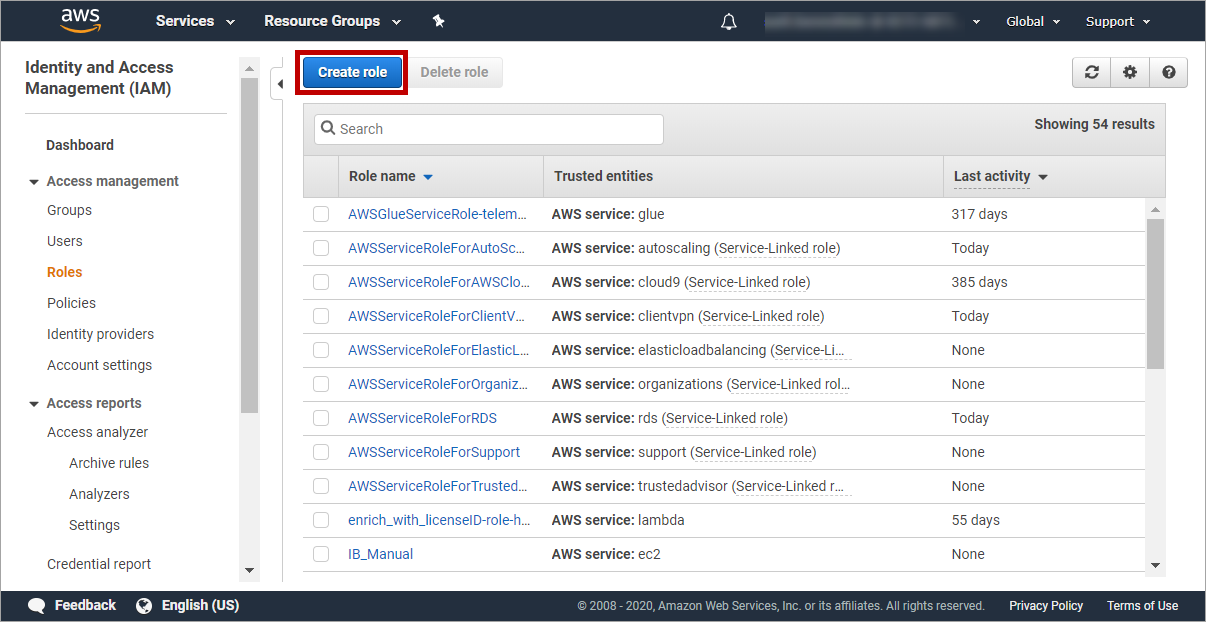
Go to Roles > Create Role.

-
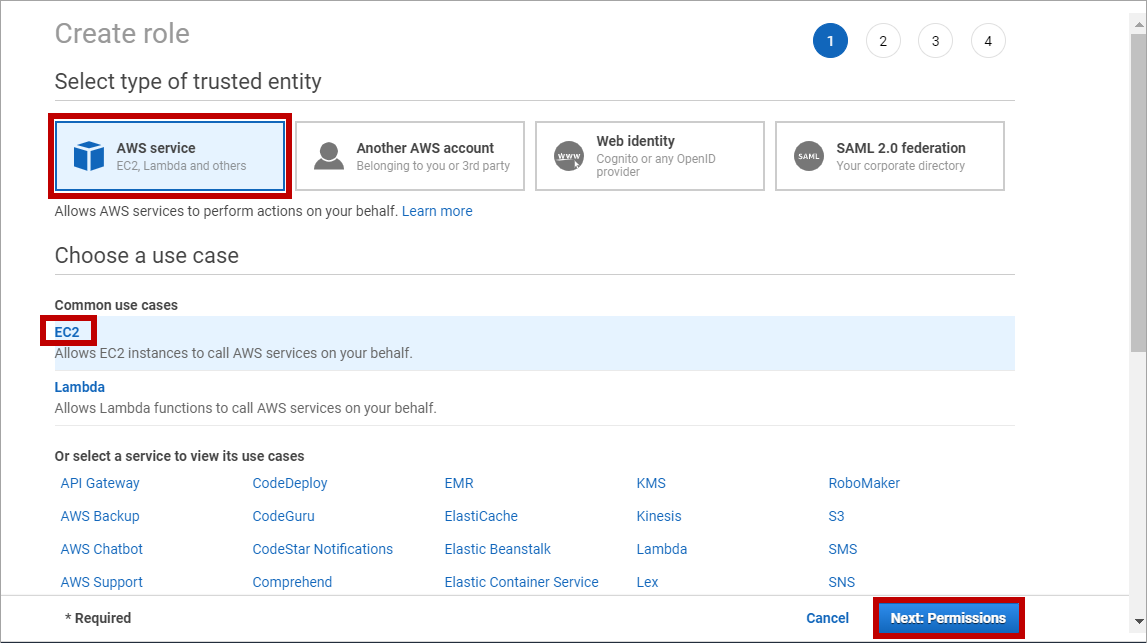
On the first page, select AWS service as the type of entity, and EC2 as the common use case.

-
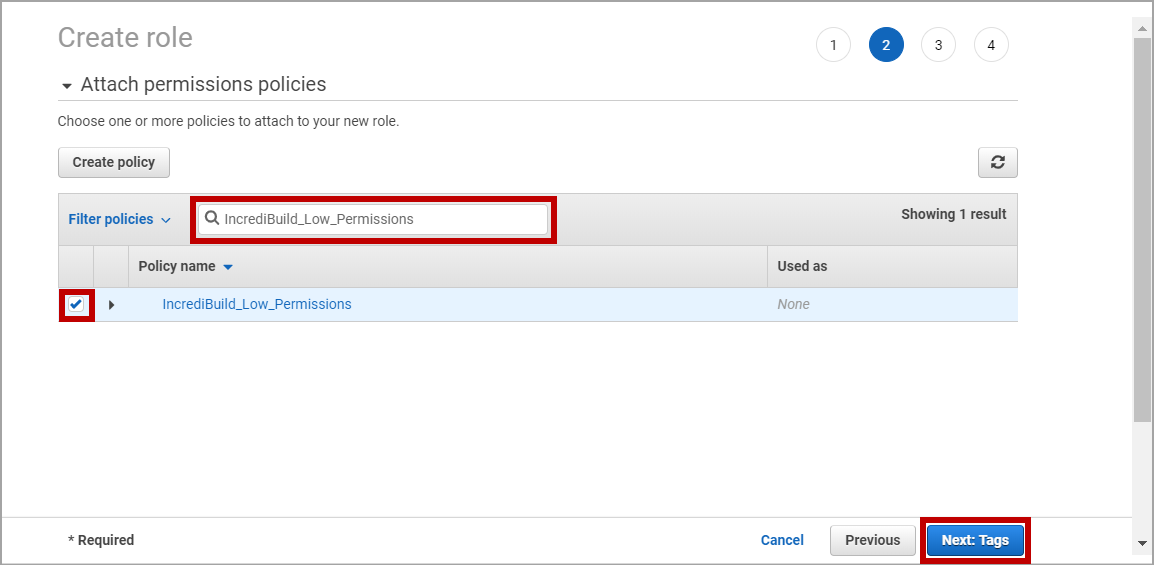
On the second page, use the Filter policies box to find the custom policy you previously created and click its check box.

-
[Optional] On the third page, you can add tags to the new role you are creating.
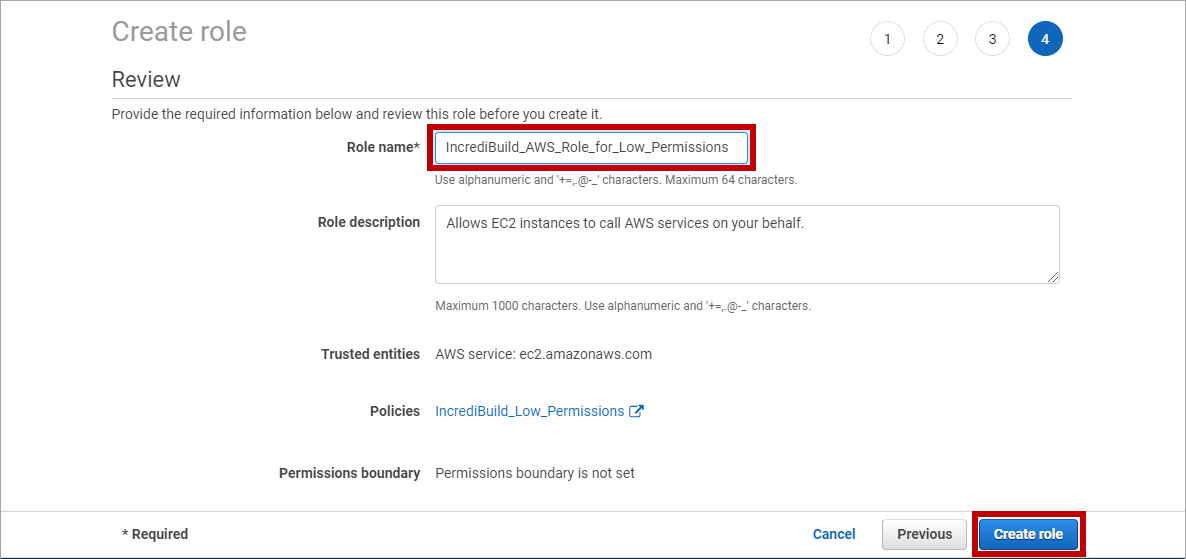
-
On the fourth page, enter a name for the new role and click Create role.
-
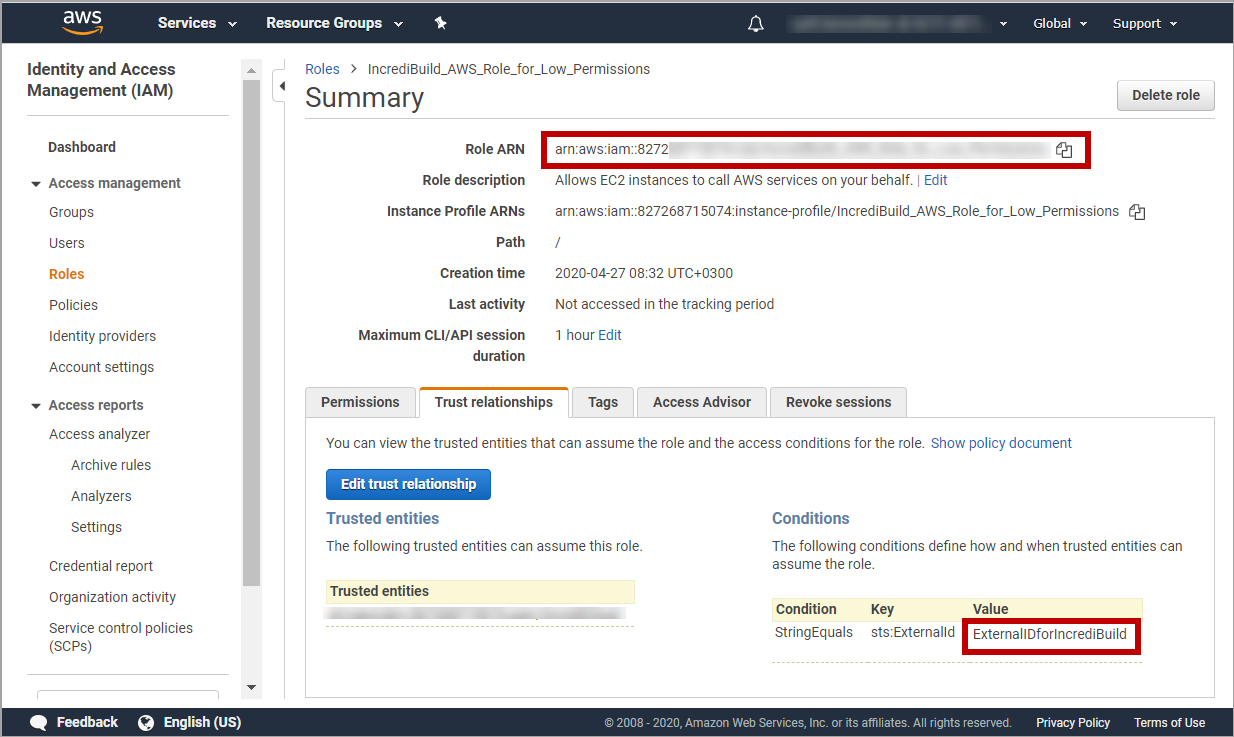
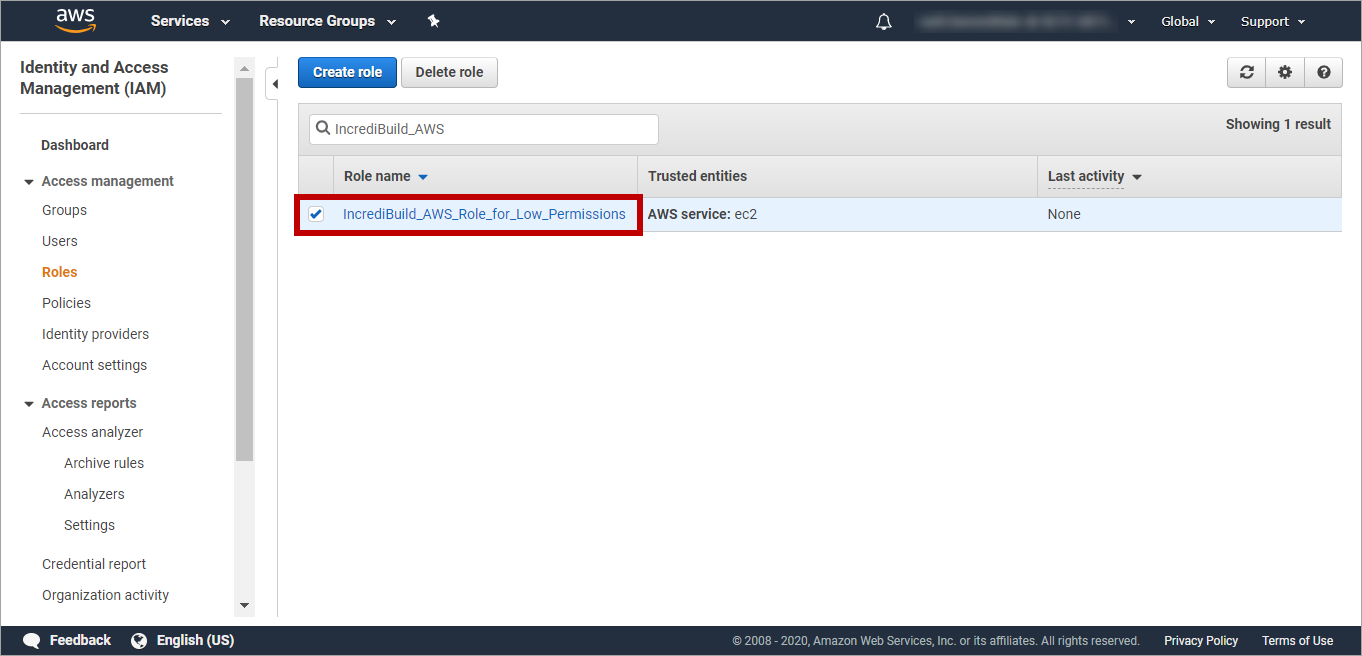
On the Roles page, locate the newly created role. Then, select its check box and click it to open it:

-
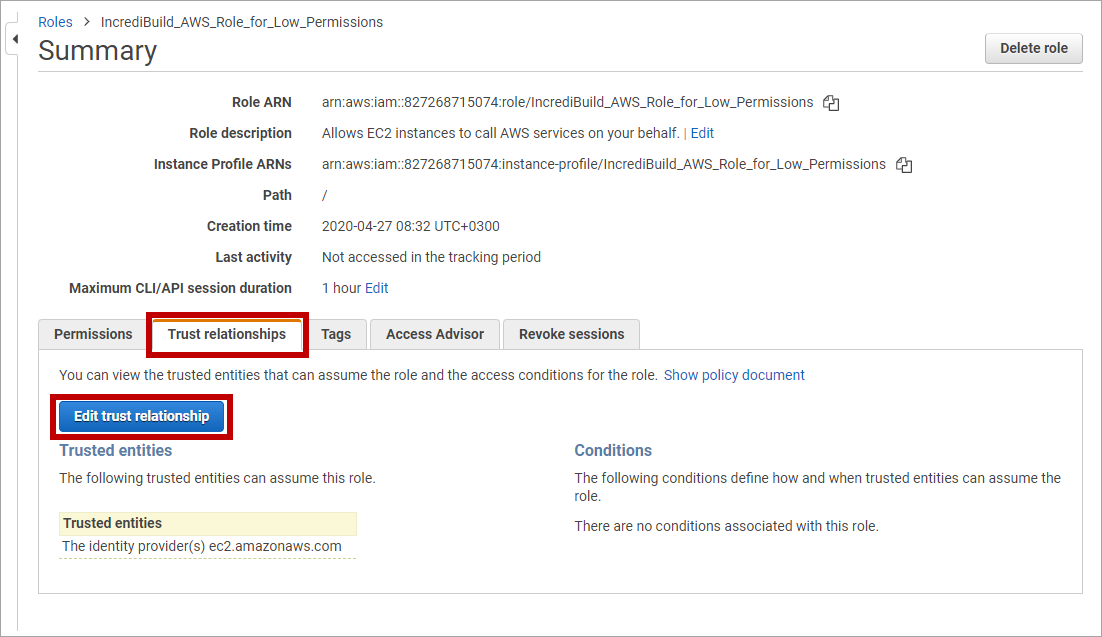
On the Summary page of the new role, click the Trust relationships tab. Then, click the Edit trust relationship button:

-
On the Edit Trust Relationship page, delete the existing content and replace it with this code:
{
"Version": "2012-10-17",
"Statement": [
{
"Effect": "Allow",
"Principal": {
"AWS": "arn:aws:iam::827268715074:user/incrediCloud" },
"Action": "sts:AssumeRole",
"Condition": {
"StringEquals": {
"sts:ExternalId": "<New_String_for_Your_External_ID>" }
}
}
]
}
Enter any unique string without special characters in place of "New_String_for_Your_External_ID". You will need to provide it to Incredibuild during activation.
-
After you entered your unique External ID to the Policy Document pane, click the Update Trust Policy button. You return to the Summary page of the role you created. In this Summary page you can find the required login details for activating Incredibuild Cloud with lower permissions: