

Prerequisites
- Create an Incredibuild grid that consists of the following:
- Initiator
- Coordinator
- Helper (on Windows, SCL or Linux) which will be used to create the Launch Template.
- Ensure that you know the credentials or have the PKI key of the Helper machine.
- Ensure that hostname of the Helper machine is NOT static.
- Ensure that the Incredibuild grid (especially the Helper) is working prior to creating the Auto Scaling group. Do this by testing the build capability and ensuring the Helper is used during the build.
Create an Auto Scaling Group using AWS CLI
- Copy the following values from the Incredibuild grid:
-
Helper instance:
<instanceID> -
Subnet:
<SubnetID> -
Security group or list of security groups:
<SecurityGroup>
- Select a VM size for machines to be created by the Auto Scaling group:
- Instance type:
<instanceType>, for example, c5a.2xlarge
- Stop the Helper instance:
- Create the AMI (image) from the Helper instance:
- Copy the AMI ID
<amiID>, for example:
- Check the AMI creation state:
- When the returned State is available, create the Launch Template:
- Note the launch template ID
<LaunchTemplateId>, for example:
- Create the Auto Scaling group, changing the max-size to the required integer value:
- Add a scaling policy to the Auto Scaling group based on metrics of CPU utilization (50%):
Create an Auto Scaling Group using AWS Console
Gather Incredibuild Initiator Information
- Sign in to the AWS Management Console.
- Navigate to the EC2 > Instances.
- Select the Initiator instance and copy the following info:
- VPC ID
- Subnet ID
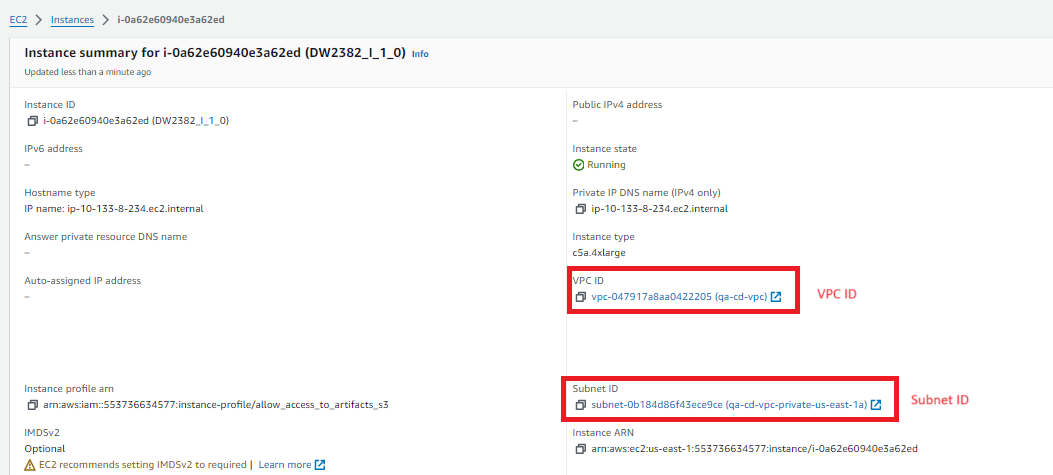
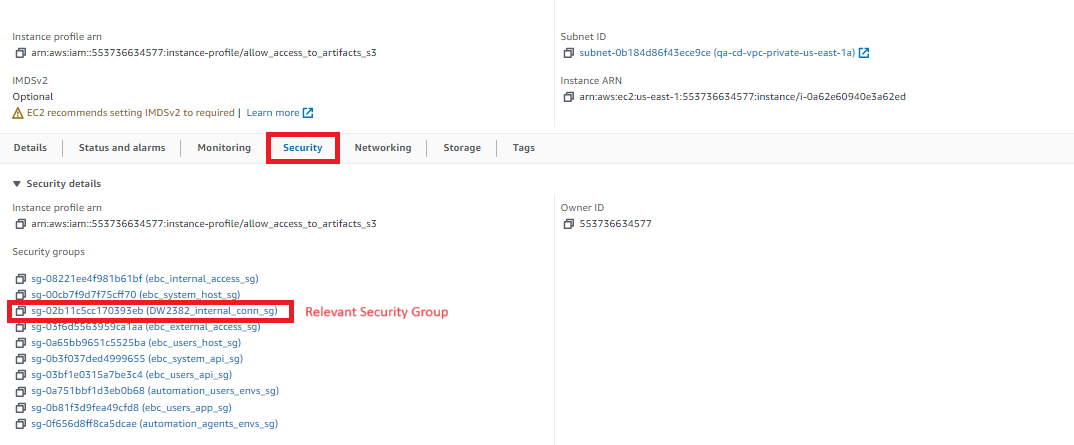
- Select the Security tab and copy the required Security Group.
Create an AMI from Helper Machine
- Sign in to the AWS Management Console.
- Navigate to EC2 > Instances.
- Select the Helper instance and choose Instance state > Stop instance. When prompted for confirmation, choose Stop. It can take a few minutes for the instance to stop.
- To create the AMI, select the Helper instance, select Actions > Image and templates > Create image.
- Enter the Image name.
- Select Tag image and snapshots together.
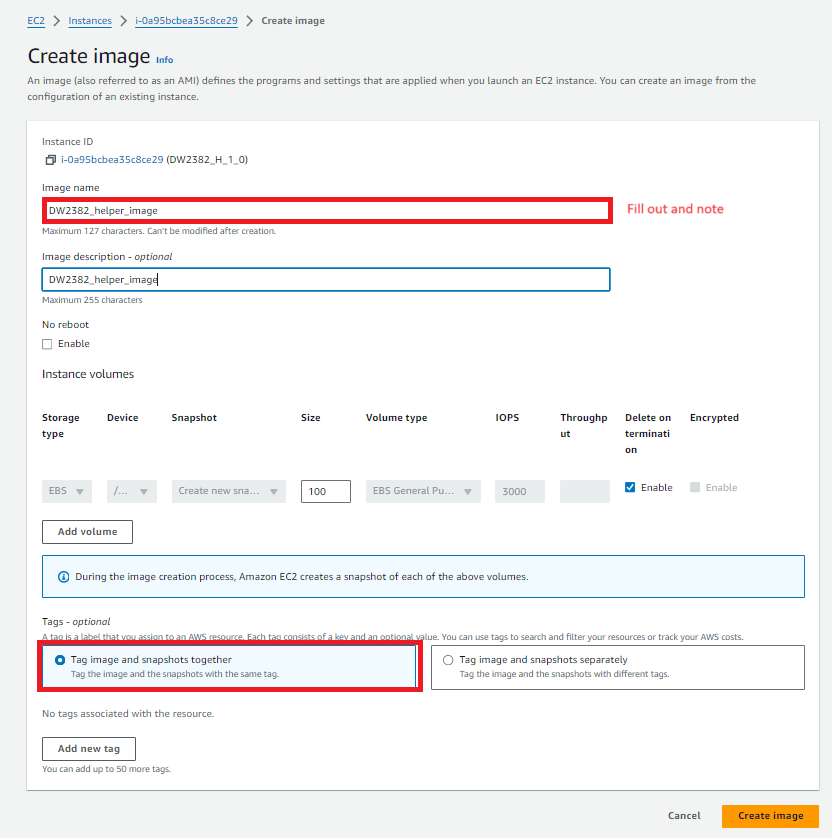
- Click Create image.
- Copy the Image name for future use.

Create Template from AMI
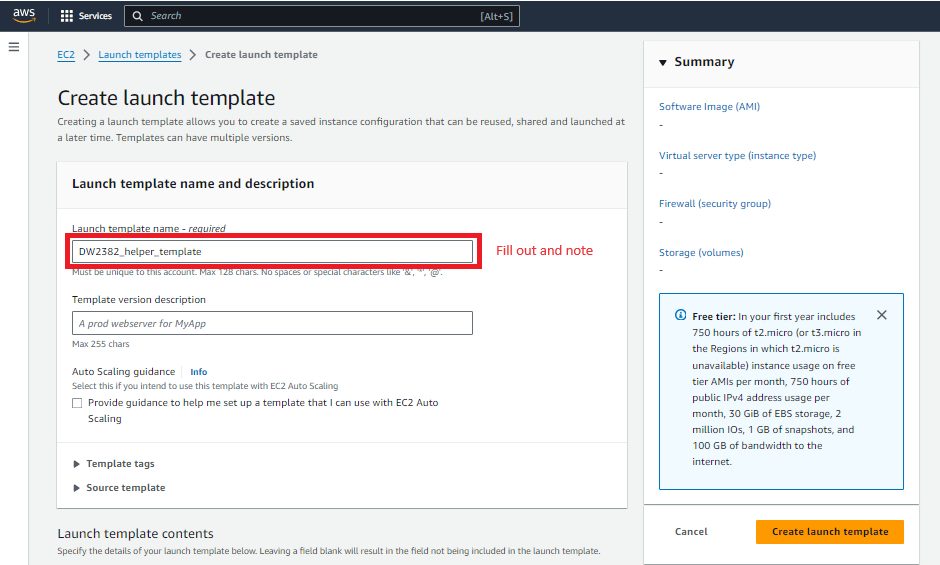
- In EC2 > Instances, select Launch Templates > Create launch template.
- Enter the Launch template name.
- Copy the Launch template name for future use.
- Under Application and OS Images (Amazon Machine Image), paste the AMI Image name.
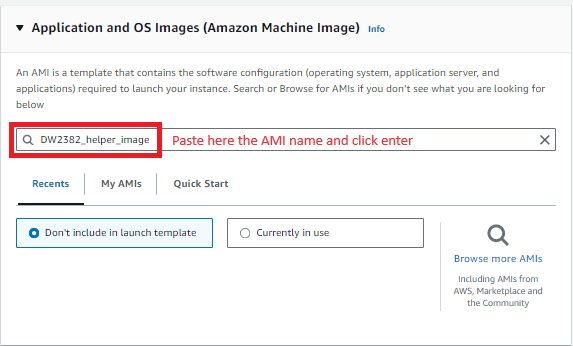
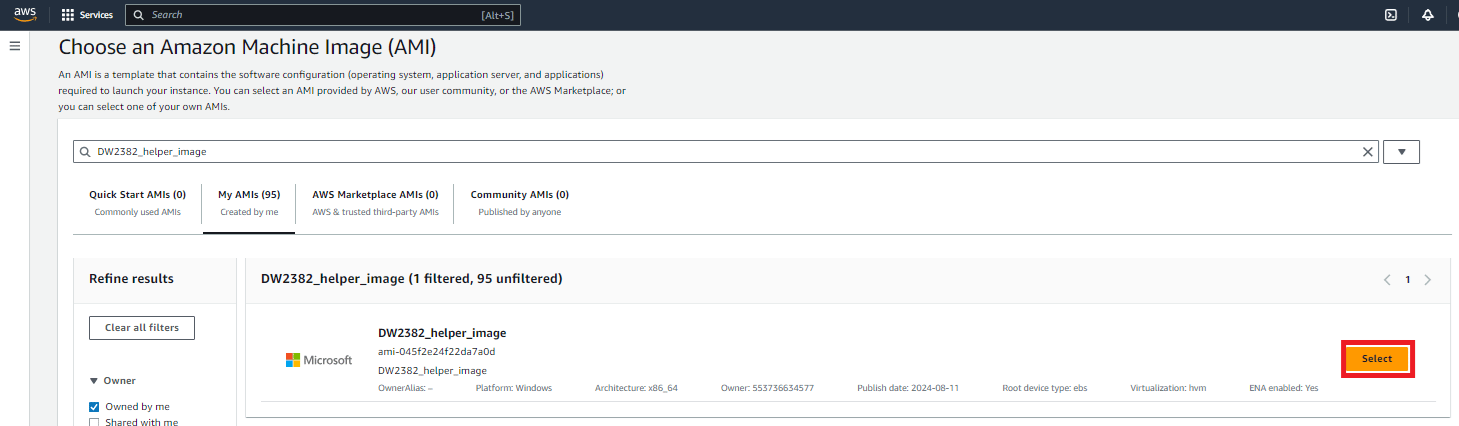
- Press Enter. The Choose an Amazon Machine Image (AMI) page appears.
- Select your AMI image and then click Select.
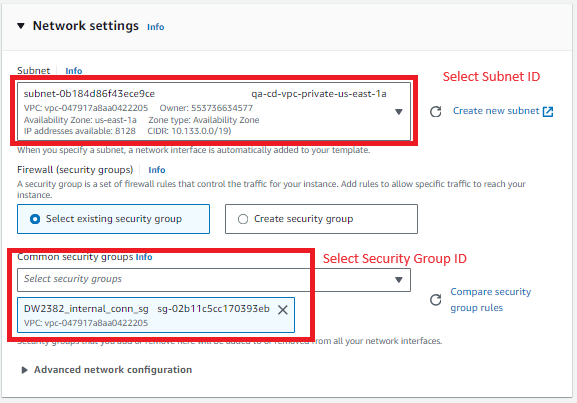
- Scroll down and configure the Network settings:
- From the Subnet dropdown, select the SubnetID.
- From the Common security groups dropdown, select the Security Group ID of the grid.
- Click Create Launch template.
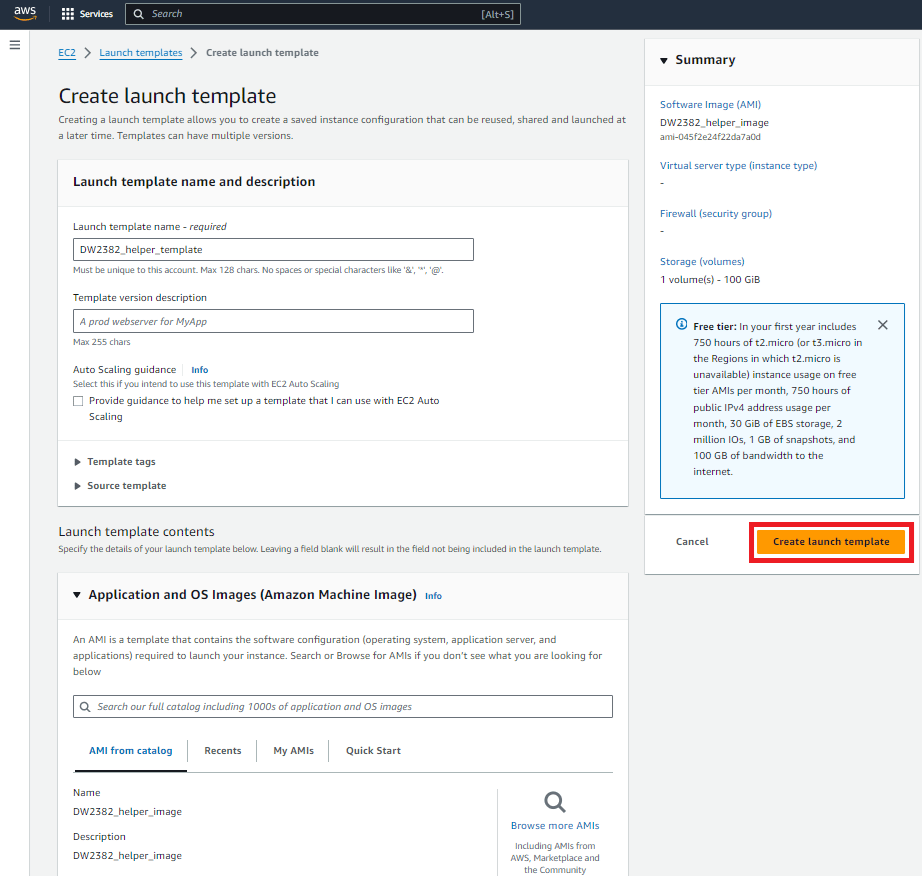
- Once created, a Success message appears.
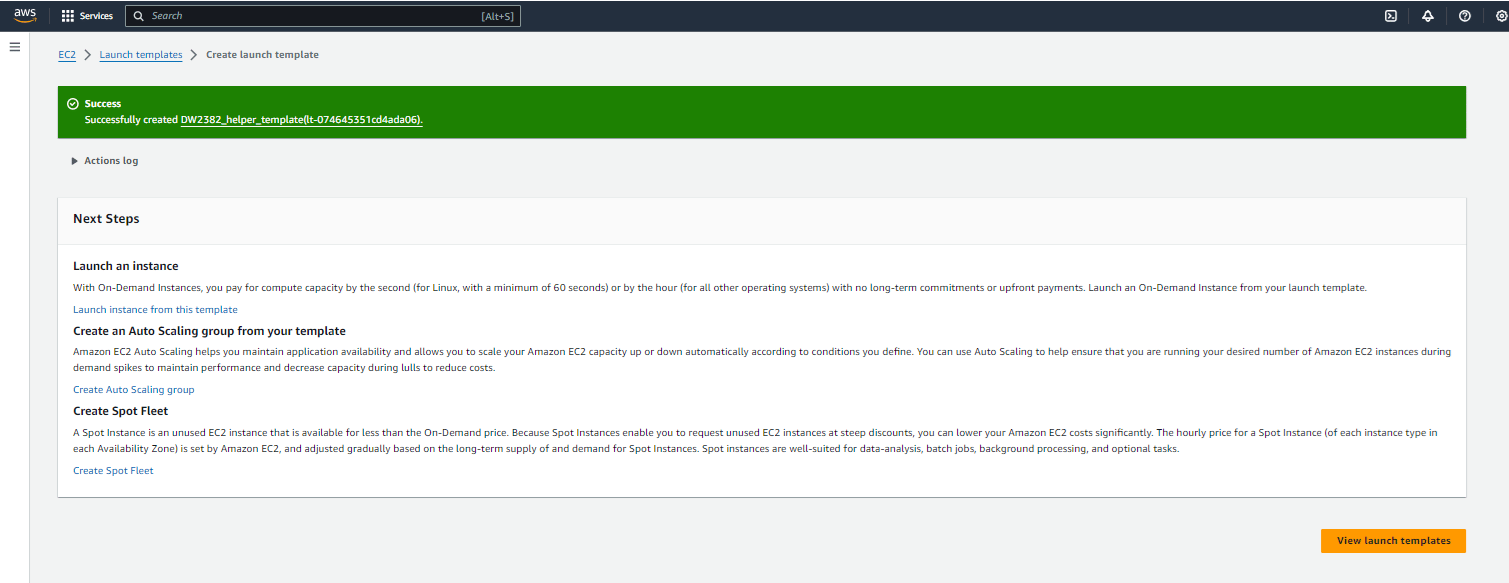
Create Auto Scaling Group from Template
- In EC2, select Auto Scaling > Auto Scaling Groups.
- Click Create Auto Scaling group. A wizard appears.
- In Step 1 - Choose launch template or configuration, configure the following:
- Enter the Auto Scaling Group name.
- From the Launch template dropdown, select the template to be used for machine creation in the Auto Scaling group (created in Create Template from AMI).
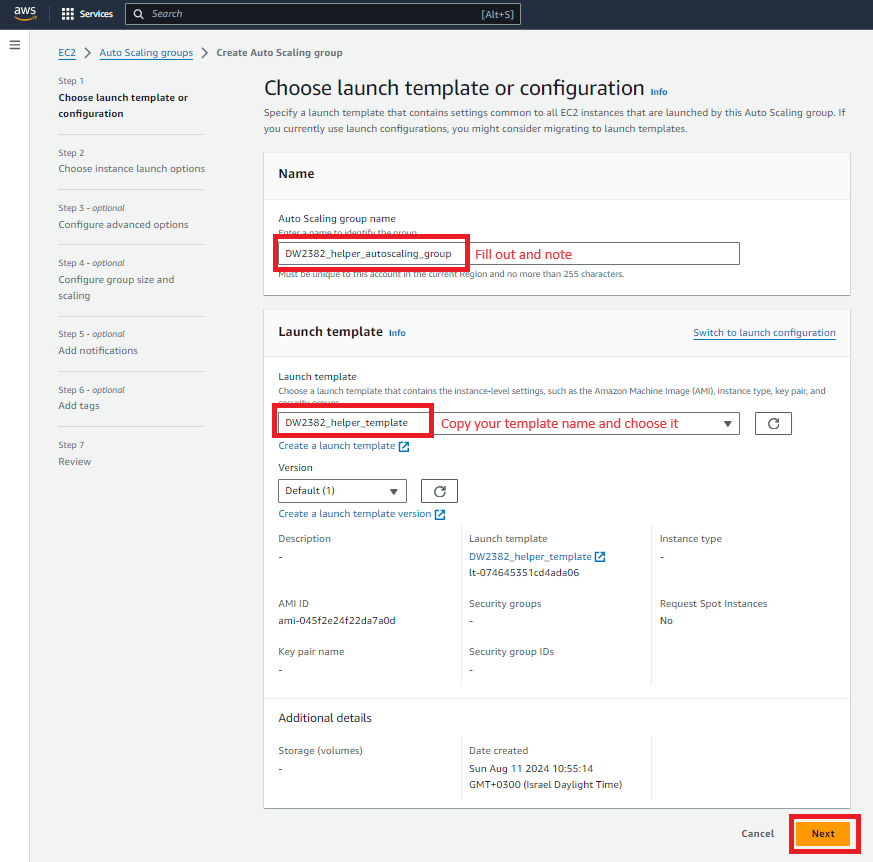
- Click Next.
- In Step 2- Choose instance launch options configure the following:
- In the Instance type requirements area, select the base model for the Helper machine to be used for scaling. Either select a specific AWS instance type or configure it manually.
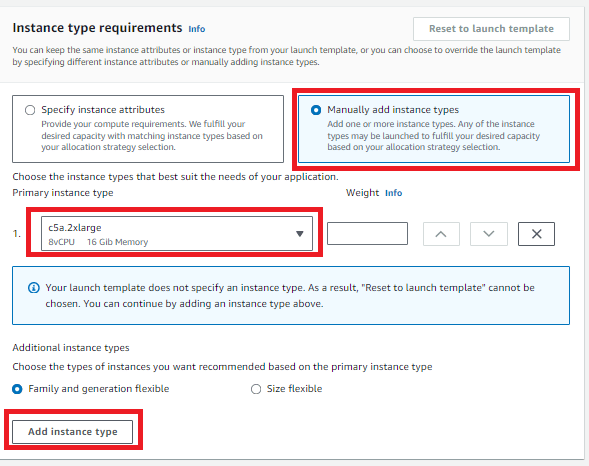
- (Optional) In the Instance purchase options area, select On-Demand or Spot instances.
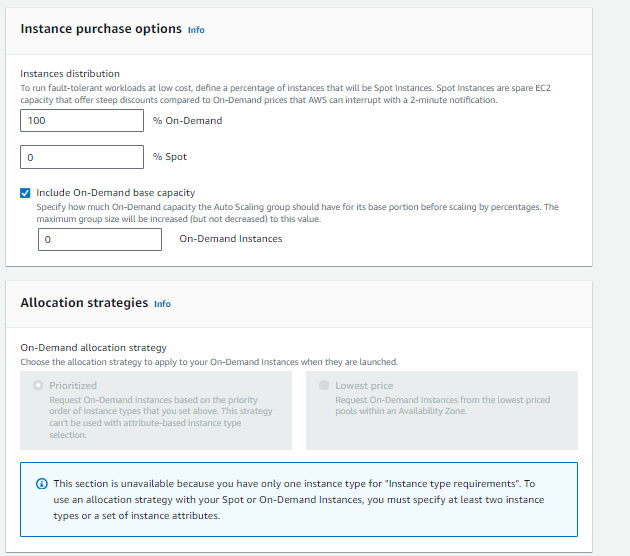
- In the Network area, select the VPC ID and Subnet ID copied from the Initiator configuration.
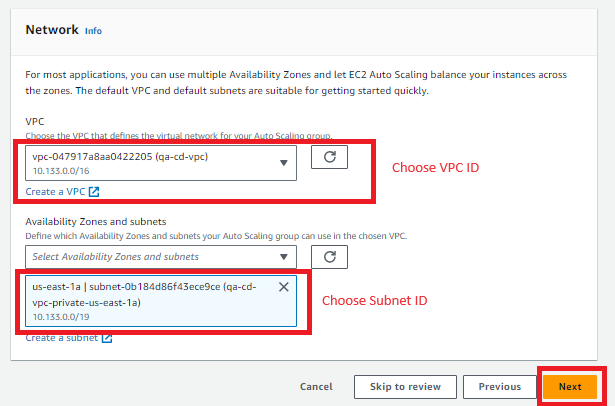
- Click Next.
- In Step 3(optional) - Configure advanced options, click Next.
- In Step 4 (optional) - Configure group size and scaling, provision the scaling of the Helpers group:
- In the Group size area, enter the Desired capacity of the group.
- In the Scaling area, enter the Min desired capacity and Max desired capacity (minimum and maximum number of Helpers in the grid).
- Select the Target tracking scaling policy.
- From the Metric type dropdown, select Average CPU utilization. This metric is used for sizing.
- Enter a Target Value, for example, 50, meaning 50% CPU usage.
- In Instance warmup, enter the number of seconds that it takes for a newly launched instance to warm up. Until its specified warmup time has expired, an instance is not counted toward the aggregated EC2 instance metrics. In this example, 60 seconds.
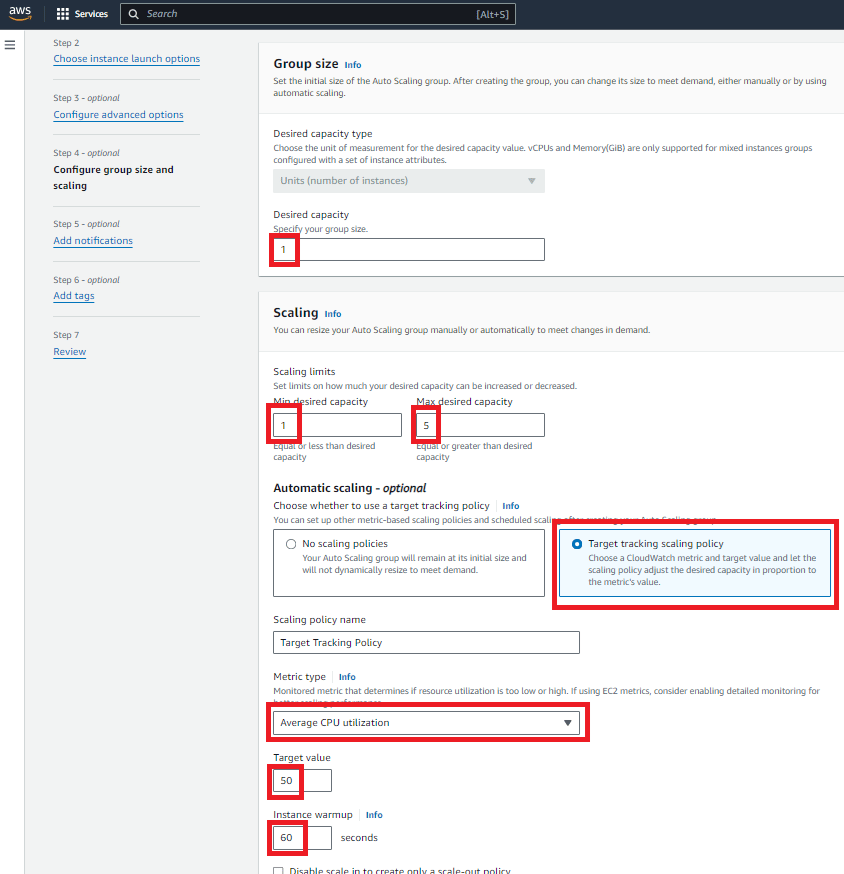
- Click Next until you get to the end of the wizard.
- Click Skip to review at the bottom of the page.
- In the Review page, scroll down and click Create Auto Scaling group. The Auto Scaling Groups page appears.

- Note that the first Helper instance is started (Updating capacity).
- Click on group Name.
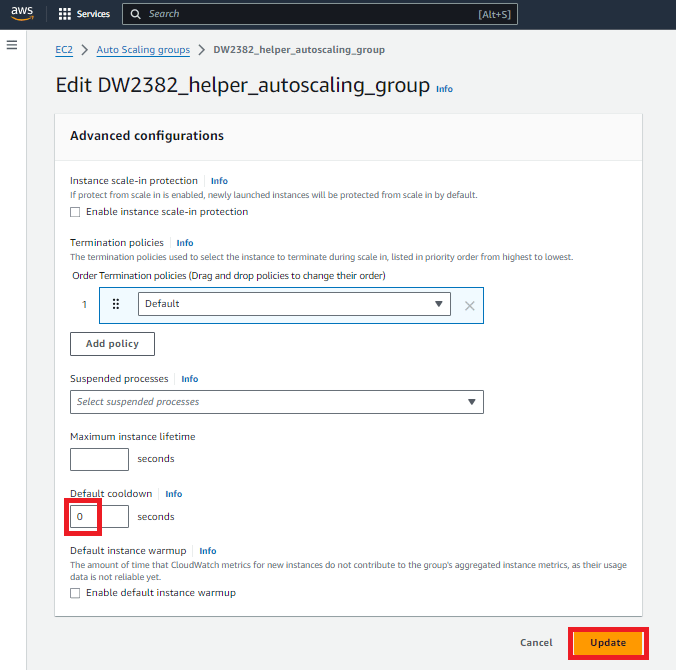
- On the Details tab, scroll down to Advanced configurations and click Edit.
- Set the Default cooldown to 0 second.
- Click Update. This means that instances are terminated immediately when there is no need for scale capacity.
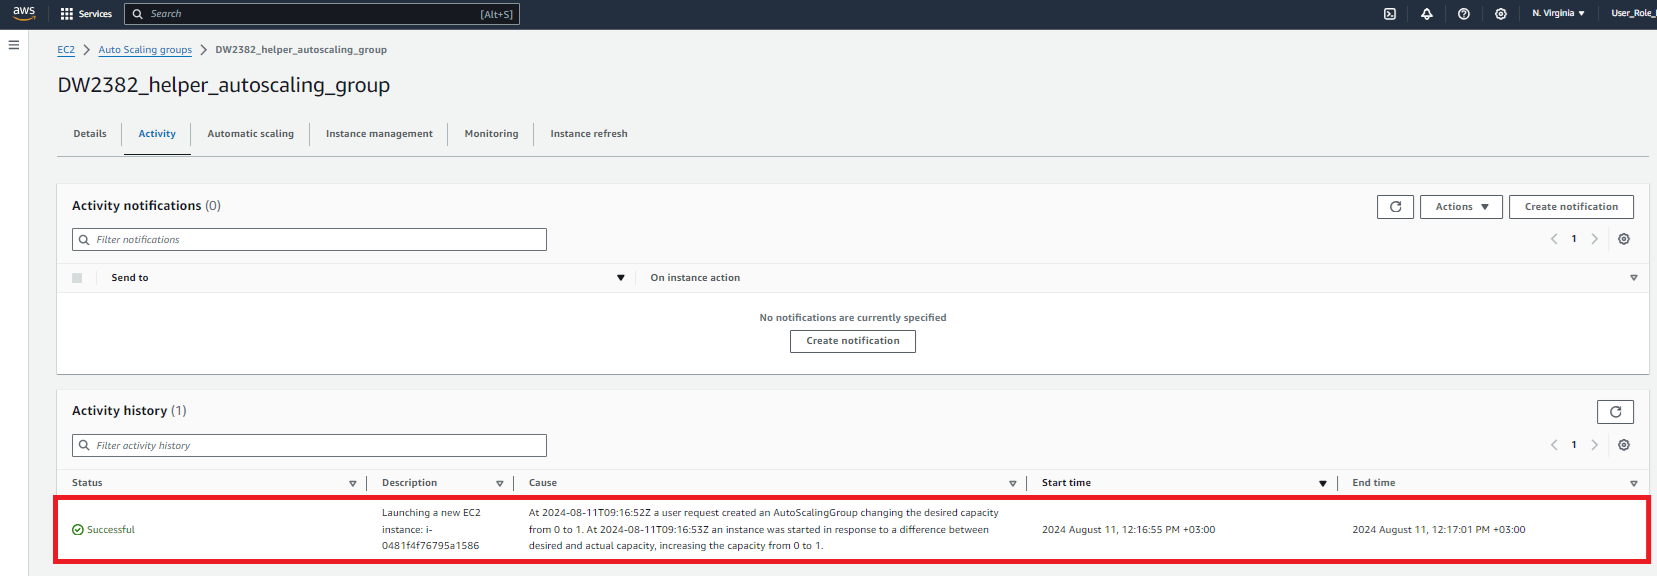
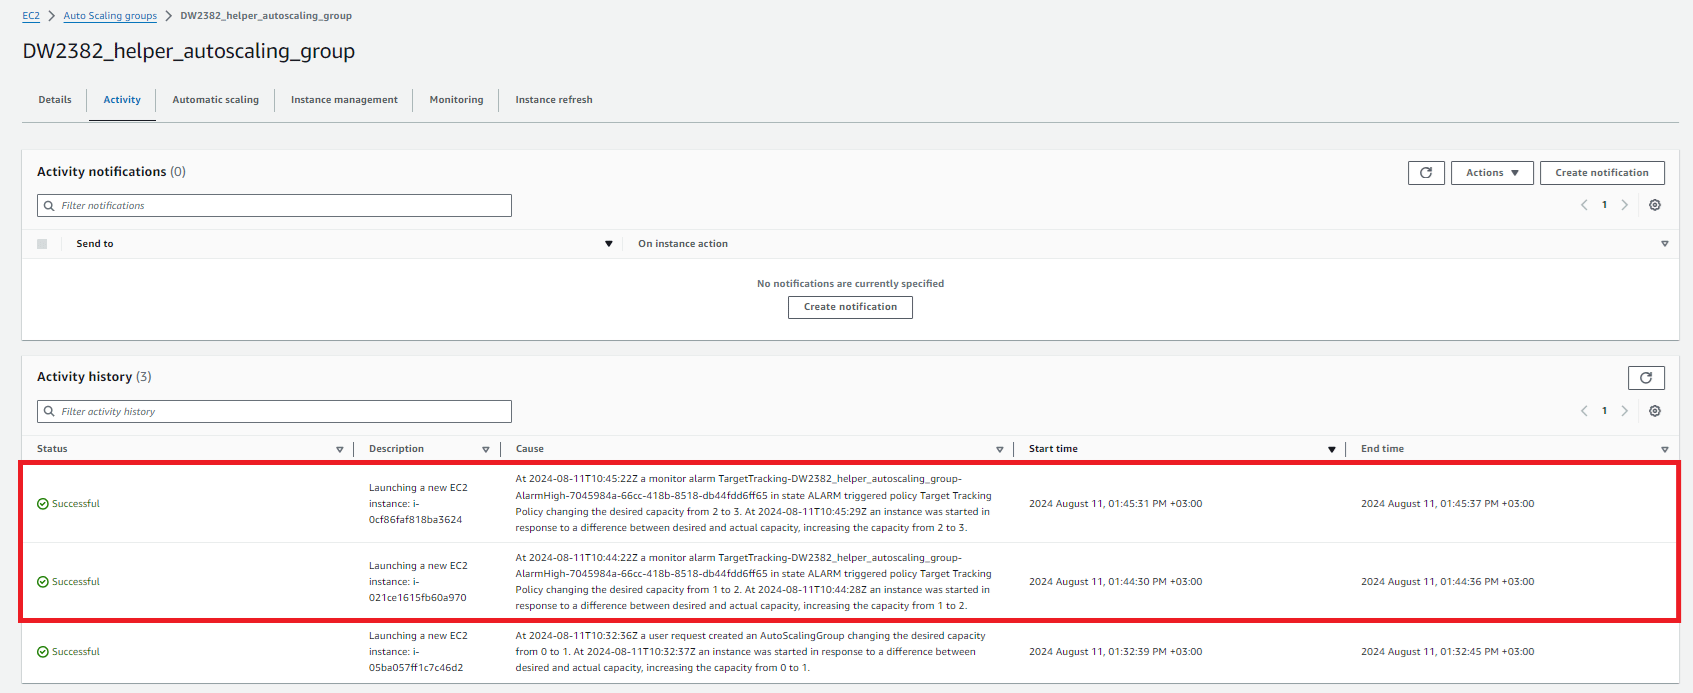
- On the Activity tab, view the log of the latest actions. Each time an additional instance is created or terminated, it appears in the log.
- On the Instance management tab, view the details of the active instances. For example, when a new Helper is created. The new Helper instance also appears in the Coordinator Management page a short while later.

- Now start the build with Incredibuild. When the CPU utilization on the Helper machine exceeds 50%, new instances are created.
- Navigate to your group in EC2 > the Auto Scaling groups, and view the Activity history in the Activity tab.
Create an Auto Scaling Group with Mixed Instance Types
Create an Auto Scaling Group with Mixed Instance Types using AWS Console
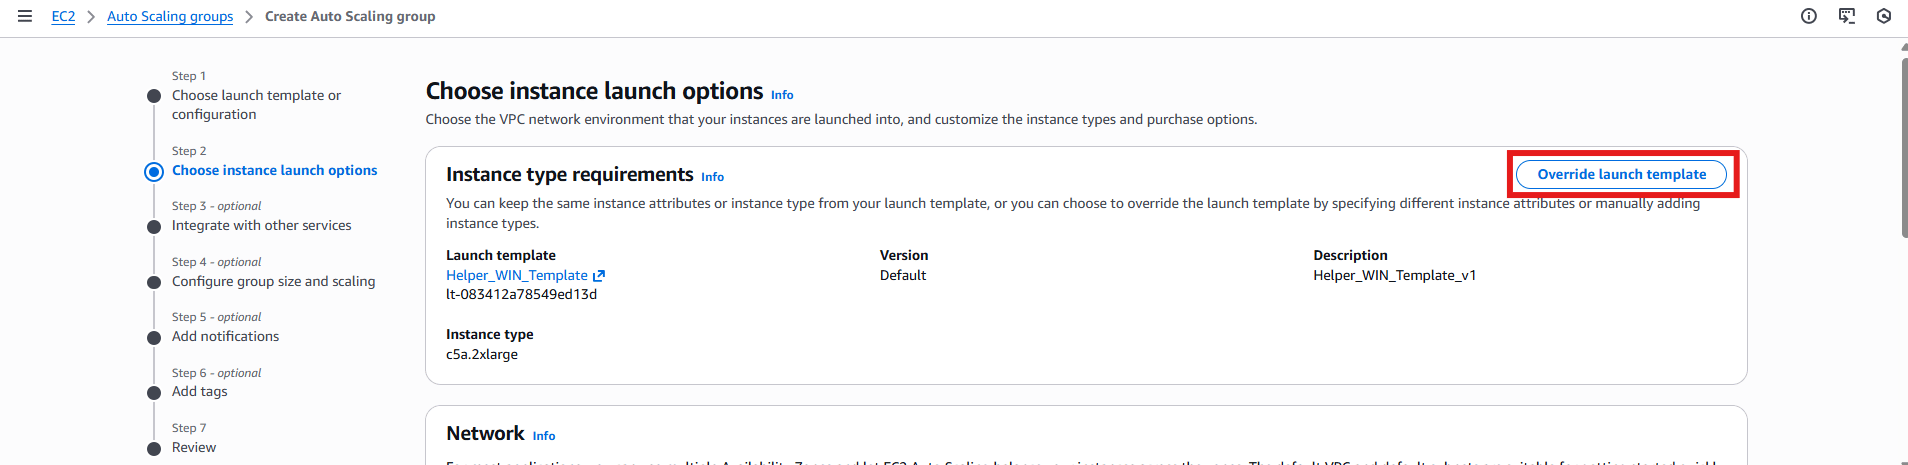
- To create an Auto Scaling group with mixed instance types, in Step 2- Choose instance launch options click Override launch template.
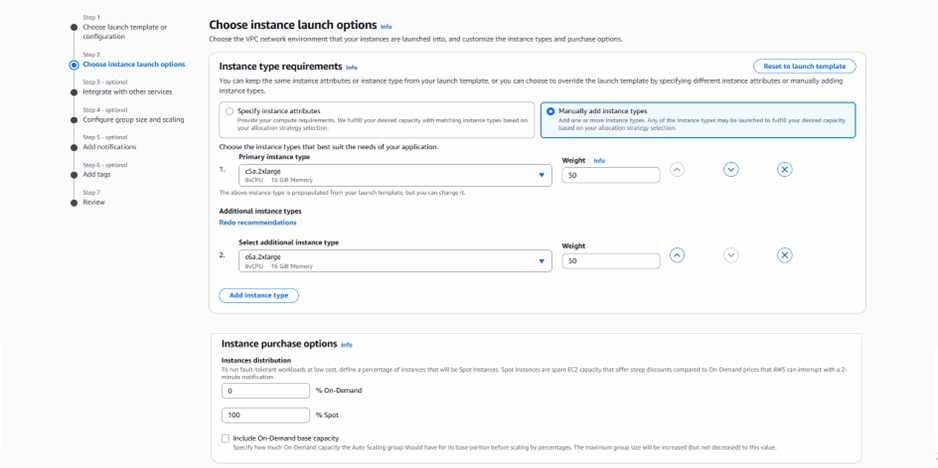
- Configure the specific Instance types requirements and the On-Demand and Spot instances.
Create an Auto Scaling Group with Mixed Instance Types using AWS CLI
- To create an Auto Scaling group with mixed instance type in AWS CLI:
Create an SCL Helper for the Auto Scaling Group
Create an SCL Helper
A VPC, subnet and security groups are required to connect the Auto Scaling group instance to an existing Incredibuild grid (Coordinator/Initiator machines) and to your machine for AMI updates.- In the AWS Management Console, navigate to EC2 > AMI Catalog.
- Filter, locate, and select the required AMI.

- In the upper-right corner, click Launch instance from AMI. The Launch an instance page appears.
-
Complete the following:
- Name: Helper-SCL
- Instance type: c5a.2xlarge
- Key pair (login): If you already have a key pair that you use to connect to your instances, select it. Otherwise, choose Create new key pair. A
<key_pair_name>.pemfile will be downloaded and can be used to connect to the instance. - Network settings: Select the appropriate VPC, subnet, and security group(s).
- Configure storage: At least 20 GB.
- Click Launch instance.

- Copy the Instance ID (for example, i-0b0edfce604652eff) and open the instance details page.
- Once the instance reaches the Running state, note its Public IPv4 address. Use SSH or SCP to connect to the instance. On Windows, it is recommended to use a Bash-based SSH client, such as Git Bash or MobaXterm.
-
Before proceeding, obtain the Incredibuild console installer (
ibsetup_<version>_console.exe). Ensure that the installer version matches the Incredibuild version deployed in your grid. - Create a folder named SCL and copy the installer into it.
- Within the SCL folder, create a file named Dockerfile with the following contents:
- Note: The Helper is created in the Universal Helpers build group, and it will be able to allocate Helper cores to all available Initiators in the grid.
- Create a file named winemodal.sh with the following contents:
- Tar (or 7zip on Windows) the SCL folder with the three files:
- winemodal.sh
- Dockerfile
-
ibsetup_<version>_console.exe
- In Bash, for example, Git Bash:
- Once the file is copied to the instance, connect to the instance with SSH:
- Once logged in, run the following commands:
- Connect again with SSH:
- Once logged in, run the following commands:
Create an AMI from SCL Helper using AWS Console
- Sign in to the AWS Management Console.
- Navigate to EC2 > Instances.
- Select the Helper instance and choose Instance state > Stop instance. When prompted for confirmation, choose Stop. It can take a few minutes for the instance to stop.
- To create the AMI, select the Helper instance, select Actions > Image and templates > Create image.
- Enter the Image name (Helper-SCL).
-
Add a new tag with
Key=NameandValue=Helper-SCL. - Click Create image.
Create an AMI from SCL Helper using AWS CLI
- To create an AMI from SCL Helper in AWS CLI:
Create a Windows Helper for the Auto Scaling Group
Create a Windows Helper
A VPC, subnet and security groups are required to connect the Auto Scaling group instance to an existing Incredibuild grid (Coordinator/Initiator machines) and to your machine for AMI updates.- In the AWS Management Console, navigate to EC2 > AMI Catalog.
- Filter, locate, and select the required AMI.
- In the upper-right corner, click Launch instance from AMI. The Launch an instance page appears.
-
Complete the following:
- Name: Helper-WIN
- Instance type: c5a.2xlarge
- Key pair (login): If you already have a key pair that you use to connect to your instances, select it. Otherwise, choose Create new key pair. A
<key_pair_name>.pemfile will be downloaded and can be used to connect to the instance. - Network settings: Select the appropriate VPC, subnet, and security group(s).
- Configure storage: At least 20 GB.
- Click Launch instance.
- Copy the Instance ID (for example, i-0b0edfce604652eff) and open the instance details page.
- Once the instance reaches the Running state, connect to it using RDP.
- Download the Remote Desktop File.
- Click Get Windows password, provide the .pem key file, and decrypt the administrator password.
- Use the downloaded RDP file and the decrypted password to connect to the Windows instance using an RDP client.
-
Before starting, prepare the Incredibuild installation file for either GUI or console installation. Use the same version that is installed in your Incredibuild grid (
ibsetup_<version>.exeoribsetup_<version>_console.exe). - Copy the installation file to the Windows instance and run the Incredibuild installation using either the GUI or the command prompt.
- If using the command prompt:
- Note: The Helper is created in the Universal Helpers build group, and it will be able to allocate Helper cores to all available Initiators in the grid.
- Once the Incredibuild installation is completed, clear the machine state. In CMD run:
- After the RDP session disconnects, create the AMI from the instance.
Create a Linux Helper for the Auto Scaling Group
Create a Linux Helper
A VPC, subnet, and security groups are required to connect the Auto Scaling Group instance to an existing Incredibuild grid (Coordinator/Initiator machines) and to your machine for AMI updates.- In the AWS Management Console, navigate to EC2 > AMI Catalog.
- Filter, locate, and select the required AMI.

- In the upper-right corner, click Launch instance from AMI. The Launch an instance page appears.
-
Complete the following:
- Name: Helper-LIN
- Instance type: c5a.2xlarge
- Key pair (login): If you already have a key pair that you use to connect to your instances, select it. Otherwise, choose Create new key pair. A
<key_pair_name>.pemfile will be downloaded and can be used to connect to the instance. - Network settings: Select the appropriate VPC, subnet, and security group(s).
- Configure storage: At least 30 GB.
- Click Launch instance.
- Note the Instance ID (for example, i-0b0edfce604652eff) and open the instance details page.
- Once the instance reaches the Running state, note its public IP address and connect to it using SSH.
-
Prepare the Linux Incredibuild installation package. Use the same version that is installed in your existing Incredibuild grid (
ibsetup_linux_<version>.run). - Copy the installation package to the instance using SCP.
- Connect to the instance using SSH.
- Make the installer executable and install the Helper.
- After the installation completes, prepare the instance for AMI creation by clearing machine-specific information.
Create an AMI from Linux Helper using AWS Console
- Sign in to the AWS Management Console.
- Navigate to EC2 > Instances.
- Select the Helper instance and choose Instance state > Stop instance. When prompted for confirmation, choose Stop. It can take a few minutes for the instance to stop.
- To create the AMI, select the Helper instance, select Actions > Image and templates > Create image.
- Enter the Image name (Helper-LIN).
-
Add a new tag with
Key=NameandValue=Helper-LIN. - Click Create image.
Create an AMI from Linux Helper using AWS CLI
- To create an AMI from Linux Helper in AWS CLI:
Optimize the AWS Auto Scaling Group with SCL or Windows
To optimize the AWS Auto Scaling group, run ibc_onprem, a python script, as a service on the Coordinator machine. This builds on the existing Auto Scaling group configuration by scaling Helpers based on actual Coordinator demand, enabling faster and more responsive provisioning than standard Auto Scaling behaviour.- Create an AMI from the Incredibuild Helper (SCL or Windows).
-
Copy the AMI ID, for example,
ami-017821fb4a6cdf386. -
Create the Auto Scaling group with the following AWS CLI script, updating the
AMI_ID,SUBNETS, andSECURITY_GROUPSvalues based on your existing grid config, as well as any optional values as described below:
- INSTANCE_TYPE_1 and INSTANCE_TYPE_2: The instance types, and if you specify different instance types, also update the INSTANCE_CPUS_1 and INSTANCE_CPUS_2 values.
- ON_DEMAND_PERCENT: Thepercentage for On-Demand instances. The remaining instances will be created as Spot instances. For 100% Spot instances, leave the parameter unchanged as 0.
- MIN_SIZE/MAX_SIZE: The minimum and maximum size for the Auto Scaling group.The maximum is a multiple of the minimum and must correspond to the CPUs specified for INSTANCE_CPUS_1 and INSTANCE_CPUS_2. For example, if there are 16 CPU cores in both machines, the minimum is 16 and the maximum is a multiple of 16 (for example, 96).
- DESIRED_CAPACITY: The initial capacity when the Auto Scaling group is created without any load (this usually corresponds to the number of CPUs in a single Helper machine).
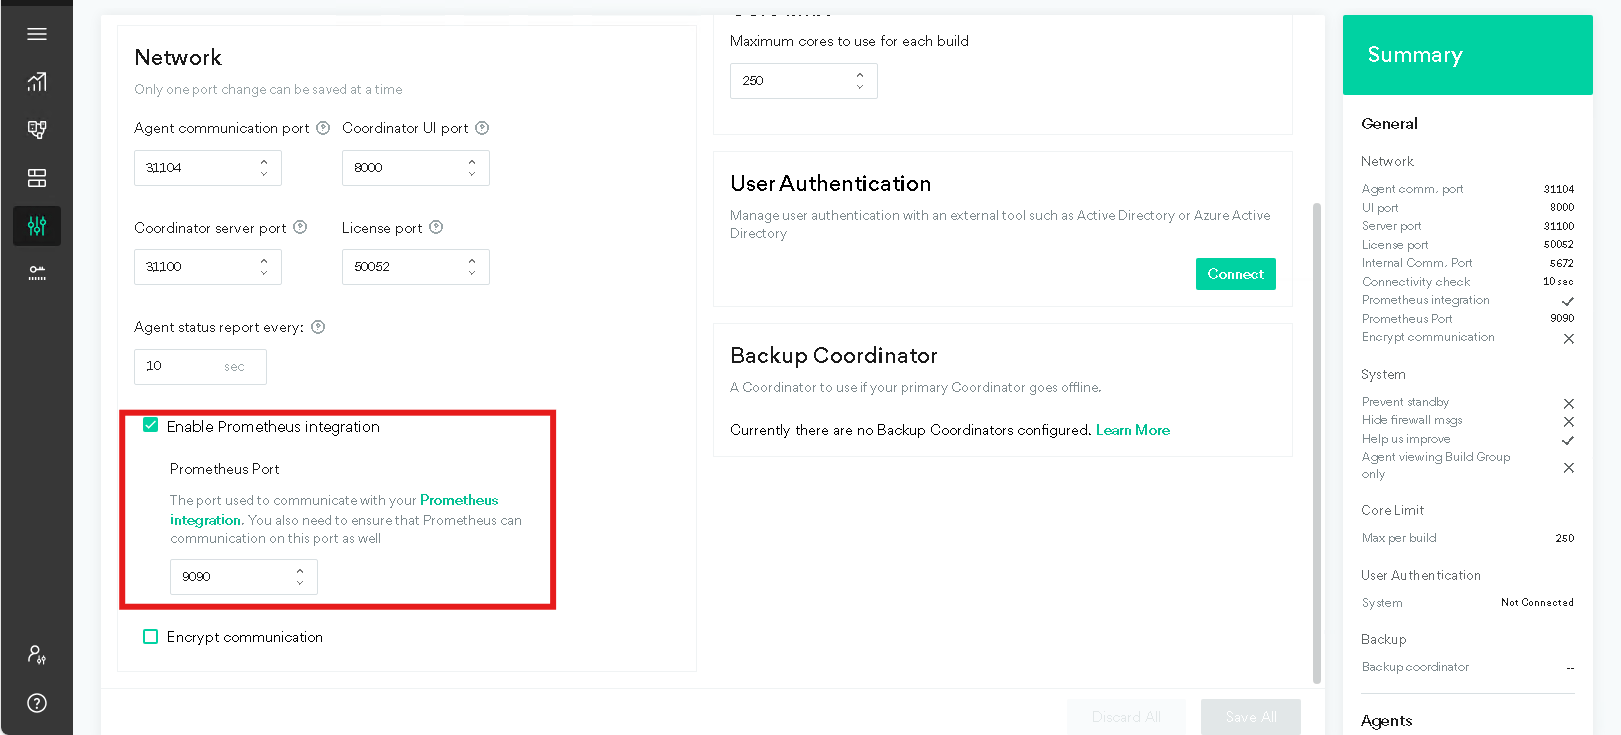
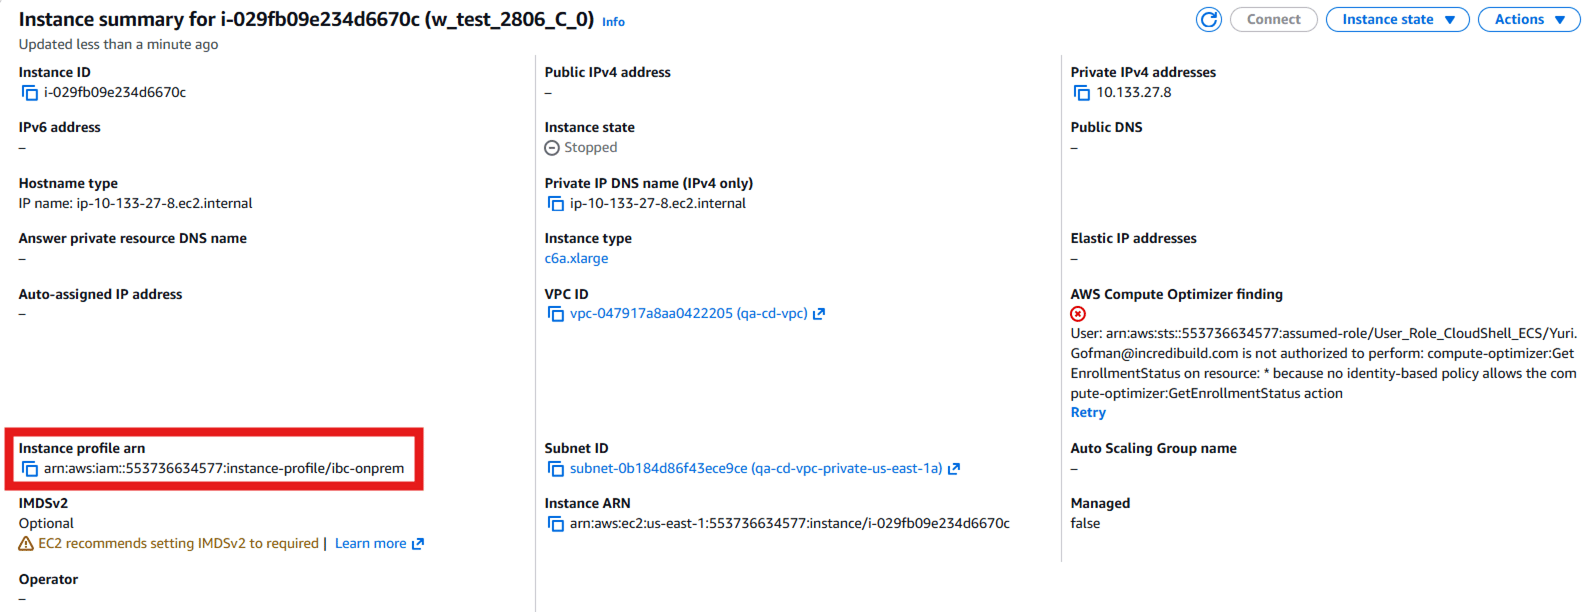
- Verify that the results do not include AccessDenied errors with identity-based policy allows requirements.
- Copy ibc_onprem (https://github.com/Incredibuild-RND/ibc_onprem) to the Coordinator machine.
-
Update the
config.ini, editing the[AWS]section, providing your AWS Region name (region_name) and Auto Scaling group name (asg_name), as well as any optional values as described below:
- period_sec: How frequently (in seconds) the program polls the Coordinator for demand for Helper cores.
- evaluation_periods: How many evaluation periods(default: 3) before making a decision to scale-out/scale-in or remain on same number of Helper cores.
- scale_in_protection_sec: To prevent “thrashing” (rapid scale in/out cycles) of instances, set this to 120 seconds or more.
- To apply the configuration changes, restart the ibc_onprem utility. Install the pip requirements and run
ibc_onprem.pyas a service, for example, usingnssm.exe:
Delete Auto Scaling Group and Launch Template
- To delete an Auto Scaling group and Launch Template in the AWS CLI:
How Required Helper Cores are Calculated
Helper core requirements are calculated separately for each Build Group. Only Build Groups with active builds are included in the calculation. For each active Build Group, the service retrieves the incredibuild_needed_helper_cores and incredibuild_available_helper_cores metrics. The total required Helper cores are calculated as the difference between the sum of the required helper cores and the sum of the available helper cores across all active Build Groups. Build Groups allow resources to be allocated independently, while the Universal Helpers Build Group can assist builds from any Build Group. To prevent over-provisioning, the service accounts for available on-premises Universal Helpers. It calculates the number of available Universal Helper cores as the reported available helper cores minus the Helper cores already provisioned in the AWS Auto Scaling Group. This value is then subtracted from the total required Helper cores to determine the additional cloud capacity that must be provisioned.Using ibc_onprem in Parallel with ASG Dynamic Target Tracking
Using the ibc_onprem in parallel with Auto Scaling Group dynamic target tracking is possible when most of the cores are allocated by the Auto Scaling group, and core usage is not “spiky” over the day.- In this case, add an Auto Scaling Group dynamic target tracking:
Optimize the AWS Auto Scaling Group with Linux
To optimize the AWS Auto Scaling group, run ibc_onprem, a python script, as a service on the Coordinator machine. This builds on the existing Auto Scaling group configuration by scaling Helpers based on actual Coordinator demand, enabling faster and more responsive provisioning than standard Auto Scaling behaviour.- Create an AMI from the Incredibuild Helper (Linux).
-
Copy the AMI ID, for example,
ami-017821fb4a6cdf386. -
Create the Auto Scaling group with the following AWS CLI script, updating the
AMI_ID,SUBNETS, andSECURITY_GROUPSvalues based on your existing grid config, as well as any optional values as described below:
- INSTANCE_TYPE_1 and INSTANCE_TYPE_2: The instance types, and if you specify different instance types, also update the INSTANCE_CPUS_1 and INSTANCE_CPUS_2 values.
- ON_DEMAND_PERCENT: Thepercentage for On-Demand instances. The remaining instances will be created as Spot instances. For 100% Spot instances, leave the parameter unchanged as 0.
- MIN_SIZE/MAX_SIZE: The minimum and maximum size for the Auto Scaling group.The maximum is a multiple of the minimum and must correspond to the CPUs specified for INSTANCE_CPUS_1 and INSTANCE_CPUS_2. For example, if there are 16 CPU cores in both machines, the minimum is 16 and the maximum is a multiple of 16 (for example, 96).
- DESIRED_CAPACITY: The initial capacity when the Auto Scaling group is created without any load (this usually corresponds to the number of CPUs in a single Helper machine).
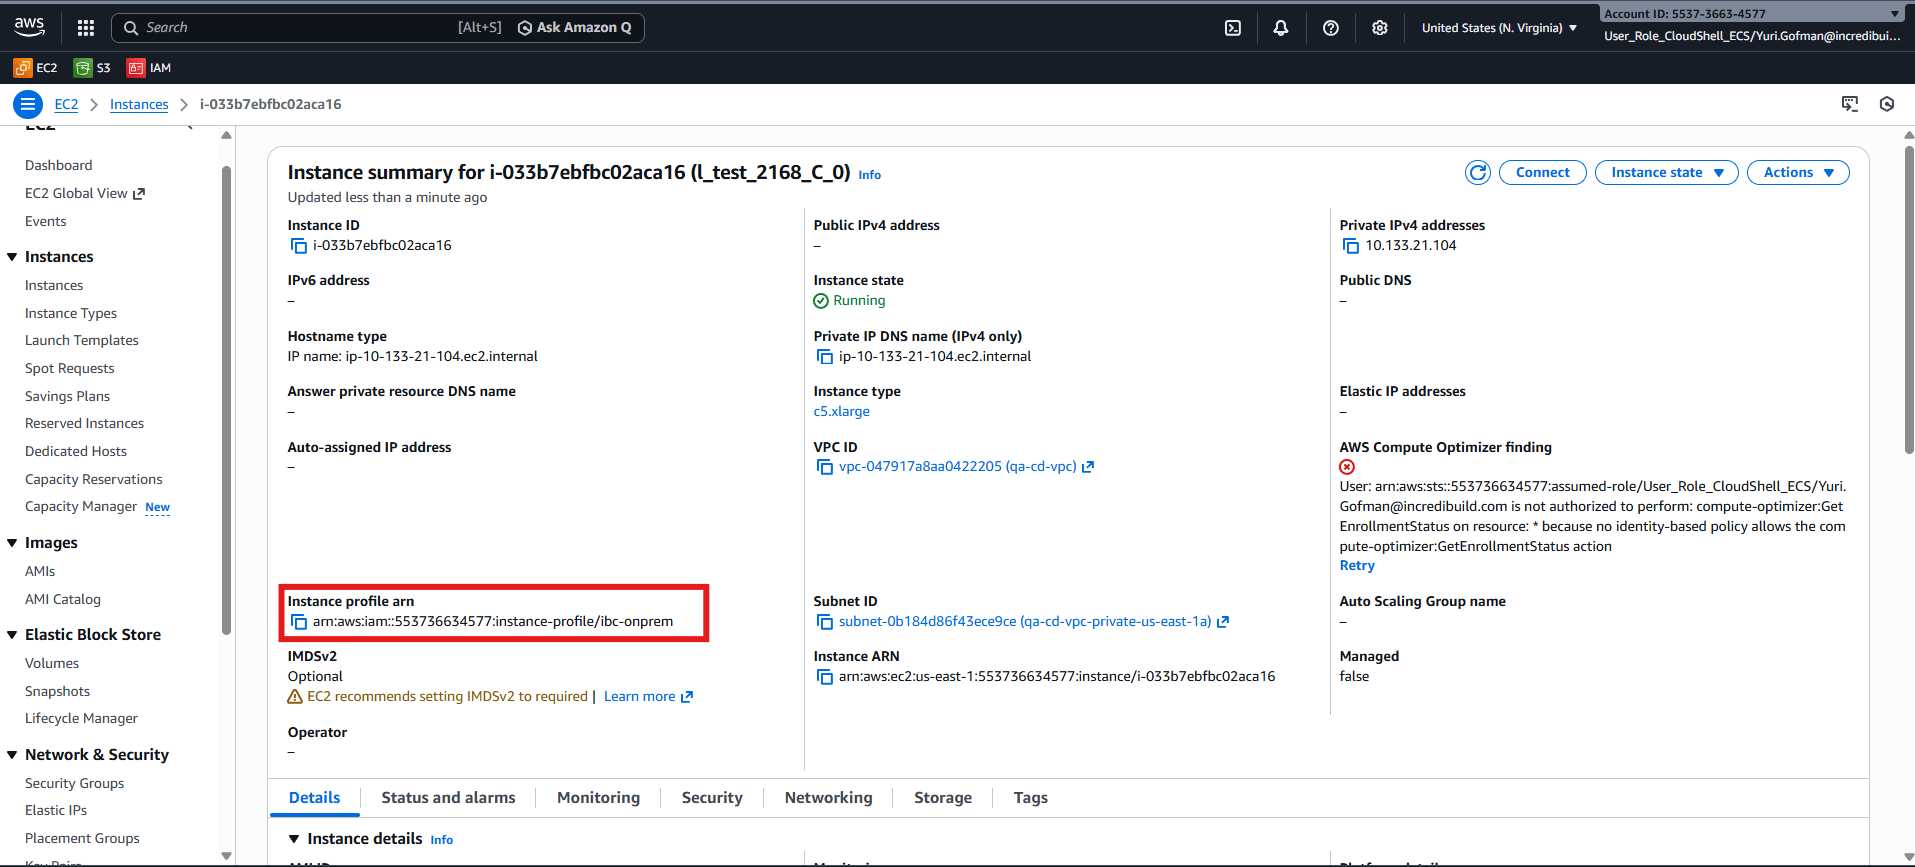
- Verify that the results do not include AccessDenied errors with identity-based policy allows requirements.
- Copy ibc_onprem (https://github.com/Incredibuild-RND/ibc_onprem) to the Coordinator machine.
-
Update the
config.ini, editing the[AWS]section, providing your AWS Region name (region_name) and Auto Scaling group name (asg_name), as well as any optional values as described below:
- period_sec: How frequently (in seconds) the program polls the Coordinator for demand for Helper cores.
- evaluation_periods: How many evaluation periods(default: 3) before making a decision to scale-out/scale-in or remain on same number of Helper cores.
- scale_in_protection_sec: To prevent “thrashing” (rapid scale in/out cycles) of instances, set this to 120 seconds or more.
- To apply the configuration changes, restart the ibc_onprem utility. Install the pip requirements and run
ibc_onprem.pyas a service, for example, usingnssm.exe:
Delete Auto Scaling Group and Launch Template
- To delete an Auto Scaling group and Launch Template in the AWS CLI:
Using ibc_onprem in Parallel with ASG Dynamic Target Tracking
Using the ibc_onprem in parallel with Auto Scaling Group dynamic target tracking is possible when most of the cores are allocated by the Auto Scaling group, and core usage is not “spiky” over the day.- In this case, add an Auto Scaling Group dynamic target tracking: